

As I stood in my kitchen, the joyful anticipation of Easter filled the air, accompanied by the fragrant scent of melting candy. Enter the delightful world of Adorable Easter Egg Cake Pops—a whimsical dessert that transforms ordinary celebration into a colorful masterpiece! These cake pops not only bring a sweet and creamy taste to the table but also allow for a fun, interactive experience for the whole family. With just a handful of ingredients, you can whip up this quick and customizable treat that’s perfect for holiday gatherings or as a delightful afternoon project with the kids. Are you ready to dive into a world of decadence and creativity with these Easter Cake Pops? Let’s get started!

Why Are These Cake Pops a Must-Try?
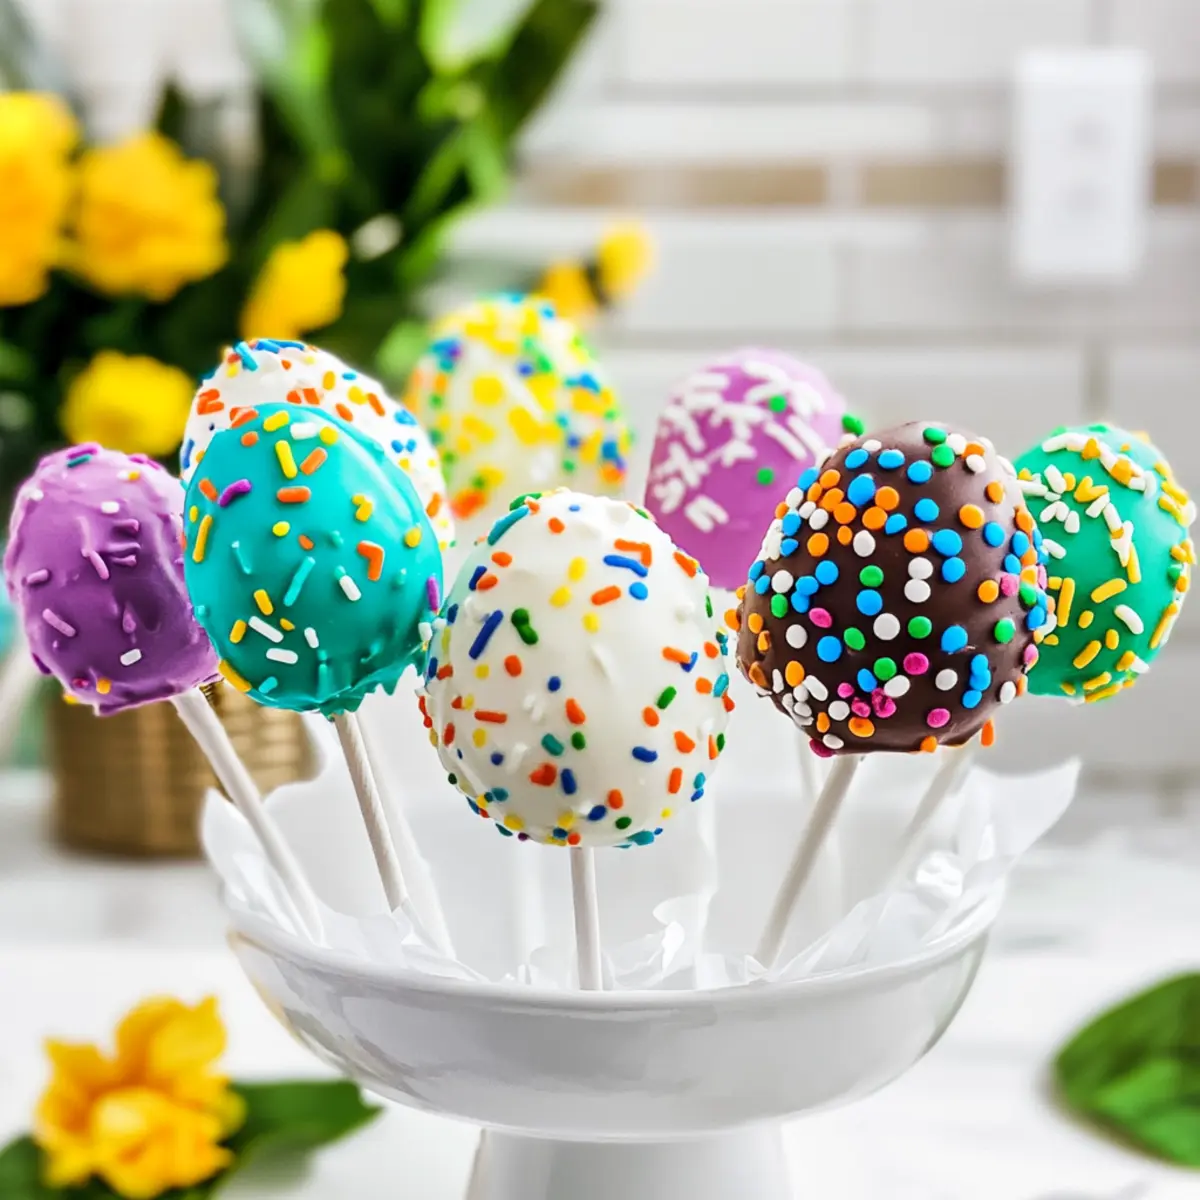
Colorful, vibrant candy melts adorn each cake pop, making them visually appealing for any festive gathering. Fun to Make, they invite family interaction, allowing kids to express their creativity with sprinkles and decorations. Customizable, you can easily switch up flavors and shapes to suit any holiday. Quick and Easy, this recipe simplifies dessert-making without sacrificing flavor! Perfect for busy bakers, these treats save time and effort, making them ideal for last-minute celebrations. Don’t miss out on the chance to serve these delightful pops alongside other favorites like Pecan Pie Cheesecake and Chocolate Lava Cakes!
Easter Cake Pops Ingredients
Get ready to create these delightful Easter Cake Pops!
For the Cake Mixture
• Prepared Confetti Cake – This serves as the flavorful foundation; whether you choose to make it from scratch or pick up a boxed mix is entirely up to you!
• Unsalted Butter – This ingredient adds a rich creaminess; make sure it’s at room temperature for seamless blending.
• Powdered Sugar – Providing sweetness and texture for the frosting, ensure it’s well-mixed for that perfect consistency.
• Heavy Cream – This is optional but highly recommended for a luxurious frosting texture.
• Vanilla Bean Paste – Enhances the flavor; feel free to swap it out for vanilla extract if needed.
For the Coating
• Bright White Candy Melts – This colorful coating brings life to your cake pops; white chocolate chips can be a handy substitute, just temper them carefully.
• Vegetable Shortening – Used to achieve a smoother melting chocolate, it’s optional depending on your desired consistency.
For Decoration
• Sprinkles – A fun, decorative touch; customize with a variety of colors and shapes to match your Easter celebration!
With this ingredient list, you’re all set to create your Easter Cake Pops. Happy baking!
Step‑by‑Step Instructions for Easter Cake Pops
Step 1: Prepare Your Baking Sheet
Start by covering a baking sheet with parchment paper, creating a non-stick surface for your Easter Cake Pops. This simple action sets the foundation for the pops to rest once shaped. Ensuring the sheet is appropriately lined will make it easier to remove the cake pops after they are frozen.
Step 2: Crumble the Cake
In a large mixing bowl, crumble the prepared confetti cake until it’s fine, resembling coarse crumbs. This process should take about 2-3 minutes, making sure there are no large chunks left. Visualize a fluffy mixture that will easily combine with the frosting. The cake serves as the main element of your Easter Cake Pops, so aim for a uniform texture.
Step 3: Mix the Frosting
In a separate mixing bowl, combine the unsalted butter, powdered sugar, heavy cream, and vanilla bean paste. With an electric mixer, beat the mixture on medium speed for about 2-3 minutes until it becomes creamy and fluffy. Visual cues include the frosting getting lighter in color and texture, which ensures a deliciously sweet binding for your cake pop mixture.
Step 4: Combine Cake and Frosting
Gradually add 2 tablespoons of the creamy frosting to the crumbled cake, mixing with your hands until completely combined. Depending on the cake’s moisture and crumbliness, you might need to incorporate more frosting for the perfect consistency. The mixture should be moist yet firm enough to hold its shape, making it ready for forming.
Step 5: Shape the Cake Pops
Using a cookie scoop or your hands, form the mixture into egg shapes, approximately 1-1.5 inches long, and place them on the prepared baking sheet. Each shaped pop should resemble an egg, perfect for your Easter Cake Pops. Once formed, transfer the sheet to the freezer and let the cake pops chill for 1 hour, helping them to firm up.
Step 6: Melt the Candy Coating
While the cake pops are chilling, melt the bright white candy melts in a glass measuring cup, stirring occasionally until they are completely smooth. This usually takes around 2-3 minutes in the microwave at medium heat, or you can use a double boiler for a gentle melt. Your melted chocolate should be glossy and fluid, perfect for coating.
Step 7: Insert the Sticks
After the cake pops have frozen, take them out and dip the ends of the sticks into the melted candy coating before inserting them into the larger end of each egg. Push the sticks about halfway into the pops and allow them to set for a minute. This step adds stability, making it easier to dip the pops in the chocolate later on.
Step 8: Coat the Cake Pops
Carefully dip each egg-shaped cake pop into the melted candy coating, allowing the excess to drip off gently. You want a smooth, even coating to envelop the cake pop entirely. Place them upright in a stand or foam block, ensuring they don’t touch each other as they set. This will keep your beautiful Easter Cake Pops from losing their shape.
Step 9: Decorate with Sprinkles
While the coating is still wet, sprinkle a generous amount of colorful sprinkles on each cake pop. Get creative with your designs, using different colors and shapes to celebrate Easter! The sprinkles will adhere perfectly to the freshly dipped chocolate, adding a festive touch that brightens up your treats as they begin to set.
Step 10: Allow to Set
Let the decorated Easter Cake Pops sit at room temperature for about 30 minutes to harden completely. You can also put them in the refrigerator for a faster set, but make sure they’re uncovered. This crucial step ensures that your pops maintain their shape and that the sprinkles affix properly before serving.
Step 11: Serve and Enjoy
Once your Easter Cake Pops are fully set and hardened, they are ready to be served! Place them on an elegant dessert tray for your Easter celebrations or store them in an airtight container at room temperature. Witness the joy they bring to family and friends when they take a bite of these delightful treats!

Make Ahead Options
These delightful Easter Cake Pops are perfect for busy bakers looking to save time! You can prepare the cake mixture and form the egg shapes up to 24 hours in advance; simply place the formed cake pops in the freezer until you’re ready to finish them. For optimal quality, wrap the baking sheet with plastic wrap to prevent freezer burn. When you’re ready to serve, follow the same steps to melt the candy coating, dip the cake pops, and then decorate them with sprinkles. They will turn out just as delicious and festive as if made fresh, allowing you to enjoy the celebration without the last-minute rush!
How to Store and Freeze Easter Cake Pops
Room Temperature: Keep your Easter Cake Pops in an airtight container at room temperature for up to 1 week. This helps maintain their moisture and delightful texture.
Fridge: If you need to chill them, store in the refrigerator for up to 3 days; however, avoid refrigeration to prevent the chocolate coating from becoming dull.
Freezer: For longer storage, freeze the uncoated cake pops for up to 2 months. Wrap individually or place them in a sealed bag, then thaw at room temperature when ready to enjoy.
Reheating: Once thawed, allow them to come to room temperature before serving. This keeps the flavors rich and consistent, ensuring a delicious bite every time!
Expert Tips for Easter Cake Pops
• Chill for Success: Ensure your cake pop mixture is thoroughly chilled before inserting sticks to avoid breakage during dipping.
• Frosting Balance: Be cautious with the amount of frosting you add; too much can make the dough too wet, leading to difficult shaping.
• Stay Moisture-Free: Keep your hands damp while rolling the cake balls to prevent sticking and make shaping easier for your Easter Cake Pops.
• Deco Timing: Decorate immediately after coating with chocolate while it’s still wet to ensure sprinkles stick perfectly, enhancing both flavor and presentation.
• Storage Savvy: Store your decorated cake pops at room temperature in an airtight container for the best texture and flavor retention.
What to Serve with Adorable Easter Egg Cake Pops
Create a festive feast that complements these delightful treats with a variety of sweet and savory pairings.
- Fluffy Vanilla Cupcakes: These light treats echo the sweet flavors of cake pops, making them a lovely addition to any Easter party.
- Fresh Fruit Salad: A medley of vibrant, seasonal fruits adds freshness and a burst of color, enhancing the celebratory vibe.
- Chocolate-Covered Strawberries: Offering a luxurious, chocolatey bite, these decadent berries are a perfect pairing with the creaminess of the cake pops.
- Carrot Cake Squares: They introduce a rich, spiced flavor that ties into the Easter theme, creating a delightful dessert spread.
- Sparkling Lemonade: A refreshing drink that balances the sweetness of the cake pops, making for a bright and zesty sip alongside your treats.
- Mini Cheesecake Bites: These creamy delights contrast perfectly with the soft texture of the cake pops, creating a well-rounded dessert experience.
- Easter Egg Hunt: Combine the joy of finding colorful eggs with these cake pops for an interactive celebration that the kids will love.
Easter Cake Pops Variations & Substitutions
Feel free to transform these delightful Easter Cake Pops into a custom creation that sings to your taste buds!
-
Flavor Twist: Opt for a lemon or chocolate cake mix instead of confetti for a zesty or rich dessert.
This swap not only changes the flavor profile but also adds a splash of seasonal variety. -
Colorful Melts: Use pastel candy melts in colors like pink, blue, and yellow to match your Easter theme.
Each pop will become a canvas for your creativity, perfect for decorating at springtime gatherings. -
Nut-Free: Replace the butter with a nut-free margarine or shortening for a nut-free version.
This ensures everyone can enjoy a treat without worrying about allergy concerns, making it inclusive for all guests. -
Creamy Alternative: Use cream cheese frosting instead of traditional buttercream for a tangy zing.
This rich twist adds depth to the sweetness and pairs fabulously with the cake’s texture. -
Coconut Shavings: Roll the dipped cake pops in toasted coconut flakes instead of sprinkles for a tropical touch.
This not only infuses a delightful flavor but also adds a fun, textured exterior. -
Spicy Surprise: Add a pinch of cinnamon or cayenne pepper to the cake mix for a surprising kick.
This subtle heat perfectly balances the sweetness and adds an adventurous element to your pops. -
Fruity Flair: Incorporate crushed freeze-dried strawberries or raspberries into the cake mixture for a fruity punch.
Each bite will bring a burst of berry goodness, providing a refreshing contrast to the sweetness. -
Decorative Shapes: Instead of egg shapes, form your cake into bunny heads or flower shapes for a whimsical twist.
These shapes are not only festive but also heighten the excitement of Easter treats, especially for kids.
Feel free to explore these delightful variations, just like you would with my scrumptious recipes, such as Fluffy Buttermilk Pancakes or No-Bake Oreo Cheesecake. Each alteration is a step towards a uniquely memorable dessert experience!

Easter Cake Pops Recipe FAQs
What type of cake should I use for the cake pops?
I recommend using a prepared confetti cake as it provides both flavor and a fun appearance! You can choose to make it from scratch or pick up a boxed mix—whichever is easiest for you!
How do I store the Easter Cake Pops?
Keep your decorated Easter Cake Pops in an airtight container at room temperature for up to one week. This helps maintain their delicious moisture and soft texture. If you need to chill them, you can store them in the refrigerator for up to three days, but avoid refrigeration if possible, as it can dull the chocolate coating.
Can I freeze the Easter Cake Pops?
Absolutely! For optimal storage, freeze the uncoated cake pops for up to two months. Just wrap them individually or place them in a sealed bag. When you’re ready to enjoy, thaw them at room temperature. This retains the rich flavors and ensures a delightful taste when you take a bite!
What should I do if my chocolate coating is too thick?
If you find your candy melts or chocolate coating too thick for dipping, try mixing in a teaspoon or two of vegetable shortening. This helps to thin out the chocolate without altering the flavor, making for an easier and smoother dipping experience.
Can these cake pops be made allergen-friendly?
Absolutely! If you’re catering to allergies, consider using gluten-free cake mixes, dairy-free butter, and non-dairy cream alternatives. These simple substitutions can help create a delicious dessert that everyone can enjoy, just be sure to check all ingredient labels!
How long do the cake pops take to set?
Allow them to sit at room temperature for about 30 minutes to harden completely. If you want a quicker set, you can place them in the refrigerator, but let them sit uncovered to ensure the coating stays shiny and beautiful!
Delightful Easter Cake Pops to Brighten Your Spring Celebrations
Ingredients
Equipment
Method
- Cover a baking sheet with parchment paper.
- Crumble the prepared confetti cake until fine.
- Combine unsalted butter, powdered sugar, heavy cream, and vanilla bean paste to make frosting.
- Gradually mix frosting into crumbled cake until combined.
- Shape the mixture into egg shapes and place on the baking sheet.
- Melt candy melts in a glass measuring cup until smooth.
- Dip the ends of the sticks into the melted coating and insert into the cake pops.
- Dip each cake pop into the melted candy coating and let excess drip off.
- Decorate with sprinkles while coating is still wet.
- Let the decorated cake pops set at room temperature for about 30 minutes.
- Serve and enjoy your delightful Easter Cake Pops!