

Introduction to Chocolate Lava Cakes
What Are Chocolate Lava Cakes?
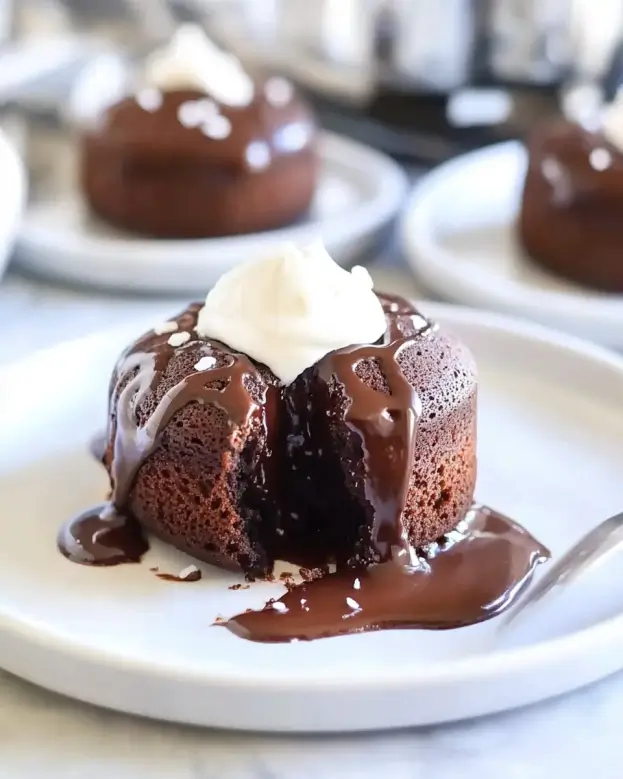
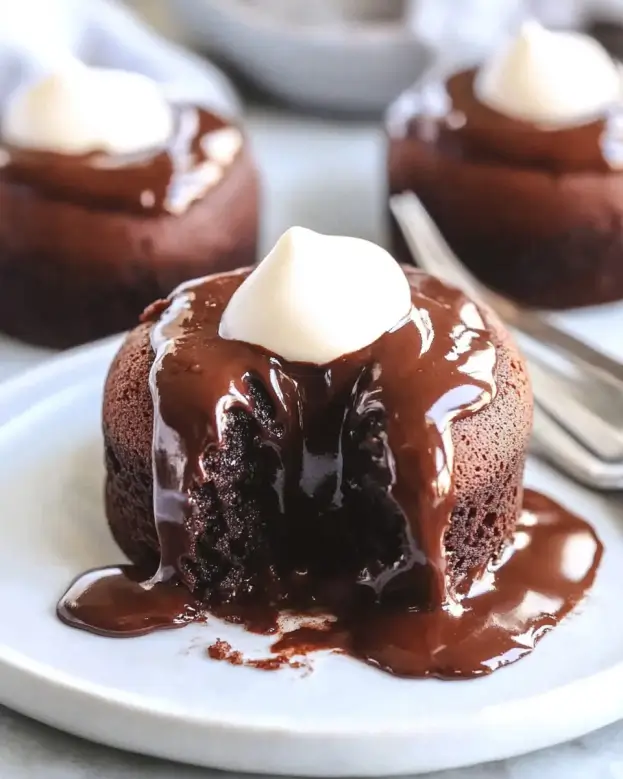
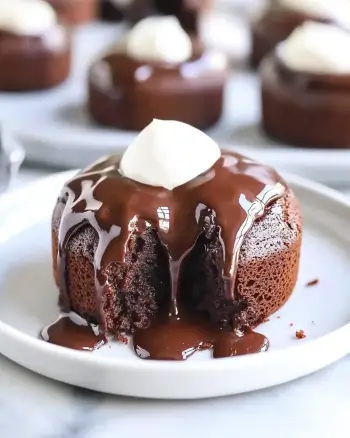
Chocolate lava cakes are a delightful dessert that combines the richness of chocolate with a gooey, molten center. When you cut into these small cakes, warm chocolate flows out, creating a delicious surprise. They are often served warm, making them a perfect treat for chocolate lovers. The outer layer is firm, while the inside remains soft and liquid, giving it that signature “lava” effect. This dessert is not only visually appealing but also offers a wonderful contrast in textures, making each bite a heavenly experience.
The Origin of Chocolate Lava Cakes
The story of chocolate lava cakes dates back to the early 1980s. Chef Jean-Georges Vongerichten is credited with creating this indulgent dessert in New York City. He wanted to combine the elements of a soufflé and a cake, resulting in a dessert that was both rich and light. The dish quickly gained popularity and became a staple in many fine dining restaurants. Over the years, chocolate lava cakes have evolved, with various chefs adding their unique twists. Today, they are enjoyed in homes and restaurants worldwide, making them a beloved dessert for all occasions.
Ingredients for Chocolate Lava Cakes
To create the perfect chocolate lava cakes, you need a few simple ingredients. Each component plays a vital role in achieving that rich flavor and gooey center. Here’s what you’ll need:
- 1/2 cup unsalted butter (1 stick): This adds richness and moisture to the cakes.
- 1 cup semi-sweet chocolate chips: The star ingredient that provides the chocolatey goodness.
- 2 large eggs: These help bind the ingredients together and give structure to the cakes.
- 2 large egg yolks: Extra yolks add richness and create a creamier texture.
- 1/4 cup granulated sugar: This sweetens the batter and helps with the cake’s rise.
- 2 tablespoons all-purpose flour: Just a small amount is needed to give the cakes a bit of structure.
- 1/4 teaspoon salt: A pinch of salt enhances the chocolate flavor.
- 1 teaspoon vanilla extract: This adds a lovely aroma and depth of flavor.
- Powdered sugar (for dusting): A light dusting adds a touch of elegance when serving.
- Vanilla ice cream (for serving, optional): A scoop of ice cream pairs perfectly with the warm cakes.
These ingredients are easy to find and can be adjusted based on your preferences. For instance, you can swap semi-sweet chocolate chips for dark chocolate chips for a richer flavor. With these ingredients on hand, you’re ready to create a dessert that will impress everyone!
Step-by-Step Preparation of Chocolate Lava Cakes
Step 1: Preheat the Oven
First things first, preheat your oven to 425°F (220°C). This step is crucial because a hot oven helps the cakes rise properly. A well-preheated oven ensures that the outside of the cakes sets while the inside remains gooey. So, don’t skip this step!
Step 2: Prepare the Ramekins
Next, grab four ramekins. Grease each one with unsalted butter to prevent sticking. Then, lightly dust them with flour, tapping out any excess. This preparation is key to ensuring your chocolate lava cakes come out smoothly. If you don’t have ramekins, you can use muffin tins, but adjust the baking time accordingly.
Step 3: Melt the Chocolate and Butter
Now, it’s time to melt the chocolate and butter. In a medium microwave-safe bowl, combine the 1/2 cup of unsalted butter and 1 cup of semi-sweet chocolate chips. Microwave this mixture in 30-second intervals. Stir in between each interval until it’s completely melted and smooth. This step is important because it creates the rich chocolate base for your cakes.
Step 4: Mix the Batter
In a separate bowl, whisk together the 2 large eggs, 2 large egg yolks, and 1/4 cup of granulated sugar. Mix until well combined and slightly frothy. Then, stir in the melted chocolate mixture until everything is fully incorporated. This is where the magic begins, as the chocolate adds a deep flavor to the batter.
Step 5: Pour the Batter into Ramekins
Now, it’s time to add the dry ingredients. Gently fold in 2 tablespoons of all-purpose flour, 1/4 teaspoon of salt, and 1 teaspoon of vanilla extract. Be careful not to overmix; you want to keep the batter light and airy. Once combined, divide the batter evenly among the prepared ramekins. This ensures that each cake bakes evenly.
Step 6: Bake the Chocolate Lava Cakes
Place the filled ramekins on a baking sheet for easier handling. Bake them in the preheated oven for 12-14 minutes. You’ll know they’re done when the edges are firm, but the center remains soft. Keep an eye on them, as overbaking can lead to a less gooey center.
Step 7: Serve Immediately
Once baked, remove the ramekins from the oven and let them sit for about 1 minute. Carefully invert each ramekin onto a plate and gently tap to release the cake. Dust with powdered sugar for a beautiful finish. Serve immediately, and for an extra treat, add a scoop of vanilla ice cream on the side. Enjoy your delicious chocolate lava cakes!
Variations of Chocolate Lava Cakes
Different Flavors to Try
Chocolate lava cakes are incredibly versatile. While the classic version is delicious, you can easily switch things up to create exciting new flavors. Here are some fun ideas to inspire your baking:
- Raspberry Chocolate Lava Cakes: Add fresh raspberries to the batter for a fruity twist. The tartness of the raspberries pairs beautifully with the rich chocolate.
- Mint Chocolate Lava Cakes: Incorporate a few drops of peppermint extract into the batter. This will give your cakes a refreshing minty flavor that’s perfect for the holidays.
- Peanut Butter Lava Cakes: Swirl in some creamy peanut butter before baking. When you cut into the cake, the warm peanut butter will flow out, creating a delightful surprise.
- Espresso Chocolate Lava Cakes: For coffee lovers, add a pinch of espresso powder to the batter. This will enhance the chocolate flavor and give your cakes a rich, mocha taste.
- Orange Zest Chocolate Lava Cakes: Grate some orange zest into the batter for a citrusy kick. The bright flavor of orange complements the chocolate wonderfully.
These variations not only add unique flavors but also make your chocolate lava cakes even more enjoyable. Feel free to experiment with different ingredients to find your favorite combination!
Gluten-Free Chocolate Lava Cakes
If you or your guests are gluten-sensitive, you can still enjoy chocolate lava cakes! Making them gluten-free is simple. Just replace the all-purpose flour with a gluten-free flour blend. Here’s how to do it:
- Choose a Gluten-Free Flour Blend: Look for a blend that contains xanthan gum, as this helps mimic the texture of regular flour.
- Follow the Same Recipe: Use the same measurements as the original recipe. The gluten-free flour will work just as well in creating that gooey center.
- Check for Cross-Contamination: Ensure that all your ingredients are certified gluten-free to avoid any issues.
With these adjustments, you can create delicious gluten-free chocolate lava cakes that everyone can enjoy. They’ll be just as rich and satisfying as the traditional version!
Cooking Note for Chocolate Lava Cakes
When it comes to baking chocolate lava cakes, a few key points can make all the difference. Understanding these cooking notes will help you achieve the perfect dessert every time. Here are some essential tips to keep in mind:
- Oven Calibration: Make sure your oven is properly calibrated. An oven thermometer can help you check if your oven’s temperature is accurate. Baking at the right temperature is crucial for achieving that gooey center.
- Timing is Everything: Keep a close eye on the baking time. Every oven is different, so start checking your cakes at the 12-minute mark. The edges should be set, while the center remains soft. Overbaking can lead to a cake that lacks the signature molten center.
- Cooling Time: Allow the cakes to cool for just a minute after baking. This brief cooling period helps the cakes firm up slightly, making them easier to invert without breaking.
- Ramekin Size: The size of your ramekins can affect baking time. If you use larger ramekins, you may need to increase the baking time slightly. Conversely, smaller ramekins will require less time.
- Experiment with Fillings: Feel free to get creative! You can add a piece of chocolate or a dollop of flavored ganache in the center before baking. This will create an even more decadent surprise when you cut into the cake.
By following these cooking notes, you’ll be well on your way to mastering the art of chocolate lava cakes. Each tip is designed to help you create a dessert that is not only delicious but also visually stunning. Happy baking!
Serving Suggestions for Chocolate Lava Cakes
Pairing with Ice Cream
One of the best ways to enjoy chocolate lava cakes is by pairing them with ice cream. The warm, gooey center of the cake contrasts beautifully with the cold, creamy texture of the ice cream. Vanilla ice cream is a classic choice, as its subtle flavor complements the rich chocolate perfectly. However, you can also try other flavors like:
- Mint Chocolate Chip: This refreshing flavor adds a cool twist to the warm cake.
- Cookies and Cream: The crunchy bits of cookies enhance the overall texture and flavor.
- Caramel Swirl: A scoop of caramel ice cream brings a sweet, buttery flavor that pairs wonderfully with chocolate.
To serve, simply place a warm chocolate lava cake on a plate and add a generous scoop of your chosen ice cream on the side. For an extra touch, drizzle some chocolate or caramel sauce over the ice cream. This combination is sure to impress your guests and make for a delightful dessert experience!
Garnishing Ideas
Garnishing your chocolate lava cakes can elevate their presentation and add a touch of elegance. Here are some simple yet effective garnishing ideas:
- Powdered Sugar: A light dusting of powdered sugar adds a beautiful finish and a hint of sweetness.
- Fresh Berries: Add a few fresh raspberries, strawberries, or blueberries on the plate. Their vibrant colors and tartness create a lovely contrast with the rich chocolate.
- Chocolate Shavings: Use a vegetable peeler to create chocolate shavings from a chocolate bar. Sprinkle them on top for a decorative touch.
- Mint Leaves: A sprig of fresh mint adds a pop of color and a refreshing aroma.
- Whipped Cream: A dollop of whipped cream on top or beside the cake adds creaminess and a light texture.
These garnishing ideas not only enhance the visual appeal of your chocolate lava cakes but also add extra flavors and textures. Feel free to mix and match these suggestions to create a dessert that looks as good as it tastes!
Breakdown of Time for Chocolate Lava Cakes
Prep Time
Preparing chocolate lava cakes is a quick and enjoyable process. The prep time typically takes about 15-20 minutes. During this time, you will gather your ingredients, preheat the oven, and prepare the ramekins. This step is essential to ensure everything is ready for baking. If you’re organized and have your ingredients measured out, you might even finish in less time!
Cooking Time
The cooking time for chocolate lava cakes is relatively short, usually around 12-14 minutes. This quick baking period is what allows the edges to set while keeping the center gooey. It’s important to keep an eye on the cakes as they bake. Remember, every oven is different, so you may need to adjust the time slightly based on your oven’s performance.
Total Time
In total, you can expect to spend about 30-35 minutes from start to finish when making chocolate lava cakes. This includes both prep and cooking time. With such a short time commitment, you can whip up this delicious dessert for any occasion. Whether it’s a special dinner or a casual gathering, chocolate lava cakes are sure to impress!
Nutritional Information for Chocolate Lava Cakes
Calories in Chocolate Lava Cakes
When indulging in chocolate lava cakes, it’s essential to be aware of their caloric content. Each serving contains approximately 350 calories. This number can vary slightly based on the specific ingredients used, such as the type of chocolate or any additional toppings. While these cakes are a treat, enjoying them in moderation is key to maintaining a balanced diet.
Protein Content
Chocolate lava cakes also provide a modest amount of protein. Each serving contains about 6 grams of protein. The protein primarily comes from the eggs used in the recipe. While this isn’t a high-protein dessert, it does contribute to your daily intake. Pairing the cake with a scoop of ice cream can also add a bit more protein, depending on the flavor you choose.
Sodium Levels
In terms of sodium, chocolate lava cakes are relatively low. Each serving contains around 150 milligrams of sodium. This amount is quite manageable within a typical daily sodium intake. However, if you’re watching your sodium levels, be mindful of any additional toppings or sauces you may add, as they can increase the overall sodium content.
FAQs About Chocolate Lava Cakes
How do you know when Chocolate Lava Cakes are done?
Knowing when your chocolate lava cakes are done is crucial for achieving that perfect gooey center. You can tell they are ready when the edges are firm, but the center still looks soft and slightly jiggly. A good test is to gently shake the ramekin; if the center wobbles but the edges hold their shape, they are done. Remember, overbaking can lead to a cake that lacks the signature molten center, so keep a close eye on them during the last few minutes of baking!
Can you make Chocolate Lava Cakes ahead of time?
Yes, you can prepare chocolate lava cakes ahead of time! To do this, follow the recipe up to the point of filling the ramekins. Cover them tightly with plastic wrap and refrigerate for up to 24 hours. When you’re ready to bake, simply remove them from the fridge and bake as directed. You may need to add a minute or two to the baking time since they will be cold. This makes it easy to serve a delicious dessert without the last-minute rush!
What can I substitute for eggs in Chocolate Lava Cakes?
If you need to substitute eggs in chocolate lava cakes, there are several options. You can use unsweetened applesauce, mashed bananas, or even silken tofu. For each egg, use about 1/4 cup of applesauce or mashed banana, or 1/4 cup of blended silken tofu. These substitutes will help bind the ingredients together while keeping the cakes moist. However, keep in mind that the texture and flavor may vary slightly from the original recipe.
How do you store leftover Chocolate Lava Cakes?
Storing leftover chocolate lava cakes is simple! Allow them to cool completely, then cover each ramekin with plastic wrap or transfer them to an airtight container. They can be stored in the refrigerator for up to 2 days. When you’re ready to enjoy them again, reheat in the microwave for about 10-15 seconds. This will warm them up and restore some of that gooey center. Just be careful not to overheat, as this can cause the cakes to lose their molten texture.
Conclusion on Chocolate Lava Cakes
Chocolate lava cakes are a delightful dessert that brings joy to any occasion. Their rich chocolate flavor and gooey center create a memorable experience for anyone lucky enough to indulge. Whether you’re celebrating a special event or simply treating yourself, these cakes are sure to impress.
With a straightforward recipe and a few simple ingredients, you can create a dessert that looks and tastes gourmet. The versatility of chocolate lava cakes allows you to experiment with different flavors and variations, making them a fun treat to customize. From adding fresh fruits to trying gluten-free options, the possibilities are endless!
Remember to follow the tips and cooking notes provided to achieve the perfect molten center. With practice, you’ll master the art of baking chocolate lava cakes that are not only delicious but also visually stunning. So, gather your ingredients, preheat your oven, and get ready to enjoy a warm, chocolatey delight that will leave everyone wanting more.
In the end, chocolate lava cakes are more than just a dessert; they are a celebration of chocolate in its most delightful form. So, go ahead and share this sweet treat with family and friends, and watch as smiles light up their faces with every gooey bite!