

As I pulled my latest creation from the oven, the rich aroma of chocolate enveloped the kitchen, igniting a happiness only baking can bring. My Spiderweb Chocolate Cake isn’t just about taste; it transforms the ordinary into an enchanting centerpiece, perfect for Halloween or any festive gathering. With its delightful flavors and moist texture, this cake is effortless to whip up, making it ideal even for beginner bakers. Plus, it offers flexibility for gluten-free and vegan diets, so everyone can indulge without worry. Are you ready to discover how you can impress your family and friends with this spooky yet scrumptious treat?

Why is This Cake So Irresistibly Fun?
Fun, Playful Design: The stunning white chocolate spiderweb elevates this cake from ordinary to extraordinary, making it a perfect treat for Halloween or themed parties.
Crowd-Pleasing Delight: With its rich chocolate flavor and moist texture, it’s a surefire hit among kids and adults alike, ensuring no slice goes uneaten.
Easy to Customize: Whether you’re adding chocolate chips for extra gooeyness or throwing in some fresh berries, this cake invites creativity.
Diet-Friendly Options: With simple substitutions, you can easily make a gluten-free or vegan version that doesn’t compromise on taste. Check out how to make Chocolate Lava Cakes for another delightful recipe that accommodates various diets!
Quick Preparation: The straightforward steps mean you can have this beauty ready in no time, perfect for busy bakers. Prepare to impress your guests with minimal effort!
Spiderweb Chocolate Cake Ingredients
• Create your own version of this delightful Spiderweb Chocolate Cake by using these carefully selected ingredients!:
For the Cake
- All-purpose flour – Essential for structure; substitute with a gluten-free flour blend for a gluten-free option.
- Sugar – Sweetens the cake and contributes to its perfect texture; coconut sugar works for a lower glycemic index.
- Cocoa powder – Delivers that rich chocolate flavor; opt for unsweetened cocoa or Dutch-processed for a smoother taste.
- Baking powder – Guarantees a beautifully risen cake.
- Baking soda – Collaborates with baking powder to provide that ideal lift.
- Salt – Balances sweetness and heightens flavor.
- Large eggs – Acts as a binder for fluffiness; can be replaced with flaxseed meal (1 tbsp flaxseed + 2.5 tbsp water per egg) for a vegan version.
- Milk – Contributes moisture for a tender crumb; use almond or oat milk for a dairy-free alternative.
- Vegetable oil – Keeps the cake moist and enhances texture.
- Vanilla extract – Imparts warm, aromatic sweetness.
- Boiling water – Intensifies chocolate flavor and ensures a smooth batter.
For the Frosting & Decorations
- Chocolate frosting – Use your favorite recipe for that rich and creamy topping.
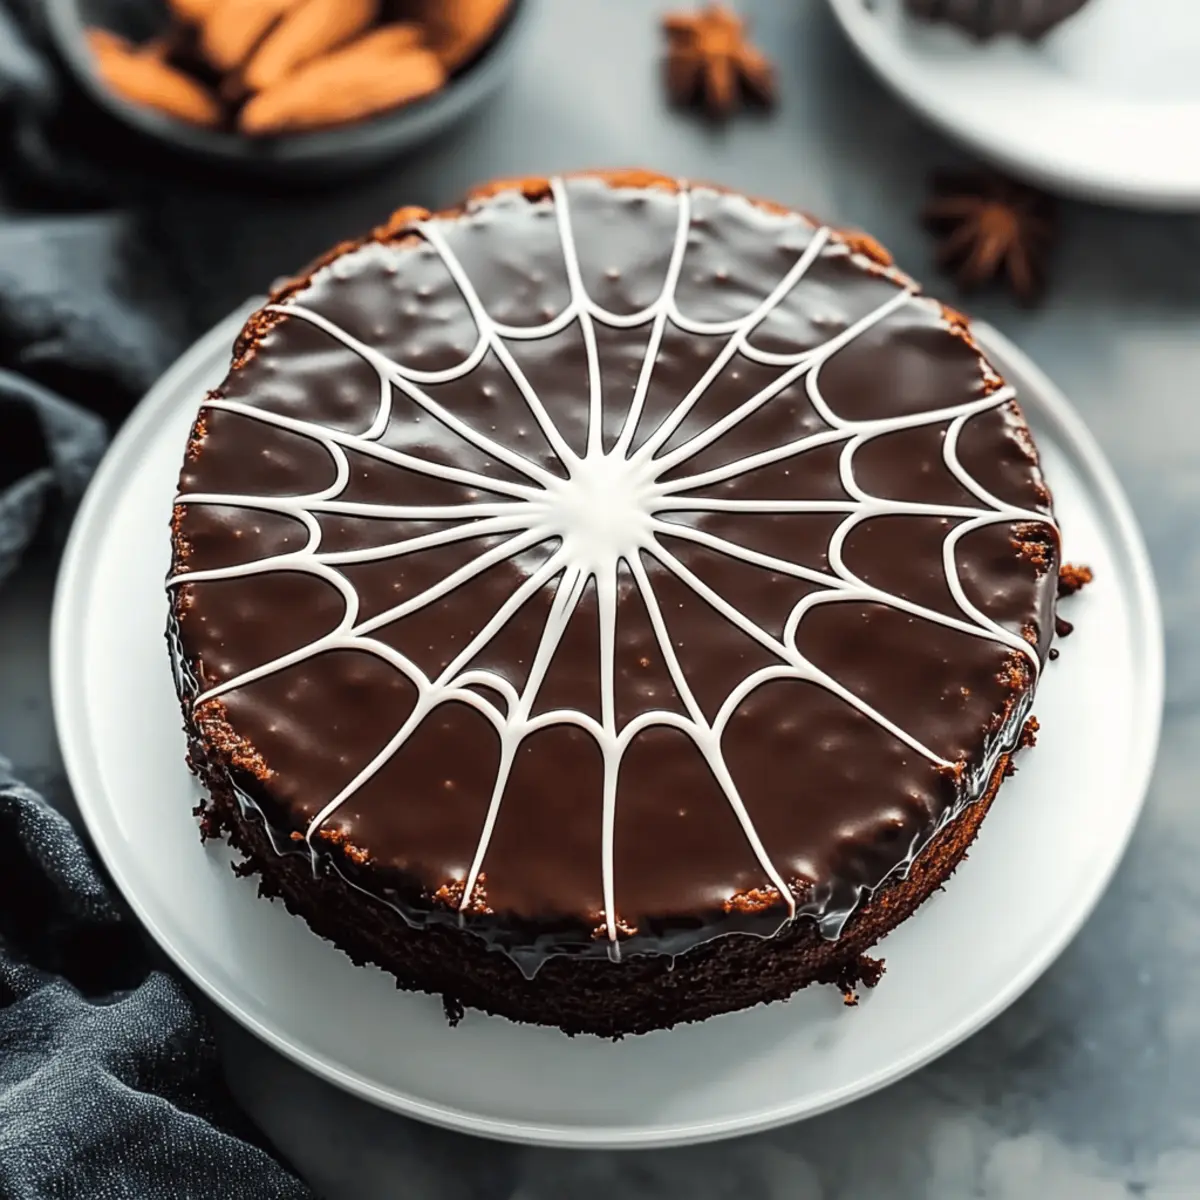
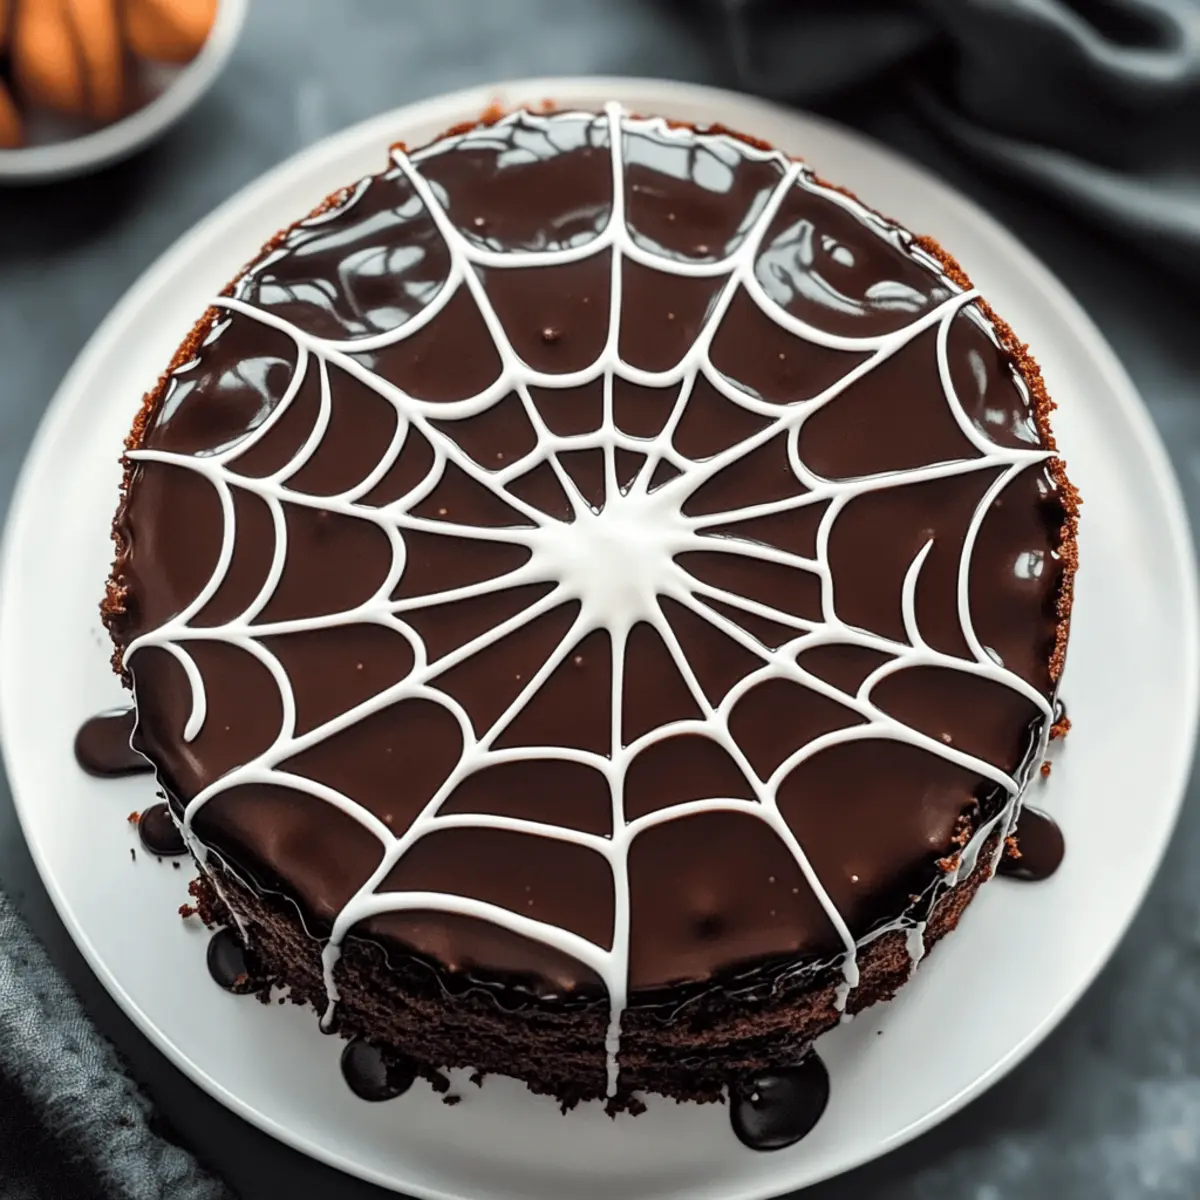
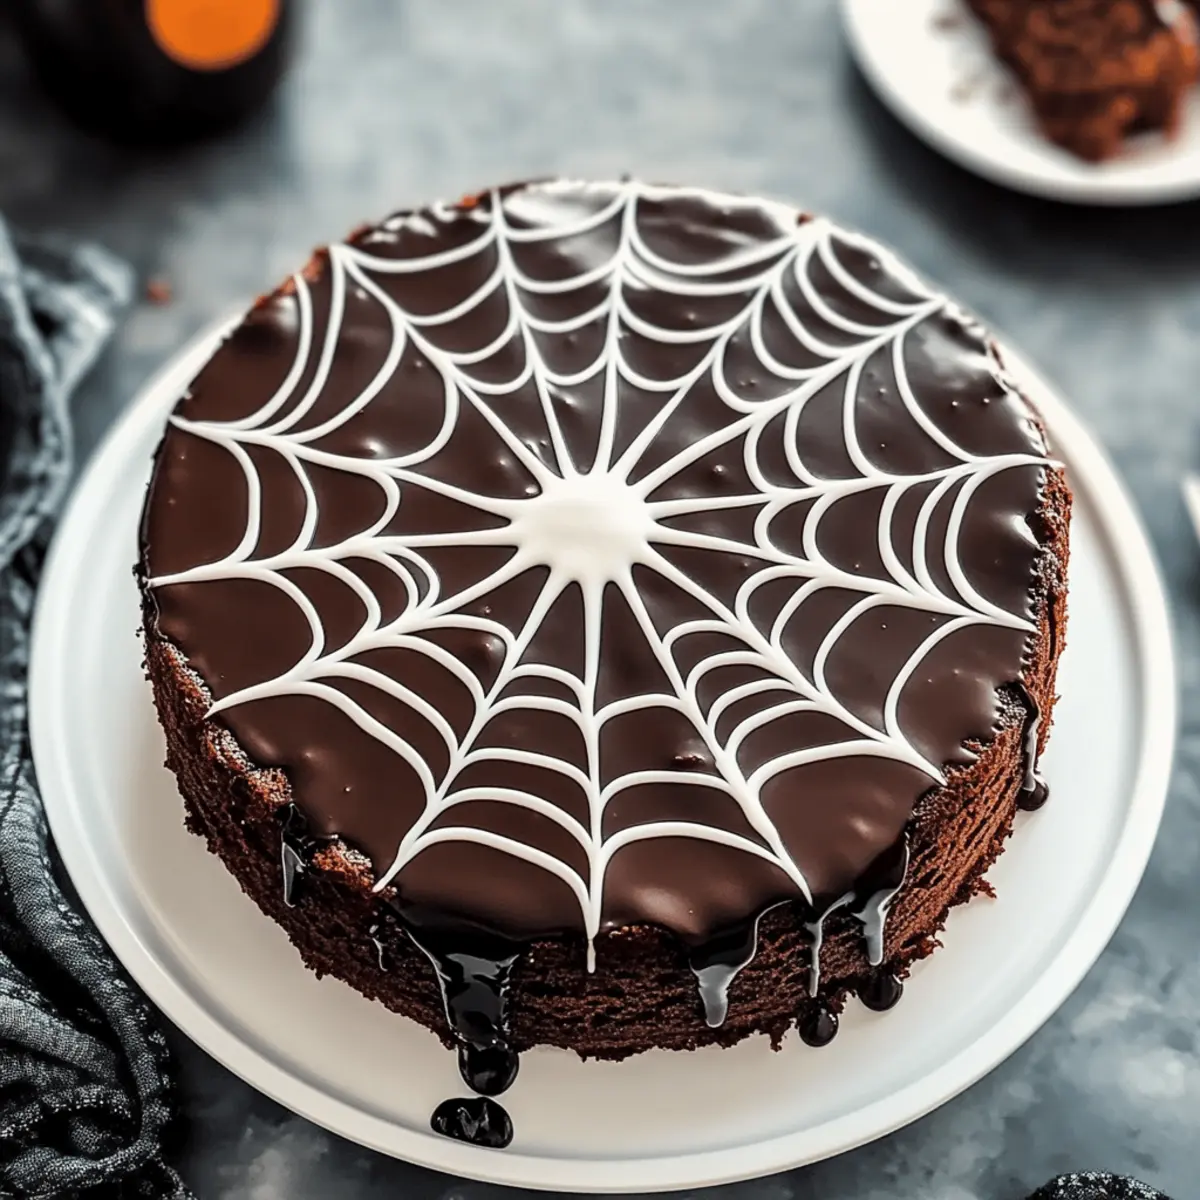
- White chocolate chips – Creates the stunning spiderweb design that makes the cake a showstopper.
Step‑by‑Step Instructions for Spiderweb Chocolate Cake
Step 1: Preheat the Oven
Begin by preheating your oven to 350°F (175°C). This crucial step ensures that your Spiderweb Chocolate Cake bakes evenly and rises beautifully. While the oven warms up, gather your mixing bowls and measuring cups to prepare for the next steps.
Step 2: Mix Dry Ingredients
In a large mixing bowl, whisk together the all-purpose flour, sugar, cocoa powder, baking powder, baking soda, and salt until well blended. You want a uniform dry mixture, so take a moment to break up any lumps. This is the foundation of your cake’s rich chocolate flavor, so don’t rush this process!
Step 3: Add Wet Ingredients
Now it’s time to incorporate the wet ingredients! Add the large eggs, milk, vegetable oil, and vanilla extract to the dry mixture. Stir everything together until just combined, being careful not to overmix. This helps keep your Spiderweb Chocolate Cake airy and fluffy, essential for that perfect texture.
Step 4: Incorporate Boiling Water
Carefully pour the boiling water into the batter, mixing gently until you achieve a smooth consistency. The heat from the water intensifies the chocolate flavor, which is key for an indulgent cake. Your batter will be quite thin, but don’t worry—it’s supposed to be that way!
Step 5: Prepare the Pans
Take your cake pans and generously grease and flour them to prevent sticking. This step is essential for ensuring that your cakes come out of the pans intact and ready for frosting. Set the prepared pans aside as you get ready to pour in the delicious batter.
Step 6: Bake the Cake
Pour your rich batter evenly between the prepared pans, ensuring they are filled about halfway. Place them in the preheated oven and bake for 30-35 minutes, or until a toothpick inserted in the center comes out clean. You’ll know it’s ready when your kitchen fills with an irresistible chocolate aroma.
Step 7: Cool the Cakes
Once baked, carefully remove the cakes from the oven and let them cool in the pans for about 10 minutes. This gentle cooling helps them firm up. After that, transfer them to a wire rack to cool completely. Ensure they are fully cooled before frosting, as hot cakes can melt your frosting.
Step 8: Frost & Decorate
Once your cakes are cool, it’s time for the fun part! Frost the top of one chocolate layer with your favorite chocolate frosting, and then sandwich the second layer on top. Finally, drizzle melted white chocolate in a circular pattern over the top to create your stunning spiderweb design, capturing the spirit of the Spiderweb Chocolate Cake!
Expert Tips for Spiderweb Chocolate Cake
-
Measure Accurately: Precise measurements can make or break your Spiderweb Chocolate Cake. Use a kitchen scale for the best results.
-
Prevent Dryness: If your cake is too dry, gently brush it with simple syrup after baking. This will infuse moisture without ruining your design.
-
White Chocolate Technique: Melt white chocolate in 30-second increments to avoid burning. Drizzle it carefully in a circle, then use a toothpick to create the web pattern.
-
Cool Completely: Ensure the cakes are completely cooled before frosting. If warm, the frosting will melt and compromise the beautiful spiderweb effect.
-
Add Personal Touches: Don’t hesitate to customize your cake! Mix in chocolate chips or nuts to make your Spiderweb Chocolate Cake uniquely delightful.
Storage Tips for Spiderweb Chocolate Cake
-
Room Temperature: Cover the cake and store it at room temperature for up to 3 days, protecting its moist texture and delicious flavor.
-
Fridge: For longer freshness, refrigerate in an airtight container for up to 5 days. This keeps the cake moist and avoids unwanted odors from other foods.
-
Freezer: You can freeze individual slices of the Spiderweb Chocolate Cake for up to 3 months. Wrap each slice tightly in plastic wrap and aluminum foil to prevent freezer burn.
-
Thawing: To enjoy, simply thaw slices in the fridge overnight before serving. Reheat in the microwave for about 10-15 seconds if you prefer it warm.
What to Serve with Spiderweb Chocolate Cake
The perfect Spiderweb Chocolate Cake is not just about the cake itself; it’s about creating a delightful experience with accompanying dishes.
-
Whipped Cream: A fluffy dollop of whipped cream contrasts beautifully with the dense cake, adding a light and airy texture to each bite.
-
Fresh Berries: Bright, tart berries like raspberries or strawberries not only add a pop of color but also their acidic notes cut through the sweetness of the chocolate.
-
Vanilla Ice Cream: The classic pairing of creamy vanilla ice cream creates a delightful temperature contrast, melting slightly against the cake’s rich chocolate surface.
-
Chocolate Ganache: Drizzling some warm chocolate ganache over the cake enhances the indulgence, creating an irresistible chocolate lover’s dream.
-
Spiced Chai Tea: A warm cup of spiced chai adds a cozy touch, with its aromatic spices complementing the rich chocolate flavor in a gentle embrace.
-
Caramel Sauce: Drizzling gooey caramel sauce over each slice gives a sweet richness that transforms the cake into an elaborate treat.
-
Coffee or Espresso: Serve the cake alongside a strong cup of coffee or espresso, whose bitterness enhances the chocolate, creating a delightful balance of flavors.
-
Nutty Biscotti: Crunchy biscotti provides a contrasting texture, making for a delightful snack alongside the cake, perfect for dipping into coffee.
-
Pumpkin Spice Muffins: Complement the Halloween theme with moist, spiced pumpkin muffins that echo the flavors of the season, creating a warm, festive atmosphere.
-
Spiked Hot Chocolate: For adults, a cup of hot chocolate infused with a splash of peppermint schnapps or orange liqueur brings a cozy warmth, perfectly matching the cake’s essence.
Make Ahead Options
These Spiderweb Chocolate Cakes are perfect for meal prep enthusiasts! You can bake the cake layers up to 3 days in advance and store them covered at room temperature. For optimal freshness, wrap each cooled layer in plastic wrap to prevent drying out. You can also prepare the chocolate frosting up to 48 hours ahead—just refrigerate it in an airtight container. When you’re ready to serve, allow the cake layers to come to room temperature, frost with your delicious chocolate frosting, and finish by drizzling the melted white chocolate for that stunning spiderweb effect. This way, you can enjoy a homemade treat with minimal last-minute effort!
Spiderweb Chocolate Cake Variations & Substitutions
Feel free to put your own spin on this delightful cake and make it truly your own!
- Gluten-Free: Substitute all-purpose flour with a 1:1 gluten-free flour blend for a delicious gluten-free version.
- Dairy-Free: Replace milk with almond or oat milk, enhancing the cake’s moistness without dairy.
- Vegan Option: Use 1 tbsp flaxseed meal mixed with 2.5 tbsp water per egg for a plant-based alternative.
- Extra Chocolatey: Mix in 1 cup of chocolate chips for deliciously gooey pockets of chocolate in every bite.
- Nutty Crunch: Add 1 cup of chopped nuts like walnuts or pecans for a delightful, crunchy texture.
- Fruity Twist: Integrate 1 cup of fresh raspberries or strawberries into the batter for a fresh and delicious burst of flavor.
- Spicy Kick: A teaspoon of cayenne pepper or a dash of cinnamon can add an unexpected warmth that enhances the chocolate.
- Coffee Lover’s Delight: Substitute half the boiling water with brewed coffee, enriching the cake’s already decadent chocolate flavor.
There’s so much you can do with this cake! If you love chocolate, don’t forget to check out my recipe for Soft Chewy Chocolate Chip Cookies or if you’re in the mood for something unique, give my Pistachio Cream Chocolate Chip Cookies a try!
Spiderweb Chocolate Cake Recipe FAQs
What type of flour should I use for the best results?
For the best texture in your Spiderweb Chocolate Cake, I recommend using all-purpose flour. If you’re looking for a gluten-free alternative, simply use a 1:1 gluten-free flour blend. This substitution will yield a delightful cake that everyone can enjoy!
How long can I store leftovers?
You can store your Spiderweb Chocolate Cake at room temperature for up to 3 days, covered to keep it nice and fresh. If you want it to last longer, refrigerate it in an airtight container for up to 5 days. Just be sure to keep it sealed to prevent any odors from other foods seeping in.
Can I freeze the cake?
Absolutely! You can freeze individual slices of the Spiderweb Chocolate Cake for up to 3 months. To do this, wrap each slice tightly in plastic wrap and then in aluminum foil to prevent freezer burn. When you’re ready to enjoy a slice, thaw it in the refrigerator overnight and heat it in the microwave for about 10-15 seconds if you’d like it warm.
What if my cake turns out dry?
If your cake ends up feeling dry, don’t fret! A simple syrup can work wonders. Just mix equal parts sugar and water, bring it to a boil until the sugar dissolves, and let it cool. Brush this syrup on your cooled cake layers before frosting to infuse moisture back into the cake!
Are there any dietary considerations for this recipe?
Yes! This Spiderweb Chocolate Cake is quite versatile. To make it vegan, substitute large eggs with flaxseed meal (1 tbsp flaxseed mixed with 2.5 tbsp water per egg), and replace milk with almond or oat milk. For a lower glycemic index option, you can also opt for coconut sugar instead of regular sugar.
How can I achieve the perfect spiderweb design?
To create the stunning spiderweb decoration, melt white chocolate in 30-second increments in the microwave, stirring between each session to avoid burning. Once melted, drizzle the chocolate in a circular pattern over your frosted cake, and use a toothpick to create the web effect. This simple technique will leave everyone in awe of your baking skills!
Delightful Spiderweb Chocolate Cake: A Spooky Sweet Treat
Ingredients
Equipment
Method
- Preheat your oven to 350°F (175°C).
- In a large bowl, whisk together the all-purpose flour, sugar, cocoa powder, baking powder, baking soda, and salt until well blended.
- Add the large eggs, milk, vegetable oil, and vanilla extract to the dry mixture. Stir until just combined.
- Carefully pour the boiling water into the batter, mixing gently until smooth.
- Grease and flour your cake pans to prevent sticking.
- Pour the batter evenly into prepared pans and bake for 30-35 minutes, or until a toothpick comes out clean.
- Let the cakes cool in the pans for about 10 minutes, then transfer to a wire rack to cool completely.
- Frost the top of one layer with chocolate frosting, sandwich the second layer on top, and drizzle with melted white chocolate to create the spiderweb design.