

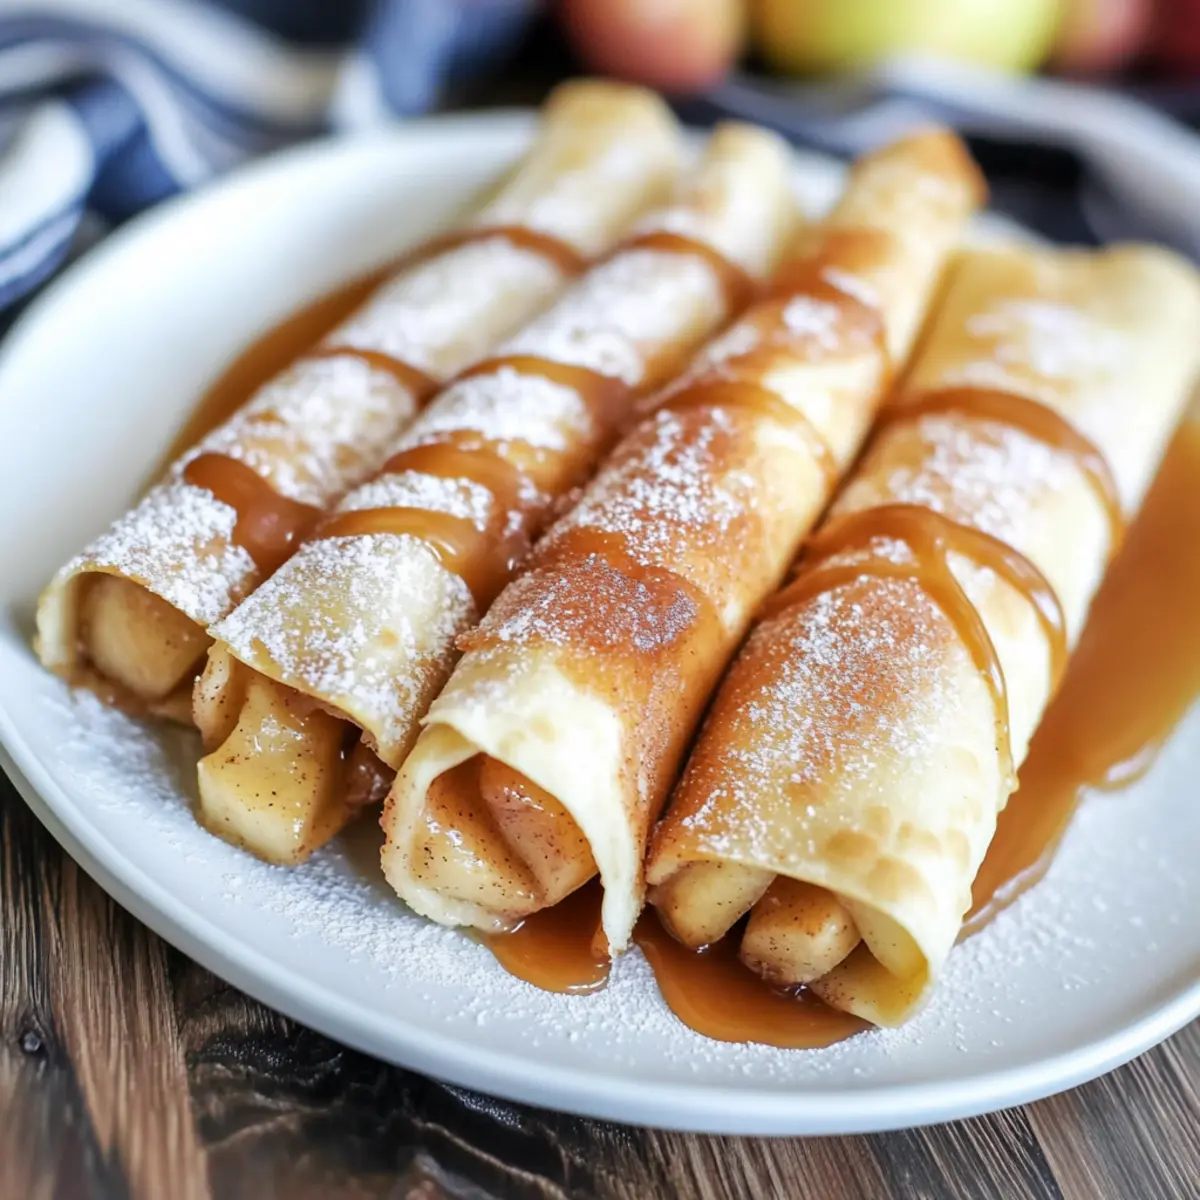
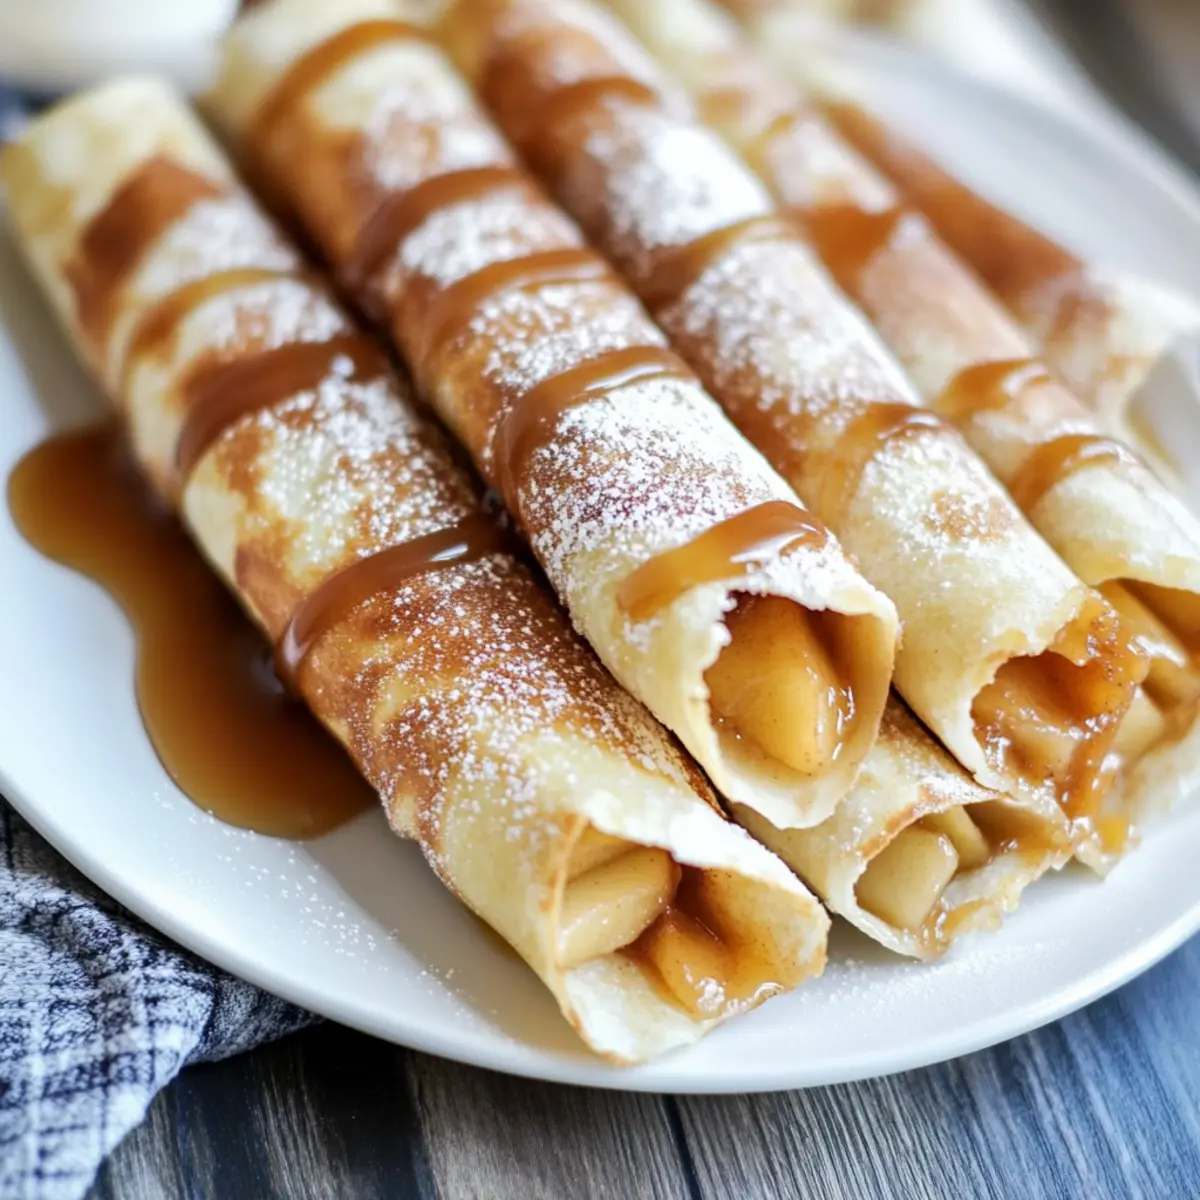
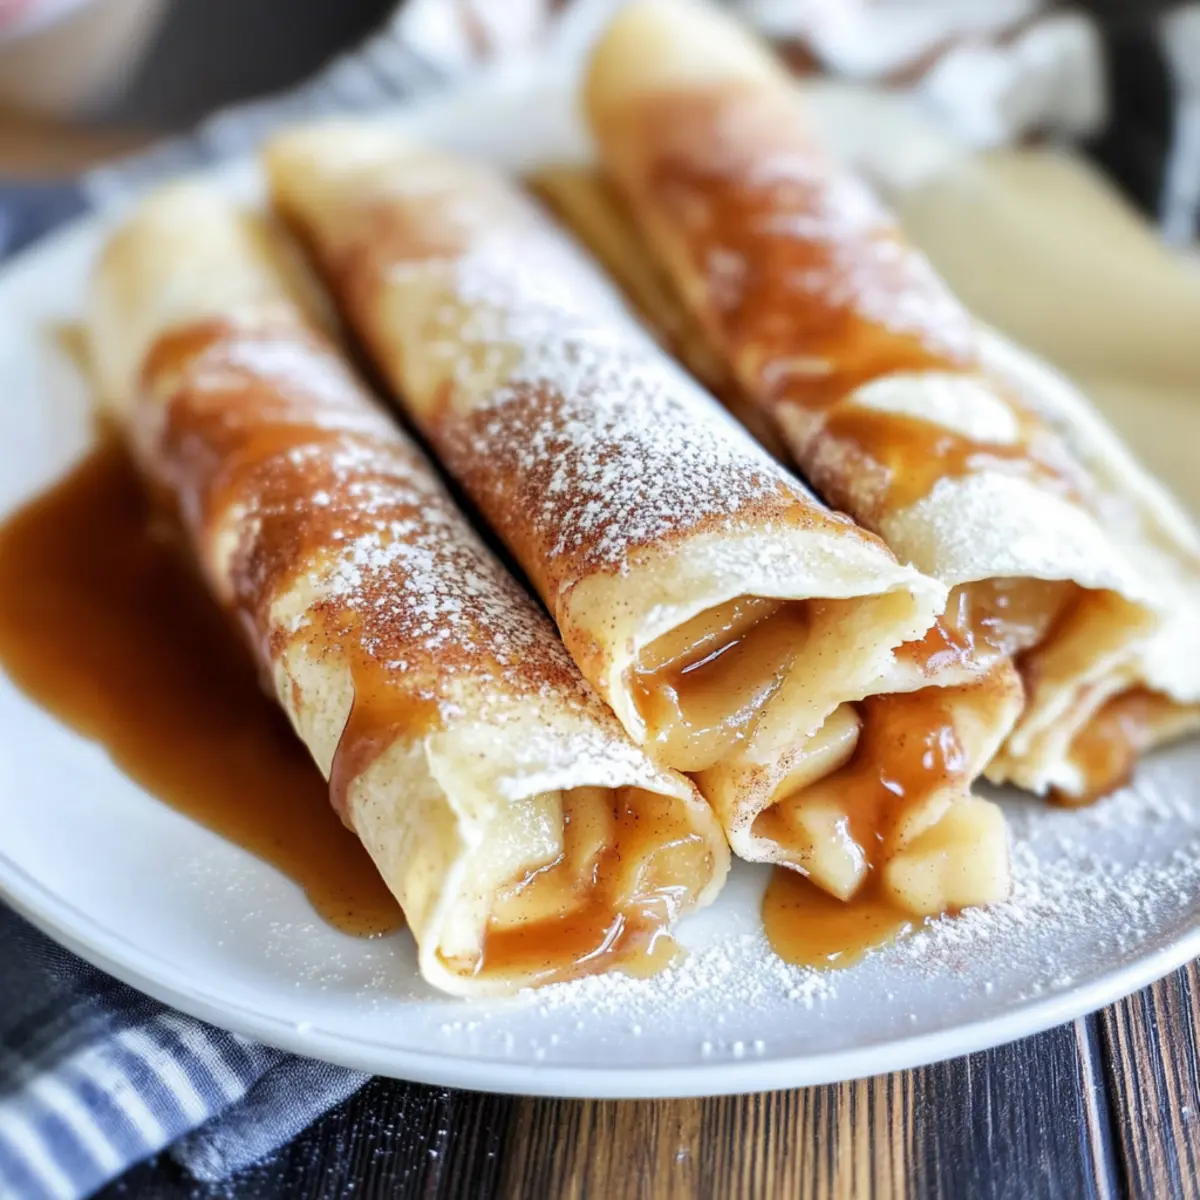
The aroma of cinnamon and caramelized apples wafts through the air, making my heart skip a beat. When it comes to comfort desserts, nothing quite matches the nostalgia of classic apple pie—until now. Enter my Apple Pie Taquitos, the perfect mashup of flavors and textures that transforms a traditional favorite into a fun, portable treat. Not only are these taquitos a crowd-pleasing dessert that you can pull together in a flash, but they also invite your little ones into the kitchen for a delightful cooking experience. Imagine crispy, golden wraps enclosing warm, gooey apple filling, all sprinkled with cinnamon sugar—what’s not to love? So, ready to join in on the fun and make your dessert game stronger? Let’s dive into this delicious recipe!
Why Are Apple Pie Taquitos So Loved?
Crispy, Delightful Texture: Enjoy the satisfying crunch of golden brown taquitos that give you the perfect contrast to the soft, gooey apple filling.
Quick & Easy: With just a handful of ingredients and a simple baking process, you can whip these up in no time—ideal for busy families!
Kid-Friendly Fun: Involve the little ones in making these taquitos; their excitement in the kitchen can lead to sweet memories and tasty results.
Versatile Flavor: Whether you stick with traditional apple filling or explore other flavors like peach or cherry, there’s always a delicious option to try! For another delightful dessert idea, don’t miss out on our Pecan Pie Cheesecake that your family will love.
Crowd-Pleasing Appeal: Perfect for gatherings, these taquitos are bound to impress both kids and adults alike, making them your go-to dessert for holidays or parties.
Apple Pie Taquitos Ingredients
For the Filling
• Apple Pie Filling – The main flavor component; a 20 oz can or homemade filling works perfectly.
For the Taquitos
• Medium Soft Flour Tortillas – Provides structure; use soft ones to prevent breakage—gluten-free tortillas can be substituted easily.
• Melted Butter – Adds richness and aids in coating; feel free to reduce if you’re aiming for a lighter option.
For the Coating
• Granulated Sugar – Sweetness for the sprinkle; no direct substitutes, but sugar alternatives can reduce calories.
• Ground Cinnamon – This spice boosts the apple flavor; it’s best to stick with cinnamon, though you can try pumpkin pie spice for a twist.
For Serving
• Caramel Syrup (optional) – Drizzle for added flavor; use store-bought or homemade for that extra special touch.
Step‑by‑Step Instructions for Apple Pie Taquitos
Step 1: Preheat the Oven
Start by preheating your oven to 350°F (175°C). This temperature is perfect for ensuring your Apple Pie Taquitos achieve that delightful golden-brown exterior while remaining warm and gooey on the inside. Once your oven is ready, you’ll be all set to bake these delicious treats.
Step 2: Prepare the Cinnamon Sugar
On a flat plate, combine granulated sugar and ground cinnamon, mixing until well blended. This delightful mixture will coat your Apple Pie Taquitos, enhancing their flavor and adding sweetness. Aim for an even distribution of cinnamon to ensure every bite is perfectly flavored!
Step 3: Chop the Filling
If you’re using canned apple pie filling, transfer it to a cutting board and chop the apples into bite-sized pieces. This step allows for easier rolling and ensures that every taquito is filled with a delectable apple experience. A quick chop will also help distribute the filling evenly in each taquito.
Step 4: Assemble the Taquitos
Lay a soft flour tortilla flat on a clean surface, and spoon approximately 3 tablespoons of the chopped apple pie filling onto the center. Carefully roll the tortilla tightly around the filling, tucking the edges as you go. This step ensures a secure and tasty Apple Pie Taquito to enjoy later!
Step 5: Coat with Butter and Sugar
Brush the exterior of each rolled taquito lightly with melted butter. This will not only add richness but also help the cinnamon-sugar adhere beautifully. Next, roll each taquito in the cinnamon-sugar mixture until fully coated, offering that mouthwatering sweetness and crunch in every bite.
Step 6: Arrange in Baking Dish
Place the coated taquitos seam-side down in a greased baking dish, ensuring they are arranged closely together but not overlapping. This layout allows for even baking and crispiness, enhancing the overall visual appeal and delicious crunch of your finished Apple Pie Taquitos.
Step 7: Bake to Perfection
Slide the baking dish into the preheated oven and bake for 15 minutes. Keep an eye out for them to turn a luscious golden brown, signaling that they are perfectly crisp. The aroma of cinnamon and sweet apples will fill your kitchen, creating anticipation for this delicious treat!
Step 8: Serve Beautifully
Once baked, remove the Apple Pie Taquitos from the oven and let them cool slightly. They’re best served warm, so consider drizzling them with caramel syrup for an extra touch of sweetness and flavor. This added indulgence will take your taquitos to a whole new level of deliciousness.

What to Serve with Apple Pie Taquitos
The sweet, cinnamon-kissed aroma of these delightful taquitos is only the beginning of your dessert adventure.
-
Vanilla Ice Cream: A classic pairing, the creamy texture and cool temperature beautifully contrast with the warm, crispy taquitos. A scoop on the side makes every bite irresistible!
-
Caramel Sauce: Drizzle this luscious sauce over the taquitos for an extra layer of sweetness that complements the apple filling perfectly.
-
Whipped Cream: Light and fluffy, whipped cream adds a delightful texture, bringing a lightness to the rich flavors of the taquitos.
-
Fresh Berries: Bright, juicy strawberries or raspberries offer a refreshing tartness that cuts through the sweetness, adding a pop of color and flavor.
-
Spiced Apple Cider: Warm spiced cider enhances the apple flavors in your taquitos, creating a delightful drink that feels festive and comforting on chilly days.
-
Chocolate Sauce: For a decadent twist, drizzle some chocolate sauce over the taquitos. The rich chocolate pairs surprisingly well with the apple and cinnamon notes.
-
Pumpkin Pie Spice Dusting: Give your taquitos a seasonal twist with a light dusting of pumpkin pie spice; it evokes fall flavors and adds complexity.
Indulging in these fantastic pairings elevates the experience, making your Apple Pie Taquitos the star of the dessert table!
Make Ahead Options
These Apple Pie Taquitos are a wonderful option for meal prep, allowing you to enjoy this delightful dessert without added stress! You can assemble the taquitos and refrigerate them for up to 24 hours before baking. Simply follow the assembly steps, wrap each taquito tightly in plastic wrap to maintain freshness, and store them in an airtight container. When you’re ready to serve, preheat the oven, unwrap the taquitos, and bake as instructed for 15 minutes until golden and crispy. This technique ensures that your taquitos will taste just as delicious as freshly made, saving you time on busy weeknights while still delivering that irresistible apple pie flavor!
How to Store and Freeze Apple Pie Taquitos
Room Temperature: Keep them at room temperature for up to 2 hours after baking. They are best enjoyed fresh but can be stored if cooled completely.
Fridge: Place Apple Pie Taquitos in an airtight container in the fridge for up to 3 days. Reheat in the oven to regain crispiness, about 10 minutes at 350°F (175°C).
Freezer: For longer storage, freeze taquitos before baking. Wrap in plastic wrap and then in aluminum foil for up to 2 months. Bake from frozen for an additional 5-7 minutes to achieve that golden-brown crunch.
Reheating: To reheat leftover cooked taquitos, pop them in the oven for 10-15 minutes at 350°F (175°C) until heated through and crispy again.
Expert Tips for Apple Pie Taquitos
-
Use Soft Tortillas: Ensure you’re using medium soft flour tortillas; harder ones may crack during rolling, ruining the Apple Pie Taquitos’ crispiness.
-
Chop Filling Well: Finely chop the apple pie filling into bite-sized pieces for easier rolling and even distribution throughout each taquito.
-
Mind the Butter: While melted butter adds flavor, too much can make the taquitos greasy; brush lightly for the best results.
-
Watch Baking Time: Keep an eye on the taquitos as they bake; remove them once they are golden brown to avoid burning and ensure a crispy texture.
-
Serve Fresh: These taquitos are best enjoyed warm right out of the oven; if they sit too long, they may lose their crispness.
-
Customize the Filling: While apple filling is delicious, don’t hesitate to try other flavors—like cherry or pumpkin—to keep things exciting!
Apple Pie Taquitos Variations & Substitutions
Feel free to mix things up and create the perfect Apple Pie Taquitos to suit your family’s tastes and dietary needs!
-
Cherry Filling: Swap out the apple pie filling for cherry pie filling for a sweet twist that’s just as delicious. Bursting with flavor, these cherry taquitos can become a favorite in no time.
-
Peach Perfection: Use peach pie filling instead for a summertime treat that’s full of juicy goodness. The sweet and tangy notes pair beautifully with the cinnamon sugar coating.
-
Pumpkin Spice: For a seasonal twist, fill with pumpkin pie filling and sprinkle with nutmeg along with cinnamon. Embrace the fall vibes with this rich, cozy option that’s perfect for holiday gatherings.
-
Cream Cheese Layer: Spread a little cream cheese on the tortillas before adding the filling for an extra creamy bite. This variation brings a delightful richness that beautifully balances the sweetness of the apples.
-
Sugar-Free Options: Use a sugar substitute if you’re looking for a lower-calorie option—just ensure it’s suitable for baking to keep that scrumptious cinnamon sugar exterior intact. Health-conscious family members will appreciate this thoughtful swap!
-
Gluten-Free: Switch to gluten-free tortillas to accommodate dietary needs without sacrificing taste or texture. You’ll still get the crispy exterior and warm filling loved by all.
-
Add Nuts: Sprinkle chopped pecans or walnuts into the apple filling for a satisfying crunch. This little touch can elevate the texture and bring a delightful nutty flavor.
-
Spicy Kick: For those who enjoy a bit of heat, add a sprinkle of cayenne or chili powder to the filling for a surprising kick. It adds an intriguing layer of flavor that adventurous eaters will love!
Whether you’re sticking with classic flavors or branching out, you’re sure to create a dessert that your family will adore. Don’t forget to try pairing these with our delightful Butternut Squash Apple Soup for a beautiful autumn-themed meal!
Apple Pie Taquitos Recipe FAQs
How do I choose the best apples for pie filling?
Absolutely! If you’re making homemade apple pie filling, I recommend using a mix of tart and sweet apple varieties, like Granny Smith and Honeycrisp. This combination brings a delightful balance to your filling. Look for apples that are firm, without dark spots or bruises, ensuring they hold up well during baking.
What’s the best way to store leftover Apple Pie Taquitos?
You can store your leftover taquitos in an airtight container in the fridge for up to 3 days. They are best reheated in the oven at 350°F (175°C) for about 10 minutes to regain their crispness. If they are left out at room temperature, try to enjoy them within 2 hours for the best flavor.
Can Apple Pie Taquitos be frozen?
Absolutely! You can freeze taquitos before baking for up to 2 months. Simply wrap each taquito in plastic wrap, then in aluminum foil to prevent freezer burn. When you’re ready to enjoy, bake them from frozen, adding an extra 5-7 minutes to the original baking time of about 15 minutes at 350°F (175°C). This way, they’ll come out as deliciously crispy as fresh!
What can I do if my taquitos are becoming soggy?
Very! If you find that your taquitos are becoming soggy, it may be due to them sitting too long after baking. To avoid this, serve them immediately while they are warm. If you have leftovers, reheating them in the oven rather than the microwave will help restore their crunch. Also, monitor your butter usage; too much can make them greasy. Just a light brush is enough!
Are Apple Pie Taquitos safe for kids with allergies?
While this recipe is generally kid-friendly, always consider any dietary restrictions. The main allergen concerns may come from flour tortillas (gluten) and possibly nuts if you add toppings like caramel. Substitute with gluten-free tortillas if necessary, and always read ingredient labels carefully to avoid allergens. When in doubt, consult with your child’s healthcare provider before serving.
Can I customize the filling for Apple Pie Taquitos?
Of course! Feel free to experiment with different pie fillings! Whether it’s cherry, peach, or even pumpkin, the sky’s the limit! Simply replace the apple pie filling with your desired pie flavor, adjusting the spices if needed. You can also mix in a bit of cream cheese spread for added creaminess! Whether you stick with apple or explore new flavors, your family will embrace the delicious adventure!
Crispy Apple Pie Taquitos That Kids Will Love to Make
Ingredients
Equipment
Method
- Preheat your oven to 350°F (175°C).
- Combine granulated sugar and ground cinnamon in a flat plate.
- Chop the canned apple pie filling into bite-sized pieces.
- Lay a soft flour tortilla flat and spoon approximately 3 tablespoons of the filling onto the center. Roll tightly and tuck in the edges.
- Brush the exterior of each taquito with melted butter, then coat in the cinnamon-sugar mixture.
- Place the coated taquitos seam-side down in a greased baking dish.
- Bake for 15 minutes until golden brown.
- Let them cool slightly and drizzle with caramel syrup before serving.