

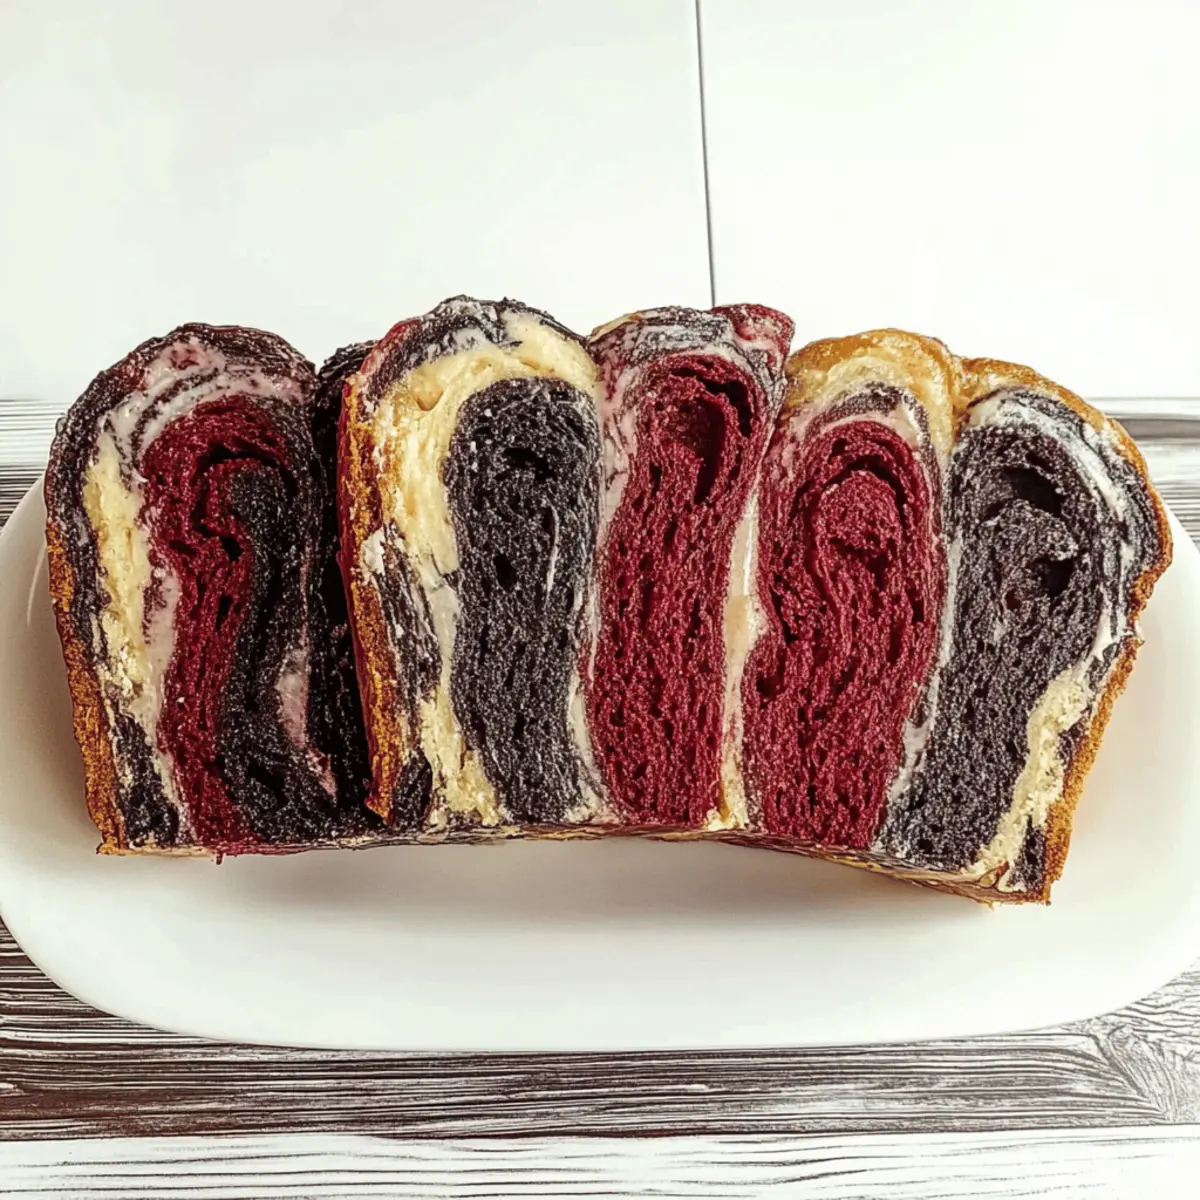
As the leaves turn and a chill fills the air, it’s time to awaken your inner chef with a bewitching creation: Spooky Vampire Bread! This delightful Halloween-themed treat features an eye-catching swirl of vibrant colors, transforming a simple loaf into the star of your festive gatherings. Not only is it a fun way to engage kids in the kitchen, but it also satisfies your cravings without piling on the guilt. Perfect for sandwiches or paired alongside a warm bowl of soup, this vegetarian recipe will become a go-to seasonal favorite. So, are you ready to sink your teeth into this easy Halloween treat and impress your family and friends?
Why is this Vampire Bread special?
Unique Twist: This is not your average loaf; it’s a delightful vibrant centerpiece for any Halloween gathering!
Kid-Friendly: Kids will love getting involved in the colorful shaping, making it not just a treat, but a fun activity!
Versatile Uses: Perfect for sandwiches or a spooky side to soup, this bread shines in various serving styles.
Guilt-Free Indulgence: Low in fat and sodium, it’s the guilt-free choice you’ll feel good about serving!
Showstopper Appeal: Enjoy the stunning visual that will impress guests and make your table festive! Embrace every delightful moment while focusing on creation—just like with other delicious treats like Red Velvet Treats or Brown Butter Treats.
Spooky Vampire Bread Ingredients
• Unleash your inner baker with these essential ingredients!
For the Dough
- Bread flour – Provides a sturdy structure; for a lighter option, use all-purpose flour.
- Yeast – Essential for leavening; make sure it’s fresh to get that perfect rise.
- Sugar – Adds a touch of sweetness and aids in browning; feel free to swap it with honey for a natural alternative.
- Salt – Enhances the overall flavor and regulates the yeast activity for successful rising.
For the Color
- Natural food coloring – Creates the mesmerizing swirl effect; consider beet juice for a natural option.
- Milk (or a dairy alternative) – Adds moisture to the dough; substitute with almond milk for a dairy-free treat.
- Butter (or vegan alternative) – Enriches the flavor; coconut oil works perfectly for a dairy-free choice.
This Spooky Vampire Bread is not just a recipe; it’s a fun way to engage with your loved ones this Halloween!
Step‑by‑Step Instructions for Spooky Vampire Bread Easy Halloween Treats
Step 1: Prepare the Dough
In a medium bowl, combine 1 cup of warm milk, 2 tablespoons of sugar, and 2 teaspoons of yeast. Let the mixture sit for about 5-10 minutes, or until it becomes frothy, indicating that the yeast is active. Meanwhile, gather your mixing bowl and measuring cups to streamline the process. This frothy mixture will be the foundation for your delicious Spooky Vampire Bread.
Step 2: Combine Dry Ingredients
In a large mixing bowl, whisk together 3 cups of bread flour and 1 teaspoon of salt until well combined. Make sure to break up any lumps in the flour to create a smooth mixture. This blend of dry ingredients will create the structure for your spooky loaf, giving it that satisfying chew when baked.
Step 3: Knead the Dough
Gradually pour the frothy yeast mixture into the flour mixture, stirring with a wooden spoon until it starts to come together. Transfer the dough to a lightly floured surface and knead it for about 10 minutes, until it’s smooth and elastic. Your dough should feel slightly tacky but not sticky. This step is vital for developing the texture of your Spooky Vampire Bread.
Step 4: Color the Dough
Once the dough is kneaded, divide it into two equal portions. In one portion, mix in drops of red and blue natural food coloring until you achieve a vibrant deep color. Keep the other portion white. Take care to distribute the coloring evenly as you work to create eye-catching swirls in the final loaf. This step adds the signature spooky look to your bread!
Step 5: First Rise
Grease a large bowl with a little oil and place both portions of dough inside, covering them with a damp cloth. Let them rise in a warm, draft-free area for about 2 hours, or until the dough has doubled in size. You’ll know it’s ready when you gently press a finger into it, and the indentation springs back. This rising time is essential for developing flavor and texture in your Spooky Vampire Bread.
Step 6: Shape and Second Rise
After the first rise, gently punch down the dough to release any air bubbles. On a floured surface, roll out both dough portions separately into rectangles. Layer the colored dough on top of the white dough, then roll tightly into a loaf shape. Place it seam-side down in a greased loaf pan, cover again, and let it rise for another 30 minutes. This second rise will give your Spooky Vampire Bread that lovely, fluffy texture.
Step 7: Baking
Preheat your oven to 350°F (175°C). Once the bread has risen nicely, place it in the preheated oven and bake for about 30 minutes. Keep an eye on it; you’ll know it’s ready when it turns golden brown and sounds hollow when tapped on the bottom. The aroma of baking bread will fill your kitchen and give guests a preview of the tasty treat to come!
Step 8: Cool and Serve
Once the bread is out of the oven, allow it to cool in the pan for 10 minutes. Then, carefully transfer it to a wire rack to cool completely before slicing. The soft texture and vibrant colors of your Spooky Vampire Bread will make it a showstopper at your Halloween gathering, perfect for sandwiches or a spooky side to soup!
How to Store and Freeze Spooky Vampire Bread
Room Temperature: Store your Vampire Bread in an airtight container at room temperature for up to 3 days. This keeps it fresh and soft for snacking or sandwiches!
Freezer: To preserve longer, slice the bread and freeze individual pieces wrapped in plastic wrap or freezer bags for up to 3 months. This way, you can enjoy your spooky treat anytime!
Reheating: When ready to enjoy, thaw slices at room temperature or gently warm them in the toaster. They’ll taste just as delightful as when they were freshly baked!
Airtight: Always ensure the bread is tightly wrapped to prevent freezer burn, which can affect the flavor and texture of your Spooky Vampire Bread.
Make Ahead Options
These Spooky Vampire Bread are perfect for busy cooks looking to save time! You can prepare the dough up to 24 hours in advance by completing the first rise, then tightly wrap it in plastic wrap and refrigerate it to slow down the fermentation. This method not only enhances the flavor but ensures it remains just as delightful when finished! When you’re ready to bake, simply remove the dough from the fridge, let it come to room temperature for about 30 minutes, shape it, and proceed with the second rise. For ultimate freshness, bake your Vampire Bread within 3 days for best quality, and enjoy the ease of having a homemade treat ready to impress at your next gathering!
Spooky Vampire Bread Variations
Feel free to let your creativity flow and personalize your Vampire Bread experience with these delightful twists!
-
Colorful Swirls: Experiment with different food coloring combinations like orange and black for an extra festive twist. The vibrant hues will make your bread even more captivating!
-
Spiced Delight: Add a teaspoon of cinnamon or nutmeg to the dough for a cozy flavor boost. These warm spices will turn each slice into a fall-inspired treat that’s sure to cozy up any gathering.
-
Mini Rolls: Instead of a loaf, shape the dough into small rolls for bite-sized treats. Perfect for little hands at Halloween parties! Your little chefs will love making their spooky creations!
-
Savory Twist: Mix in herbs like rosemary or garlic powder to transform this sweet batch into a savory bread. Perfect for pairing with soups or festive spreads like pumpkin butter!
-
Dairy-Free Option: Swap the milk for almond or oat milk and use coconut oil instead of butter. This way, everyone can enjoy a piece of the spooky fun without missing out!
-
Nutty Crunch: Add a handful of chopped walnuts or pecans to the dough for a delightful crunch. These little surprises add both flavor and texture—making each bite a unique experience!
-
Chocolate Chip Addition: Fold in chocolate chips for a semi-sweet twist. This indulgent touch will delight your sweet tooth and turn your Vampire Bread into a dessert sensation!
-
Spicy Kick: For those who like a little heat, incorporate a pinch of cayenne pepper or chili powder. It’s a surprising yet delightful addition that will tantalize taste buds at your Halloween bash!
Enhance your spooky table with these variations, and don’t forget to try pairing your Vampire Bread with delicious treats like Cowboy Cornbread Casserole or Crispy Baked Chicken Thighs. Happy baking!
Expert Tips for Spooky Vampire Bread
-
Active Yeast: Make sure your yeast is fresh and bubbly. If it doesn’t froth after mixing with warm milk, it’s likely expired.
-
Color Mixing: For vibrant swirls, add food coloring gradually. Mixing in too much at once may result in unexpected shades.
-
Kneading Time: Don’t rush the kneading process; a well-kneaded dough leads to a perfect, chewy texture in your Vampire Bread.
-
Resting Time: Allow the dough to rise fully in both stages. Skipping this step can lead to dense bread instead of airy, fluffy loaves.
-
Experiment with Flavors: Consider adding spices like cinnamon or nutmeg for an extra flavor twist in your spooky bread, making it even more delightful!
-
Storage Tip: To keep your Spooky Vampire Bread fresh, store it in an airtight container at room temperature, or freeze slices for longer enjoyment.
What to Serve with Vampire Bread
Elevate your spooky dinner table with these delectable pairings that promise to enchant every guest this Halloween.
-
Pumpkin Soup: A warm, velvety bowl of pumpkin soup perfectly complements the vibrant bread’s sweetness, creating a harmonious fall experience.
-
Creamy Whipped Butter: Spread a dollop of whipped butter over warm slices for a rich, mouthwatering addition that enhances the bread’s flavors.
-
Chili: The hearty flavors of chili pair splendidly with Vampire Bread, complementing its sweetness and making for a cozy, satisfying meal.
-
Cheese Platter: Arranging an assortment of cheeses adds both sweetness and richness, offering a delightful contrast to the bread’s playful look.
-
Spooky Dips: Consider serving it alongside themed dips like beet hummus or ghostly guacamole, providing an interactive and fun dining experience for kids and adults alike.
-
Hot Apple Cider: Sipping on warm apple cider as you enjoy your Vampire Bread warms the spirit and adds a seasonal touch with every bite.
-
Chocolate Mousse: For dessert, indulge in a light and fluffy chocolate mousse. Its richness balances the playful sweetness of your Halloween loaf beautifully.
Spooky Vampire Bread Recipe FAQs
How do I choose the right ingredients for Spooky Vampire Bread?
Absolutely! For best results, use fresh bread flour and yeast to ensure optimal rise and structure. I recommend checking the yeast’s expiration date—active yeast should froth when mixed with warm milk, indicating it’s ready to rise. Additionally, select natural food coloring for vibrant swirls; beet juice is a fantastic alternative for a natural option.
What’s the best way to store leftover Vampire Bread?
Store your Vampire Bread in an airtight container at room temperature for up to 3 days. This keeps your bread soft and fresh. If you want to enjoy it longer, slice the bread and wrap individual pieces tightly in plastic wrap or use freezer bags to freeze for up to 3 months. You’ll love how well it preserves!
Can I freeze Vampire Bread, and how should I do it?
Yes! Freezing is a great option. After the bread cools completely, slice it and wrap each slice in plastic wrap or parchment paper tightly, then place them in a freezer-safe bag to eliminate air. When you’re ready to enjoy a slice, you can thaw it at room temperature or pop it into the toaster until warm and ready to eat.
What should I do if my dough isn’t rising?
Very important! If your dough isn’t rising, your yeast may be inactive. Ensure that your milk was warm (but not too hot) when you activated the yeast. If it doesn’t froth in the first step, try again with fresh yeast, and make sure your mixture is kept in a warm, draft-free area during the rising period.
Is this Vampire Bread suitable for different dietary needs?
Yes, indeed! This Spooky Vampire Bread recipe is vegetarian and can be easily adapted for dairy-free or vegan diets by using non-dairy milk like almond milk and substituting butter with coconut oil or a vegan spread. For allergy considerations, avoid common allergens by selecting gluten-free flour or specific dairy alternatives based on individual needs. Enjoy crafting a treat everyone can share!
How can I jazz up the flavors of my Spooky Vampire Bread?
For an extra special twist, consider incorporating unique spices like cinnamon or nutmeg into the dough. You can mix these into the dry ingredients before adding the wet ingredients. Another fun option is to shape your dough into fun Halloween-themed shapes or even mini rolls for individual servings—this will surely delight both kids and adults alike during the spooky season!
Spooky Vampire Bread: Easy Halloween Treats for Everyone
Ingredients
Equipment
Method
- In a medium bowl, combine 1 cup of warm milk, 2 tablespoons of sugar, and 2 teaspoons of yeast. Let the mixture sit for about 5-10 minutes, or until it becomes frothy.
- In a large mixing bowl, whisk together 3 cups of bread flour and 1 teaspoon of salt until well combined.
- Gradually pour the frothy yeast mixture into the flour mixture, stirring with a wooden spoon until it starts to come together. Knead the dough for about 10 minutes.
- Divide the dough into two equal portions. In one portion, mix in drops of red and blue natural food coloring.
- Grease a large bowl with oil, place both portions of dough inside, and cover with a damp cloth. Let them rise for about 2 hours.
- Punch down the dough, roll out both portions separately into rectangles, layer the colored dough on top, and roll tightly into a loaf. Place seam-side down in a loaf pan and let rise for another 30 minutes.
- Preheat your oven to 350°F (175°C). Bake the bread for about 30 minutes or until golden brown and hollow when tapped.
- Allow the bread to cool in the pan for 10 minutes before transferring to a wire rack to cool completely.