

There’s something incredibly comforting about the smell of fresh bread wafting through the kitchen, isn’t there? It’s a transformative experience that elevates a simple meal into a cherished moment, and that’s exactly what you’ll find with these Homemade Crescent Rolls. This easy recipe boasts both delightful fluffiness and gorgeous presentation, making them the perfect companion to any dinner. With just seven basic ingredients and under two hours of preparation, these rolls are both a breeze to whip up and a joyous addition to your table. Whether you’re planning a family feast or just looking for a simple yet impressive side, these crescent rolls will warm your heart and fill your home with love. Ready to roll up your sleeves and dive into the art of homemade baking? Let’s make magic happen!
Why Make Homemade Crescent Rolls?
Comforting aroma: The delightful scent of freshly baked rolls fills your home, creating an inviting atmosphere.
Incredible fluffiness: With a soft, tender texture, these rolls elevate any meal.
Simple ingredients: Made with just seven basic staples, these rolls are both approachable and satisfying.
Quick preparation: In under two hours, you can serve warm rolls from your oven.
Versatile serving options: Enjoy them as a side, a sandwich base, or even with sweet toppings. With these Homemade Crescent Rolls, you’ll make every meal an occasion!
Homemade Crescent Rolls Ingredients
For the Dough
- Flour – Essential for providing structure and a delightful texture that makes these homemade crescent rolls so fluffy.
- Warm Milk – Activates the yeast and adds moisture; aim for around 95°F for best results.
- Egg – Enriches the dough, acting as a binder; can be swapped with 3 tbsp of milk or water if necessary.
- Butter – Softened for mixing, it ensures the rolls are tender and flavorful.
- Yeast (instant or active dried) – A vital leavening agent that helps the dough rise; instant yeast is preferred for simplicity.
- Sugar – Provides a touch of sweetness and nourishes the yeast during fermentation.
- Salt – Enhances flavor while also controlling yeast activity for a perfect rise.
These simple ingredients combine to create the magic of homemade crescent rolls that will impress everyone!
Step‑by‑Step Instructions for Homemade Crescent Rolls
Step 1: Prepare the Dough
In a large mixing bowl, combine the flour, warm milk (about 95°F), yeast, egg, softened butter, sugar, and salt. Use a wooden spoon to mix the ingredients until a shaggy dough forms, making sure all the flour is incorporated. This initial blending should take about 3-5 minutes, leaving the mixture slightly sticky but cohesive.
Step 2: Knead the Dough
Transfer the dough onto a lightly floured surface and knead it for 8-10 minutes. Keep kneading until the dough becomes smooth and elastic, which indicates that gluten has developed properly. The perfect dough should stretch without tearing. If necessary, sprinkle a little extra flour to avoid stickiness but be careful not to add too much.
Step 3: Shape the Dough
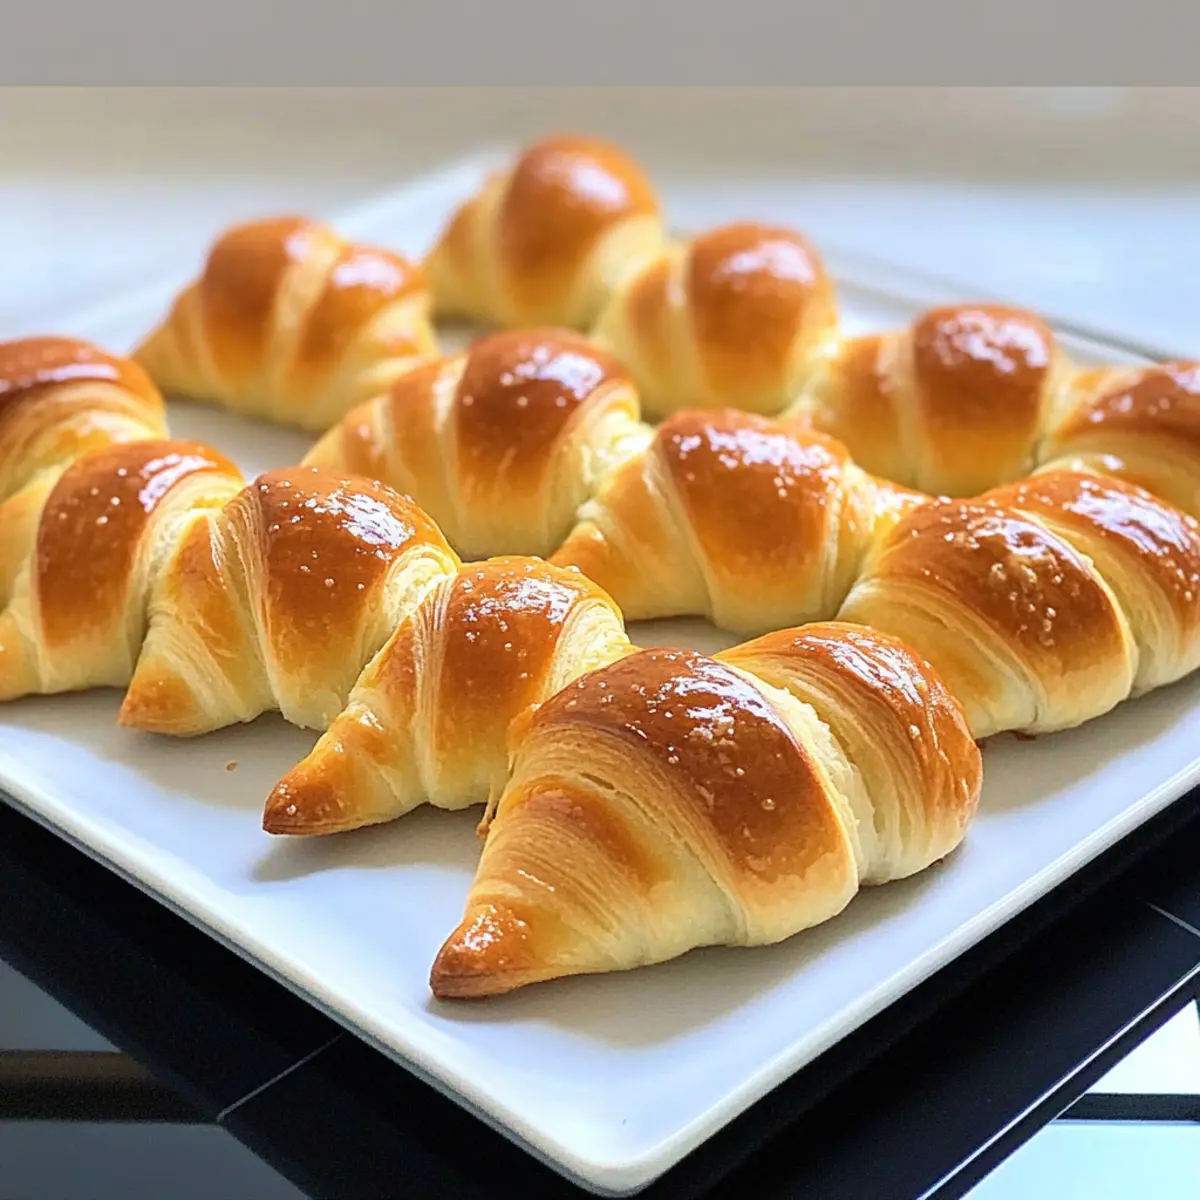
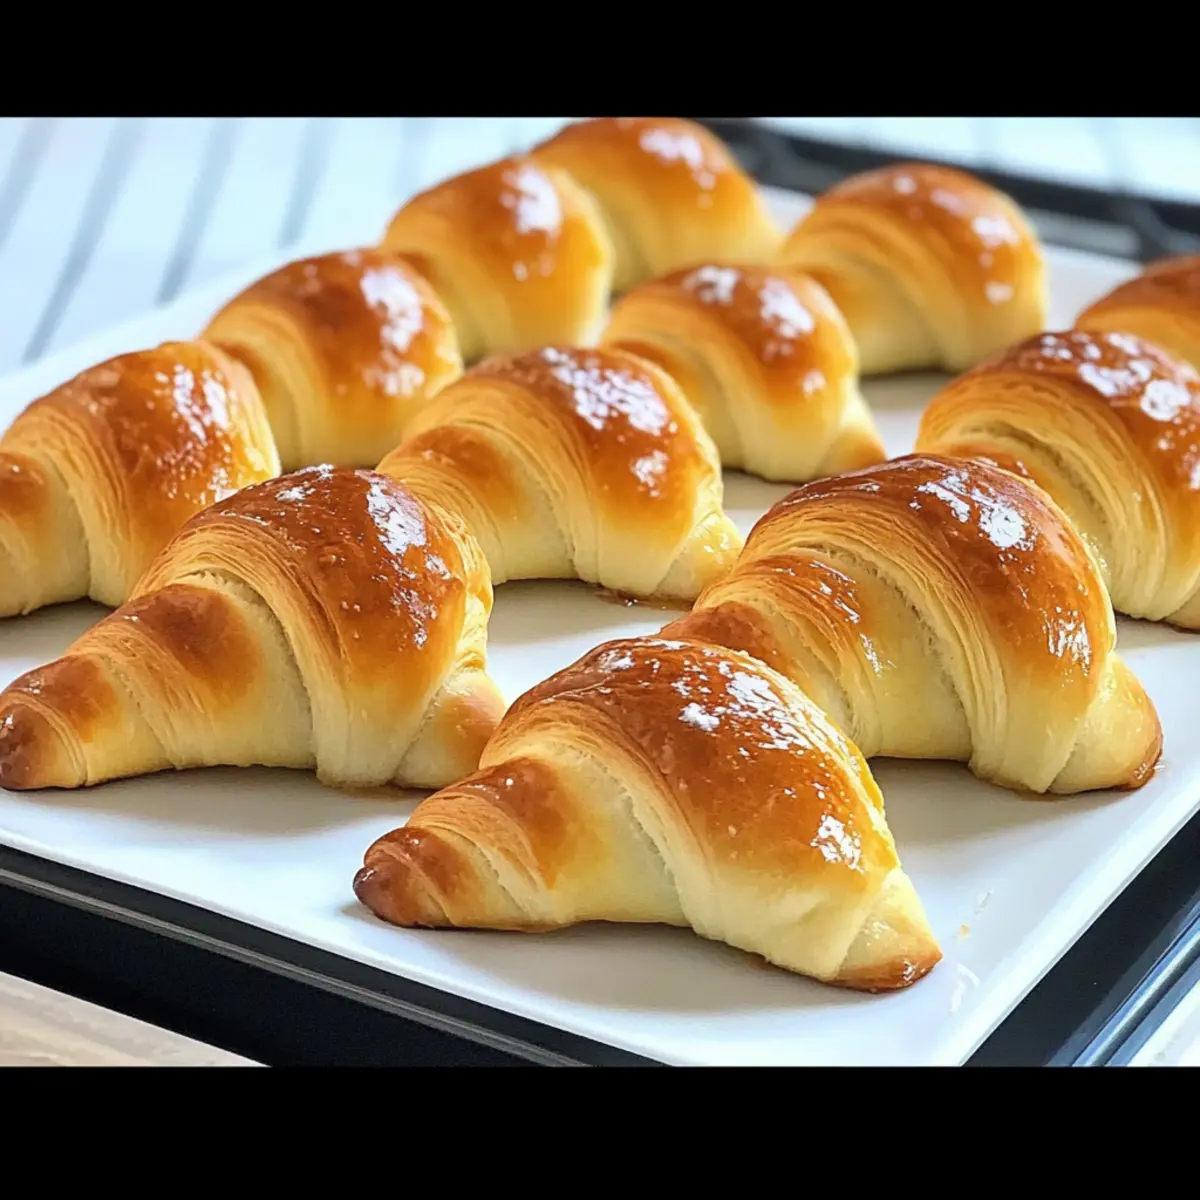
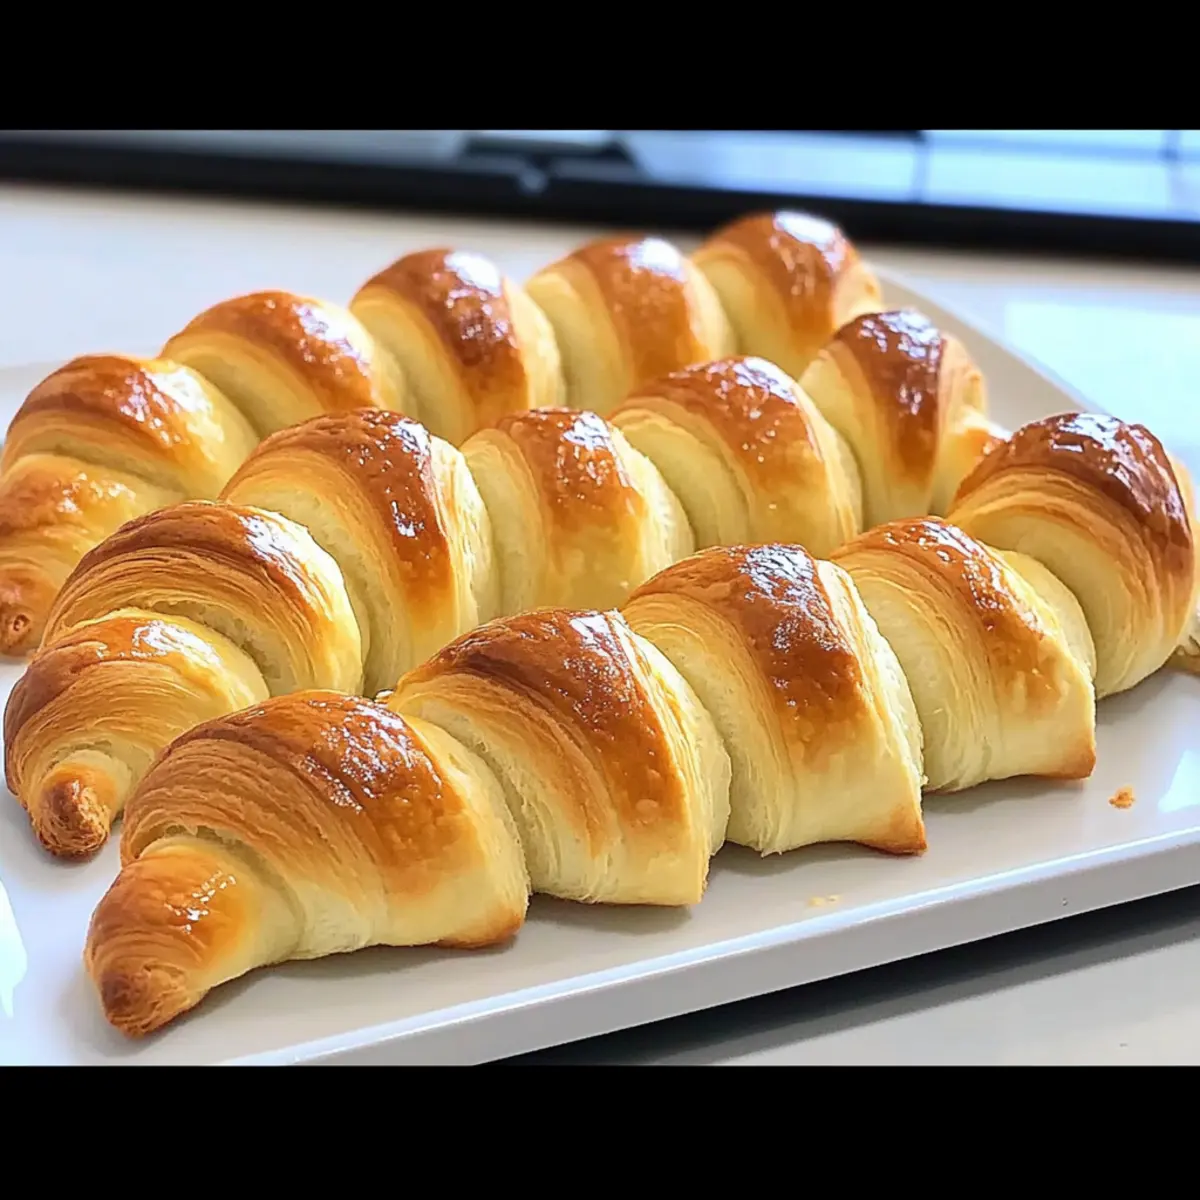
Once kneaded, roll the dough into a large circle about 14 inches in diameter. Using a sharp knife or pizza cutter, slice the circle into 12 equal wedges. Begin at the wider end of each wedge and roll it up tightly towards the tip, shaping each piece into a crescent. Place the rolled crescents on a prepared baking tray lined with parchment paper.
Step 4: Proof the Rolls
Cover the shaped crescent rolls with cling film, allowing them to rise in a warm, draft-free area for about 60 minutes. During this time, the rolls will double in size, becoming fluffy and airy. A good visual cue is to look for them to nearly touch each other on the tray, indicating they are ready for baking.
Step 5: Bake
Preheat your oven to 350°F (180°C) while the rolls are proofing. Once doubled in size, brush the tops of the crescent rolls with an egg wash for a beautiful golden finish. Bake for 19-21 minutes, or until they are a lovely golden brown hue. You’ll know they’re ready when they give off a warm, baked aroma and sound hollow when tapped on the bottom.

Make Ahead Options
These Homemade Crescent Rolls are perfect for meal prep enthusiasts! You can prepare the dough and shape the rolls up to 24 hours in advance by following the initial steps up to the proofing stage. Once formed, cover the rolls with cling film and refrigerate to prevent them from rising too much. When you’re ready to bake, simply remove them from the fridge, allow them to rise for about 30-45 minutes in a warm spot until puffed up, then brush with egg wash and bake as directed. By prepping ahead, you’ll save valuable time during busy weeknights while still enjoying fluffy, delicious rolls that are just as delightful as fresh-baked.
Expert Tips for Homemade Crescent Rolls
Knead with Care: Make sure to knead the dough until it’s smooth and elastic, which is crucial for achieving fluffy homemade crescent rolls.
Correct Temperature: Use warm milk around 95°F to activate the yeast effectively—too hot will kill the yeast, while too cold will hinder rising.
Watch the Proofing: Place the dough in a warm area to rise; if it’s too cool, it won’t expand like it should. A warm oven (off) can work well.
Don’t Rush Baking: Allow the crescent rolls to bake fully; underbaking leads to a doughy center and undesirable yeasty smells.
Experiment with Flavor: While the base is wonderful, consider adding herbs or cheese to the dough or fillings for a special twist on these homemade crescent rolls.
Homemade Crescent Rolls Variations
Feel free to get creative and customize your homemade crescent rolls to suit your taste buds and dietary needs.
-
Dairy-Free: Replace milk with almond or oat milk and use vegan butter for a dairy-free version.
-
Whole Wheat: Swap in whole wheat flour for white flour to incorporate more fiber; just add a bit more liquid for moisture.
-
Cheesy: Add shredded cheese to the dough for a savory twist, or tuck some in each roll before sealing.
-
Sweet: Mix in cinnamon and sugar to the dough, or brush the rolls with melted butter and sprinkle with a cinnamon-sugar blend before baking.
-
Herbed: Incorporate fresh herbs like rosemary or thyme into the dough for a fragrant, savory flavor that embraces the traditional charm of homemade rolls.
-
Stuffed Rolls: Experiment with fillings! Try ham and cheese, sautéed spinach and feta, or even fruit preserves for a delightful surprise inside each roll.
-
Spicy Kick: For those who love heat, sprinkle some red pepper flakes into the dough or include jalapeños as a filling.
-
Gluten-Free: Use a gluten-free flour blend to create a lighter roll. Just ensure the mix contains xanthan gum for structure.
These variations make it easy to enjoy homemade crescent rolls for any occasion or preference! If you’re interested in more baking inspiration, consider exploring our recipe for homemade pizza dough or learn how to make flaky biscuits that pair beautifully with these rolls.
How to Store and Freeze Homemade Crescent Rolls
Room Temperature: Store baked crescent rolls in an airtight container at room temperature for up to 3-4 days to maintain their soft texture.
Fridge: If you need to keep them longer, you can refrigerate them for up to a week. Just make sure they’re sealed well to prevent them from drying out.
Freezer: To freeze, place uncooked shaped rolls on a baking sheet to freeze individually. Once solid, transfer to a freezer bag for up to 3 months.
Reheating: When ready to enjoy, let them thaw and rise again for 30-60 minutes before baking as directed. These homemade crescent rolls will be just as fluffy and delicious!
What to Serve with Homemade Crescent Rolls
There’s nothing quite like the warmth of freshly baked rolls to complete a meal, enhancing both flavor and comfort with every bite.
- Creamy Garlic Mashed Potatoes: The buttery richness of garlic mashed potatoes pairs well with the softness of the rolls, providing a delightful contrast. Imagine scooping up the creamy potatoes with warm crescent rolls for an indulgent side.
- Herbed Roast Chicken: Juicy roast chicken seasoned with fresh herbs complements the fluffy rolls perfectly. The savory flavors of the chicken elevate the meal, making it a feast.
- Fresh Garden Salad: A crisp salad with a tangy vinaigrette adds brightness and freshness to your plate, balancing the richness of the rolls. Consider adding seasonal veggies for a colorful touch!
- Savory Beef Stew: The hearty, comforting nature of a slow-cooked beef stew feels complete when served with crescent rolls for sopping up the delicious broth. It’s pure comfort food in every bite.
- Sweet Jam or Honey: For a delightful twist, serve warm crescent rolls with sweet jams or honey on the side—perfect for those who enjoy a bit of sweetness with their bread!
- Sparkling Lemonade: A refreshing drink like sparkling lemonade cuts through the richness of the rolls and complements any meal beautifully. The fizz and tang offer a bright contrast to the soft bread.
- Chocolate Chip Cookies: For dessert, pairing these rolls with warm, gooey chocolate chip cookies will surely satisfy any sweet tooth. The combination of textures and flavors creates a delightful end to the meal!
Whether you’re hosting a special occasion or enjoying a quiet family dinner, these pairings will ensure your homemade crescent rolls shine at the table!
Homemade Crescent Rolls Recipe FAQs
What type of flour is best for homemade crescent rolls?
I recommend using all-purpose flour for these homemade crescent rolls, as it provides the perfect balance of structure and tenderness. If you want a slightly lighter texture, you can blend all-purpose flour with a touch of bread flour for added strength.
How should I store leftover crescent rolls?
To keep your baked crescent rolls fresh, store them in an airtight container at room temperature for 3-4 days. If you want to preserve them for a longer period, they can be refrigerated for up to a week, but ensure they’re well-sealed to maintain moisture.
Can I freeze homemade crescent rolls before baking?
Absolutely! To freeze, shape your crescent rolls and place them on a baking sheet lined with parchment paper. Freeze them individually until solid (about 2 hours), then transfer them to a resealable freezer bag for up to 3 months. When you’re ready, just let them thaw, and allow them to rise again for 30-60 minutes before baking!
What should I do if my dough didn’t rise?
If your dough didn’t rise, it could be due to inactive yeast. Ensure your milk is warmed to around 95°F and not too hot, as high temperatures can kill the yeast. If it’s too cold, try placing the dough in a warm area to help activate the yeast better. If all else fails, you could try using a new batch of yeast!
Can I make these crescent rolls ahead of time?
Certainly! You can prepare the dough ahead of time and shape the rolls, then cover them and place them in the refrigerator overnight. Before baking, let them come to room temperature and rise for 30-60 minutes, and then bake as directed. This is a great way to enjoy fresh rolls without the rush!
Are these crescent rolls suitable for people with allergies?
These homemade crescent rolls contain common allergens like gluten (from flour), dairy (from milk and butter), and eggs. If you’re looking for alternatives, you can use gluten-free flour blend, coconut oil instead of butter, and a flaxseed egg (1 tbsp ground flaxseed mixed with 3 tbsp water) as an egg substitute. Just keep in mind that the texture may vary!
Fluffy Homemade Crescent Rolls That Will Impress Everyone
Ingredients
Equipment
Method
- In a large mixing bowl, combine the flour, warm milk, yeast, egg, softened butter, sugar, and salt. Mix until a shaggy dough forms.
- Transfer the dough onto a lightly floured surface and knead it for 8-10 minutes until smooth and elastic.
- Roll the dough into a 14-inch diameter circle and slice into 12 wedges. Roll each wedge tightly from the wider end.
- Cover the rolls with cling film and let rise in a warm area for about 60 minutes until doubled in size.
- Preheat the oven to 350°F (180°C). Brush the tops with an egg wash and bake for 19-21 minutes until golden brown.