

As I flipped through my recipe collection, a delightful sight caught my eye: Witch Hat Waffles, the perfect blend of whimsy and flavor for a spooktacular Halloween breakfast! These enchanting treats are more than a feast for the eyes; with their rich chocolatey goodness, they’re bound to charm kids and adults alike. One of the best parts? They’re quick to whip up and customizable for gluten-free or dairy-free diets, making them the ultimate crowd-pleaser. Whether you’re hosting a Halloween brunch or simply surprising your family on October 31st, these waffles encourage creativity in the kitchen and set a festive tone to celebrate the season. So, are you ready to conjure up some Halloween magic at your breakfast table?
Why are Witch Hat Waffles irresistible?
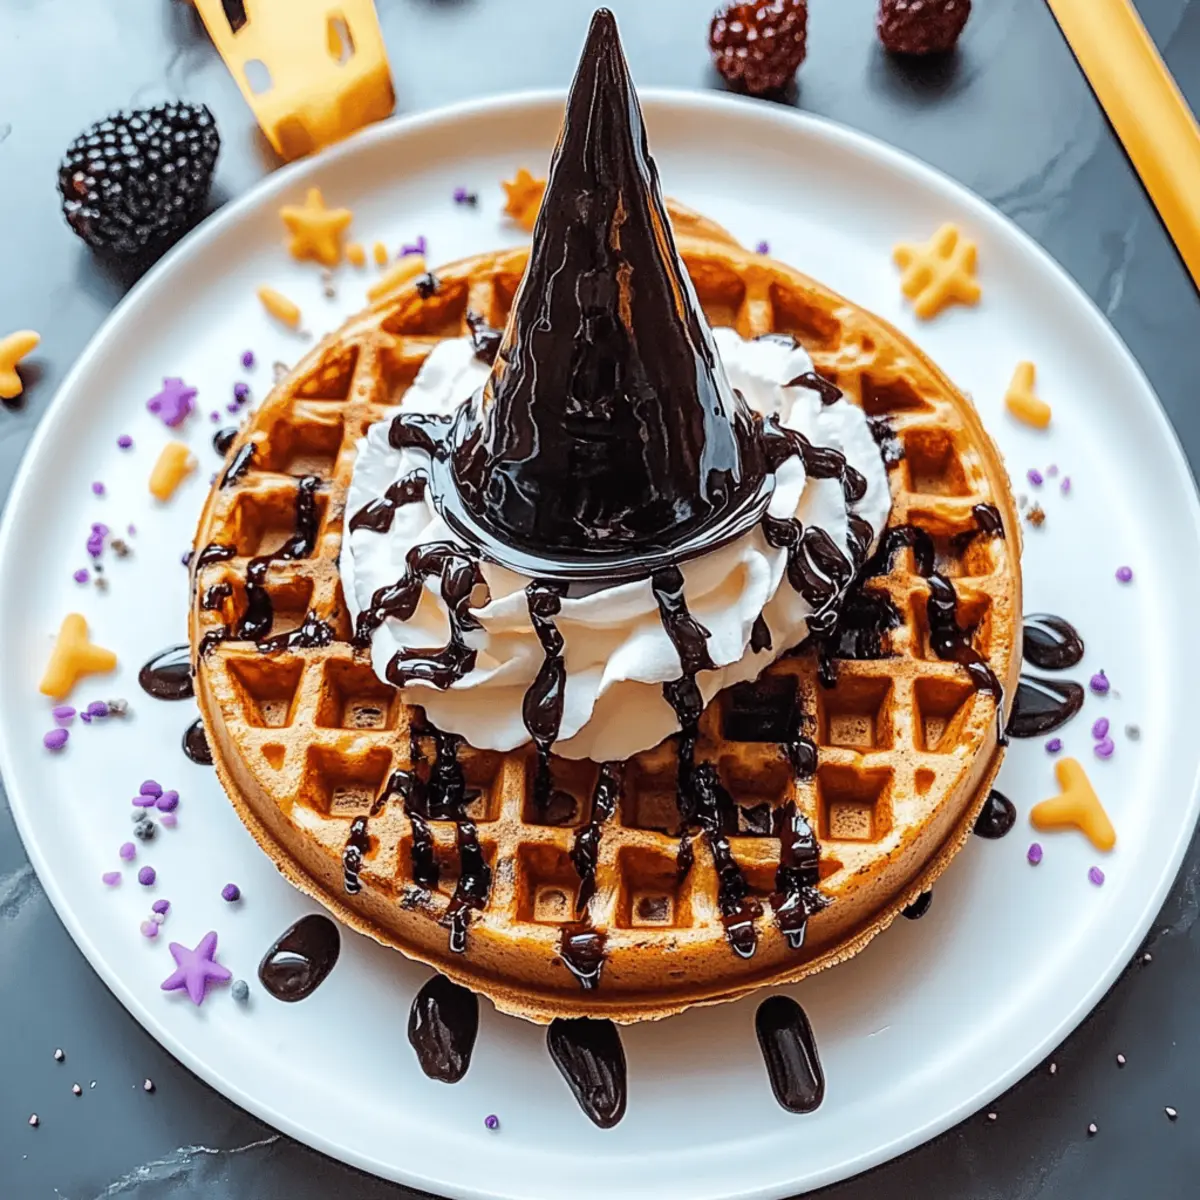
Whimsical Presentation: Each waffle resembles a witch’s hat, adding a playful touch to your Halloween breakfast table.
Rich Chocolate Flavor: The cocoa powder infuses a deep, satisfying taste that both kids and adults will love.
Customizable Options: Easily adapt the recipe for gluten-free or dairy-free diets, making it inclusive for everyone.
Quick Preparation: Ready in minutes, these waffles become a convenient go-to for busy mornings or holiday gatherings.
Creative Family Bonding: Decorate together with toppings like whipped cream and sprinkles, fostering fun memories in the kitchen.
With all these delightful aspects, you won’t want to miss this spooky sweet treat!
Halloween Witch Hat Waffles Ingredients
To create these enchanting, fluffy delights, gather your ingredients and get ready to unleash your inner chef!
For the Waffle Batter
- 2 cups all-purpose flour – This is the base for your waffles, providing essential structure and can be swapped with a gluten-free flour blend for a gluten-free version.
- 1/2 cup unsweetened cocoa powder – Contributes a rich chocolate flavor that makes these waffles irresistible.
- 1 tablespoon baking powder – Ensures your waffles rise beautifully for that perfect fluffy texture.
- 1/4 cup granulated sugar – Sweetens the batter; feel free to use maple syrup or honey for a natural sweetener alternative.
- 3 large eggs – Acts as a binding agent, bringing all the ingredients together seamlessly.
- 1 1/2 cups milk – Provides moisture; opt for any plant-based milk to achieve a dairy-free alternative.
- 1/2 cup melted butter – Adds a luscious richness; substitute with coconut oil for your dairy-free option.
- 1 teaspoon vanilla extract – A splash of goodness that elevates the overall flavor profile of the waffles.
For the Decorations
- 1 cup whipped cream – Use this to create the signature brim of the witch’s hat.
- 1/4 cup chocolate sauce – Drizzle this over the waffles for an extra touch of sweetness.
- 1/2 cup colorful sprinkles – Add these for that festive flair that will delight kids and adults alike.
- 1 cup fresh berries – A lovely addition for decoration that also adds a fruity burst of flavor.
Now that you have your ingredients lined up, it’s time to cast your culinary spell and prepare these Halloween Witch Hat Waffles that are sure to enchant everyone at your table!
Step‑by‑Step Instructions for Halloween Witch Hat Waffles
Step 1: Prepare the Dry Ingredients
In a large mixing bowl, whisk together 2 cups of all-purpose flour, 1/2 cup of unsweetened cocoa powder, 1 tablespoon of baking powder, and 1/4 cup of granulated sugar. Ensure all ingredients are evenly combined and free from lumps to create a smooth waffle batter. This foundational step sets the stage for your delightful Halloween Witch Hat Waffles.
Step 2: Mix the Wet Ingredients
In a separate bowl, beat 3 large eggs, then whisk in 1 1/2 cups of milk, 1/2 cup of melted butter, and 1 teaspoon of vanilla extract until the mixture is smooth and homogenous. This batter should be creamy and well blended, capturing the essence of rich flavors that will make your waffles heavenly.
Step 3: Combine Mixtures
Gradually pour the wet ingredients into the dry mixture, using a spatula to gently fold them together. Mix until just combined—aim for a thick but pourable batter with a few lumps to ensure your Halloween Witch Hat Waffles remain fluffy. Avoid overmixing to maintain the perfect texture!
Step 4: Preheat the Waffle Maker
While your batter rests, preheat your waffle maker according to the manufacturer’s instructions. Aim for a medium to high setting to achieve a crispy exterior without compromising the light, fluffy interior. A properly heated waffle maker is key to making those bewitched waffle treats truly enchanting!
Step 5: Cook Waffles
Once your waffle maker is ready, pour an appropriate amount of batter into the center, using approximately 1/2 to 3/4 cup depending on your machine’s capacity. Close the lid and cook for about 3-5 minutes, or until the waffles are puffed up and golden brown. A crispy exterior promises the ultimate satisfaction in each bite.
Step 6: Decorate
After briefly letting the waffles cool, use 1 cup of whipped cream to create the brim of the witch’s hat, keeping it generous for a delightful effect. Drizzle 1/4 cup of chocolate sauce over the top, and adorn with 1/2 cup of colorful sprinkles and 1 cup of fresh berries for a fun and festive presentation. Your Halloween Witch Hat Waffles are now ready to cast a spell on everyone at your breakfast table!

Expert Tips for Halloween Witch Hat Waffles
-
Mix Wisely: Avoid overmixing the batter. Stir until just combined for light and fluffy Halloween Witch Hat Waffles.
-
Preheat Properly: Make sure your waffle maker is fully preheated for a crispy exterior and fluffy interior that’ll enchant everyone.
-
Storage Savvy: Store any leftover waffles in an airtight container for up to 5 days, or freeze for up to 3 months. Reheat in a toaster for the best texture.
-
Customize Ahead: For a quick Halloween morning, prepare the waffle batter and toppings in advance. This helps you enjoy the festive fun without the stress!
-
Creative Toppings: Encourage family involvement by setting up a toppings bar with whipped cream, chocolate sauce, and colorful sprinkles for a personalized touch.
How to Store and Freeze Halloween Witch Hat Waffles
- Fridge: Store leftover waffles in an airtight container for up to 5 days. Reheat in a toaster or microwave for a quick treat that retains their delightful texture.
- Freezer: For longer storage, freeze waffles individually wrapped in plastic wrap and then placed in a freezer-safe bag for up to 3 months. This preserves their flavors for a future spooktacular breakfast.
- Reheating: Simply pop frozen waffles in the toaster or heat them in the microwave for a minute or two. The toaster is preferred for crispy goodness!
- Make-Ahead: If you’re planning a Halloween breakfast, prepare the batter up to 24 hours in advance and refrigerate it, making morning prep a breeze.
Halloween Witch Hat Waffles Variations
Feel free to explore and personalize your Witch Hat Waffles to suit your dietary needs and taste preferences!
- Gluten-Free: Use a gluten-free flour blend instead of all-purpose flour to make these waffles suitable for gluten-sensitive eaters.
- Dairy-Free: Swap regular milk with almond, oat, or coconut milk, and replace butter with vegetable oil for a delightful dairy-free option.
- Pumpkin Spice: Fold in pumpkin puree and warm spices like cinnamon and nutmeg for a cozy seasonal twist that’ll warm your heart.
- Fruity Surprise: Mix in mashed bananas or fresh berries into the batter for added flavor and a deliciously fruity note to your waffles.
- Savory Option: Add cooked bacon or shredded cheese into the batter for a surprising savory twist that will delight breakfast enthusiasts.
- Halloween Colors: Use natural food coloring to tint the batter in festive orange and purple hues, bringing even more fun to your Halloween breakfast.
- Chocolate Chip Delight: Stir in mini chocolate chips for an extra chocolatey treat that adds texture with every bite.
- Nutty Crunch: Incorporate chopped nuts such as walnuts or pecans into the batter for extra crunch and a wholesome touch.
Each variation can turn your Halloween Witch Hat Waffles into a delightful surprise! If you want to try adding an extra kick, consider drizzling your waffles with homemade maple syrup or a dollop of coconut whipped cream for a tropical twist. Whatever you choose, let your creativity shine in the kitchen!
Make Ahead Options
These Halloween Witch Hat Waffles are perfect for meal prep enthusiasts looking to save time on a busy Halloween morning! You can prepare the waffle batter up to 24 hours in advance by mixing the dry and wet ingredients separately and refrigerating them until ready to cook. Additionally, decorate your waffles with whipped cream, chocolate sauce, and toppings like sprinkles and berries right before serving to ensure they look festive and appetizing. When you’re ready to enjoy, simply warm your waffle maker and cook the batter as per the instructions; they’ll be just as delightful and fresh as if made on the spot!
What to Serve with Halloween Witch Hat Waffles
Elevate your Halloween breakfast experience with delightful pairings that enhance both flavor and festivity.
- Crispy Bacon: The salty crunch of bacon perfectly contrasts the sweet, chocolatey waffles, balancing flavors beautifully.
- Fresh Fruit Medley: A colorful array of sliced strawberries, bananas, and blueberries adds a refreshing touch and natural sweetness. Serve it on the side for a vibrant addition.
- Maple Syrup Drizzle: A warm, rich drizzle of maple syrup enhances the chocolate flavor while adding a comforting sweetness to each bite.
- Pumpkin Spice Latte: Embrace the season with a cozy drink that complements the playful theme of your breakfast. The warm spices will have everyone feeling festive.
- Vanilla Yogurt Parfait: Layer vanilla yogurt with granola and fruit for a creamy, crunchy counterpoint to the waffles, making it a delightful and nutritious side.
- Hot Chocolate: Tempt your taste buds with a rich, velvety hot chocolate on the side. Add marshmallows for an extra sweet treat!
- Whipped Cream: Serve additional whipped cream for guests who wish to enhance their waffles even further; it’s a fun and indulgent touch.
- Chocolate Chip Cookies: For a sweet ending, a couple of chocolate chip cookies can add a comforting twist to your breakfast spread.
- Halloween-themed Smoothies: Blend up a fun green or orange smoothie to match the festive spirit—spooky yet delicious!
With these pairings, your Halloween breakfast will be nothing short of magical!
Halloween Witch Hat Waffles Recipe FAQs
How do I select the perfect ingredients for my Witch Hat Waffles?
Absolutely! For the best results, choose all-purpose flour that is fresh and free of lumps for a smooth batter. When selecting cocoa powder, opt for unsweetened varieties for optimal flavor. If going for gluten-free, make sure your gluten-free flour blend is well-reviewed for baking. The freshness of your eggs and milk also contributes greatly to the texture and flavor.
How should I store leftover Witch Hat Waffles?
After enjoying your delightful Halloween Witch Hat Waffles, store any leftovers in an airtight container in the refrigerator for up to 5 days. This keeps them fresh and ready for a quick breakfast. Reheat in a toaster for that crispy texture—it’s a fantastic way to enjoy them again!
Can I freeze my leftover Witch Hat Waffles?
Yes, you can freeze your waffles! Wrap them individually in plastic wrap and then place them in a freezer-safe bag. They can be frozen for up to 3 months. To reheat, simply pop them in the toaster or microwave for a minute or two—using the toaster gives you the best crispiness, just like when they were freshly made!
What should I do if my waffle batter is too thick?
If your batter is too thick, don’t worry! Just add a little more milk, about 1 tablespoon at a time, until it reaches a pourable consistency. Remember, you want the batter to be thick but not so stiff that it can’t flow into the waffle maker. Also, make sure to stir gently, as overmixing can lead to dense waffles.
Are there any dietary considerations for the Witch Hat Waffles?
Very! These waffles can be easily adapted for gluten-free and dairy-free diets. Simply substitute the all-purpose flour with a gluten-free blend, and use a plant-based milk such as almond or oat milk instead of regular milk. Additionally, you can replace butter with coconut oil for a dairy-free alternative. Always check the labels for allergies, especially with toppings like whipped cream and chocolate sauce!
Halloween Witch Hat Waffles: A Spooky Sweet Breakfast Delight
Ingredients
Equipment
Method
- In a large mixing bowl, whisk together the dry ingredients; flour, cocoa powder, baking powder, and sugar until smooth.
- In another bowl, beat the eggs and whisk in milk, melted butter, and vanilla until smooth.
- Gradually fold the wet ingredients into the dry mixture until just combined, aiming for a thick batter.
- Preheat the waffle maker according to the instructions for medium to high setting.
- Pour batter into the center of the waffle maker (1/2 to 3/4 cup) and cook for 3-5 minutes until golden brown.
- After cooling, use whipped cream to create the brim, drizzle chocolate sauce, and top with sprinkles and berries.