

On a sun-drenched afternoon, with the air buzzing with laughter, it hit me: there’s nothing quite like a cool, refreshing treat to complement summer’s sweetness. That’s when I decided to whip up these irresistible Cherry Creamsicles. This delightful recipe celebrates vibrant cherry flavors and creamy textures without the guilt of refined sugar, making it a wholesome choice for family gatherings or solo indulgence. Not only are these Cherry Creamsicles a breeze to prepare, but they’re also a crowd-pleaser, perfect for both kids and adults. With a coconut cream variation available, there’s a delicious option for everyone! So, are you ready to dive into making your own frosty delights? Let’s keep the good vibes rolling!

Why are Cherry Creamsicles a must-try?
Refreshing, Guilt-Free Treat: These popsicles blend the tartness of cherries with creamy goodness, creating a dessert that satisfies without the added sugars.
Easy to Make: Just a few simple steps turn fresh ingredients into a delightful treat that the whole family will adore—perfect for summer afternoons!
Dairy-Free Variation Available: With a coconut cream option, these Cherry Creamsicles cater to diverse dietary preferences while retaining the luscious taste.
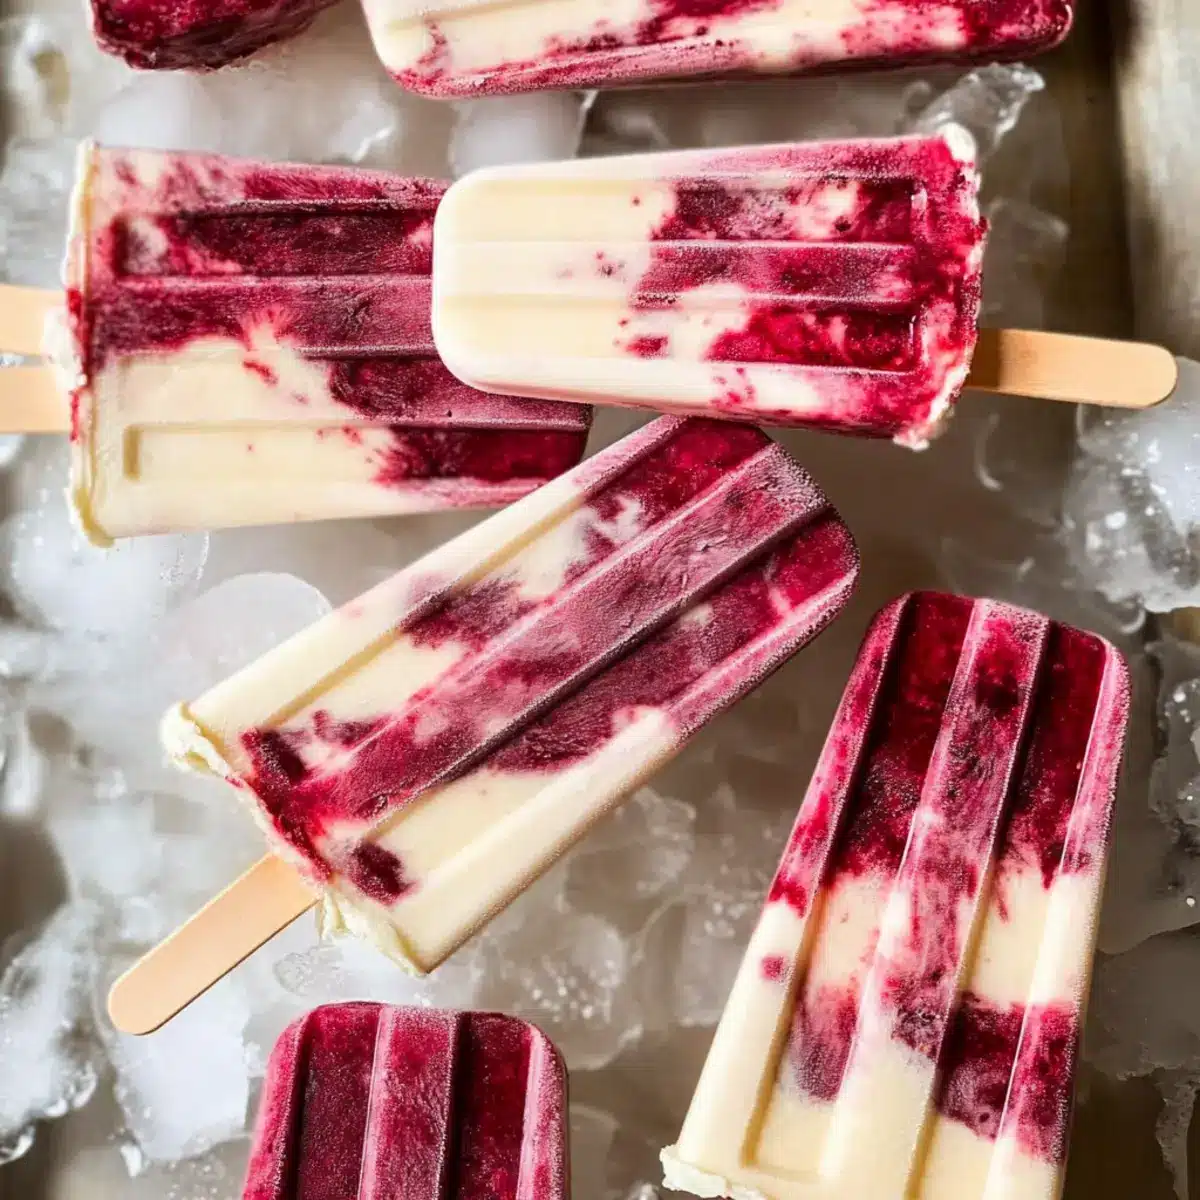
Visually Stunning: The marbled effect of cherry and cream not only looks gorgeous but also tempts your taste buds with every bite.
Healthy Indulgence: Each popsicle is packed with nutrition while balancing flavor, making it a smart choice over store-bought sweets.
For tips on serving and storage, consider checking out our storage tips to keep your popsicles fresh and delicious!
Cherry Creamsicle Ingredients
• Dive into the delightful world of Cherry Creamsicles with these all-natural ingredients!
For the Cherry Base
- 10 oz. fresh or frozen organic cherries – Provides natural fruity sweetness and color. Use pitted cherries for easier blending.
- 1/4 cup coconut water or filtered water – Adds hydration and helps blend cherries. Substitute with more or less based on desired consistency.
For the Cream Mixture
- 1 cup raw cream or organic whipping cream – Adds creaminess and richness. For a dairy-free option, substitute with coconut cream from full-fat coconut milk.
- 1 teaspoon organic vanilla extract – Enhances flavor and aroma. No substitution needed but can add more for a stronger vanilla taste.
- 3-4 tablespoons raw light-colored honey – Acts as the sweetener; preferably local for better flavor. Adjust sweetness to taste or replace it with maple syrup for a vegan option.
These fresh ingredients make your Cherry Creamsicles not just delicious but also a healthy choice for your next dessert!
Step‑by‑Step Instructions for Cherry Creamsicles
Step 1: Chill the Mixing Bowl
Begin by chilling a large mixing bowl in the refrigerator for about 15 minutes. This ensures that your whipped cream will achieve the perfect fluffy texture as you prepare these Cherry Creamsicles. Make sure your mixing bowl is completely cold before you start, which will help in achieving those airy peaks.
Step 2: Prepare the Cherries
If using frozen organic cherries for your Cherry Creamsicles, ensure they are fully thawed. This can take about 30 minutes at room temperature, or you can speed up the process by running them under warm water for a few moments. Pitted cherries work best as they blend smoothly, ensuring a delightful consistency.
Step 3: Blend Cherry Mixture
In a blender, combine the thawed cherries with 1/4 cup of coconut water or filtered water. Blend on high speed for about 30 seconds or until the mixture is completely smooth and vibrant in color. Once blended, set this cherry puree aside; it will be layered beautifully with the whipped cream.
Step 4: Whip the Cream
Retrieve your chilled mixing bowl and add 1 cup of raw cream or organic whipping cream, along with 1 teaspoon of organic vanilla extract and 3-4 tablespoons of raw light-colored honey. Using a hand mixer or stand mixer, whip the mixture for about 1-1.5 minutes on medium-high speed until it reaches thick, fluffy peaks, resembling whipped frosting.
Step 5: Layer the Mixtures
Prepare your popsicle molds while the whipped cream stands ready. Start by adding a layer of the whipped cream, followed by a layer of the cherry mixture. Alternate between the two until the molds are filled, ensuring you create a beautiful marbled effect that will be visually stunning in your Cherry Creamsicles.
Step 6: Freeze
Once filled, cover the popsicle molds with their lids or wrap them tightly with plastic wrap. Place the molds in the freezer and allow them to freeze for at least 6-8 hours, or preferably overnight. This long freezing time is crucial for achieving that firm, creamy texture that makes these Cherry Creamsicles irresistible.
Step 7: Release the Popsicles
When you’re ready to enjoy your Cherry Creamsicles, remove them from the freezer. To easily release the popsicles, run the mold briefly under warm water for about 10-15 seconds. This gentle heat will help the popsicles slide out easily, allowing you to savor your homemade treat effortlessly.

Expert Tips for Cherry Creamsicles
-
Chill Time Matters: Don’t skip chilling the mixing bowl. A cold bowl makes whipping cream easier and results in a fluffier texture for your Cherry Creamsicles.
-
Layering Technique: When layering the cherry and cream mixtures, take your time. A well-layered marbled effect not only looks stunning but also ensures even flavor distribution.
-
Cherry Quality: Always opt for fresh or high-quality frozen organic cherries. They provide better flavor and are essential for that delicious burst of cherry taste.
-
Sweetness Adjustments: Taste your cherry mixture before filling the molds. Adjust the honey or syrup according to your sweetness preference for the perfect Cherry Creamsicles.
-
Mold Choice: If you have both plastic and stainless steel molds, choose steel for easier release. They tend to slide the popsicles out effortlessly compared to plastic.
Make Ahead Options
These Cherry Creamsicles are perfect for busy home cooks looking to save time in the kitchen! You can prepare the cherry mixture and whipped cream up to 24 hours in advance. Simply blend the cherries and coconut water, then store this mixture in an airtight container in the refrigerator. Next, whip your cream and keep it chilled until you’re ready to assemble. When you’re ready to serve, layer the cherry mixture and whipped cream in popsicle molds, freeze for at least 6-8 hours, and then enjoy these delightful treats. This prep-ahead method ensures that your Cherry Creamsicles are just as delicious without sacrificing quality, making your dessert planning a breeze!
How to Store and Freeze Cherry Creamsicles
Fridge: Store any leftover Cherry Creamsicles in an airtight container in the refrigerator for up to 2 days if not fully frozen. This keeps them fresh and ready for a quick treat.
Freezer: For best results, keep the Cherry Creamsicles in the freezer for up to 2 weeks to maintain their flavor and texture. Ensure they are sealed tightly to prevent freezer burn.
Reheating: There’s no need to reheat these popsicles! Just run the mold briefly under warm water for about 10-15 seconds to release them easily when you’re ready to enjoy.
Serving Suggestions: Prepare a batch for summer gatherings or family movie nights and enjoy at your own pace!
What to Serve with Cherry Creamsicles
Imagine a sun-soaked gathering, where vibrant flavors dance on your palate, creating the perfect complement to these delightful frozen treats.
- Fresh Berry Salad: A medley of mixed berries brightens the experience with added freshness and a touch of tartness, pairing beautifully with the creamy sweetness of the creamsicles.
- Crispy Coconut Chips: The crunchy texture of toasted coconut chips offers a delightful contrast to the smooth creamsicles, enhancing each bite with an unexpected twist.
- Minted Limeade: This refreshing drink, with a splash of tangy lime and a hint of mint, cuts through the sweetness of the creamsicles, providing a palate-cleansing balance.
- Chocolate-Covered Almonds: The rich flavor of chocolate complements the fruity cherry notes, delivering a delightful crunch that elevates the dessert experience.
- Grilled Peaches: Juicy, caramelized peaches drizzled with honey bring a warm, sweet note that contrasts wonderfully with the chilled creamsicles, creating a harmonious summer dessert.
- Vanilla Yogurt Parfait: Layer creamy yogurt with granola and berries for a wholesome treat that echoes the flavors of the creamsicles while adding a nutritious element to your meal.
Cherry Creamsicles Variations & Substitutions
Feel free to unleash your creativity with these delightful twists that’ll make your Cherry Creamsicles even more exciting!
-
Stone Fruit Swap: Replace cherries with peaches or plums for a sweet summer twist. Each bite offers a new delicious adventure!
-
Coconut Cream Richness: Use full-fat coconut milk instead of coconut water for an extra creamy texture, giving your popsicles a velvety finish that’s hard to resist.
-
Citrus Zest: A tablespoon of lime juice adds a refreshing tartness that brightens the flavor. Imagine that perfect balance of sweetness and tang with every lick!
-
Sweetener Switch: Substitute raw honey with agave syrup or maple syrup for a vegan-friendly option that keeps the popsicles deliciously sweet.
-
Infused Flavors: Stir in a teaspoon of almond extract to bring an aromatic nuttiness to your Cherry Creamsicles. The subtle flavor profile will take you on a whole new taste journey.
-
Chocolate Drizzle: For an indulgent twist, drizzle melted dark chocolate over the frozen popsicles just before serving. Nothing pairs better with sweet cherries than rich chocolate!
-
Add Some Heat: For a spicy kick, sprinkle in a hint of cayenne or chili powder to the cherry mixture. The heat perfectly contrasts the refreshing sweetness, making it a unique treat.
-
Nutty Crunch: Fold in some crushed almonds or walnuts into the whipped cream for added texture. This will add a delightful crunch that surprises with every bite!
For even more fun ideas on enjoying these Cherry Creamsicles, check out our serving suggestions, which include pairing your tasty popsicles with fresh fruit or a light summer salad. Happy experimenting!

Cherry Creamsicles Recipe FAQs
How do I choose ripe cherries for my Cherry Creamsicles?
Absolutely! When selecting cherries, look for firm, plump fruits with a deep red color and a vibrant sheen. Avoid cherries with dark spots all over, which may indicate overripeness. If you’re using frozen cherries, make sure they are organic and pitted for a smoother blend.
What’s the best way to store Cherry Creamsicles?
Very! After making your Cherry Creamsicles, store them in an airtight container in the freezer for up to 2 weeks. This keeps them fresh and prevents freezer burn. If you need to store leftover popsicles that aren’t fully frozen, keep them in the fridge for up to 2 days for a quick treat.
Can I freeze Cherry Creamsicles for longer?
Absolutely! While they are best enjoyed within 2 weeks, you can freeze Cherry Creamsicles for up to 3 months. To do this, ensure they’re properly wrapped in plastic wrap or stored in a freezer-safe container. Just remember to let them sit at room temperature for a few minutes before serving if they have been stored for an extended time.
What should I do if my cream doesn’t whip properly for the Cherry Creamsicles?
Don’t worry; this can happen! First, ensure your mixing bowl is cold and that your cream is fresh. Start whipping at medium-high speed; if it doesn’t thicken within 1-2 minutes, you may need to chill both the bowl and the cream a bit more. Whipping cream should reach soft peaks that hold their shape, allowing for a fluffy texture in your popsicles.
Are Cherry Creamsicles safe for my allergies?
Very! If someone in your household has dairy allergies, the dairy-free coconut cream variation is a fantastic option. Additionally, always check the labels on your sweeteners like honey or maple syrup for any allergens. These Cherry Creamsicles are generally gluten-free and can accommodate many dietary needs, but be sure to adapt according to specific allergies.
Can I add other fruits to my Cherry Creamsicles?
Absolutely! You can get creative with fruits! Substitute cherries with other stone fruits like peaches or plums for a different twist on flavor. Just make sure to maintain a balance between the fruit and cream so your Cherry Creamsicles stay creamy and delicious!
Cherry Creamsicles: Guilt-Free, Creamy Summer Bliss
Ingredients
Equipment
Method
- Chill a large mixing bowl in the refrigerator for about 15 minutes.
- If using frozen cherries, ensure they are fully thawed before blending.
- In a blender, combine thawed cherries and coconut water; blend until smooth.
- Retrieve the chilled bowl and whip cream, vanilla, and honey until fluffy peaks form.
- Layer whipped cream and cherry mixture in popsicle molds until filled.
- Cover molds and freeze for at least 6-8 hours or overnight.
- To release, run molds under warm water briefly before enjoying.