

The sweet aroma of cinnamon and vanilla wafting through my kitchen always takes me back to family gatherings where desserts stole the spotlight. Today, I’m excited to share a fun twist on a beloved Italian classic: Classic Cannoli Squares! These treats capture the rich, creamy filling of traditional cannoli but in a delightful, easy-to-manage square format. Not only are they a crowd-pleaser ready in no time, but they also make for an impressive homemade dessert that’s perfect for any occasion. Whether you’re hosting a dinner party or simply treating yourself, these Cannoli Squares are sure to bring a smile to your face. Curious about how to create this scrumptious delight? Let’s dive into the recipe!
Why Will You Love These Cannoli Squares?
Simplicity Guaranteed: Making these Cannoli Squares is a breeze, requiring just a few straightforward steps and minimal ingredients. No complicated techniques here!
Decadent Flavor: The creamy ricotta filling, enhanced by warm cinnamon and rich chocolate chips, provides an indulgent taste that mirrors traditional cannoli.
Versatile Serving Options: Whether you serve them at a family gathering or as a weekday treat, these squares adapt effortlessly to any occasion. Add chopped pistachios for an elegant touch!
Timely Treat: Baked in just 30-35 minutes, they’re the perfect last-minute dessert to impress guests or satisfy your own sweet cravings.
Family-Friendly Fun: Kids and adults alike will love these easy-to-eat squares, making them a surefire hit for gatherings or cozy evenings at home. Try these variations for an exciting twist!
Cannoli Squares Ingredients
For the Filling
• Ricotta Cheese – Provides creaminess and richness in the filling. Note: Use whole milk for creaminess or low-fat for a lighter option.
• Powdered Sugar – Adds sweetness to the filling. Substitution: Coconut sugar can be used for a healthier alternative.
• Vanilla Extract – Enhances the flavor profile beautifully.
• Cinnamon – Adds warmth and depth to the filling, making these Cannoli Squares irresistible.
• Mini Chocolate Chips – Brings sweetness and texture to the filling; dark chocolate chips enhance richness.
For the Crust
• Pre-made Pie Crusts (or Homemade) – Forms the outer layers of the dessert. For homemade, ensure it fits a 9×9-inch baking dish.
• Egg (beaten) – Used for an egg wash to give a golden finish on the top crust.
• Sugar (for sprinkling) – Adds a sweet crunch to the top crust.
Optional Garnishes
• Chopped Pistachios – For an elegant finish and a delightful crunch.
• Maraschino Cherries – Adds a pop of color and a sweet note.
• Extra Chocolate Chips – For those who just can’t get enough chocolate!
Step‑by‑Step Instructions for Cannoli Squares
Step 1: Prepare the Filling
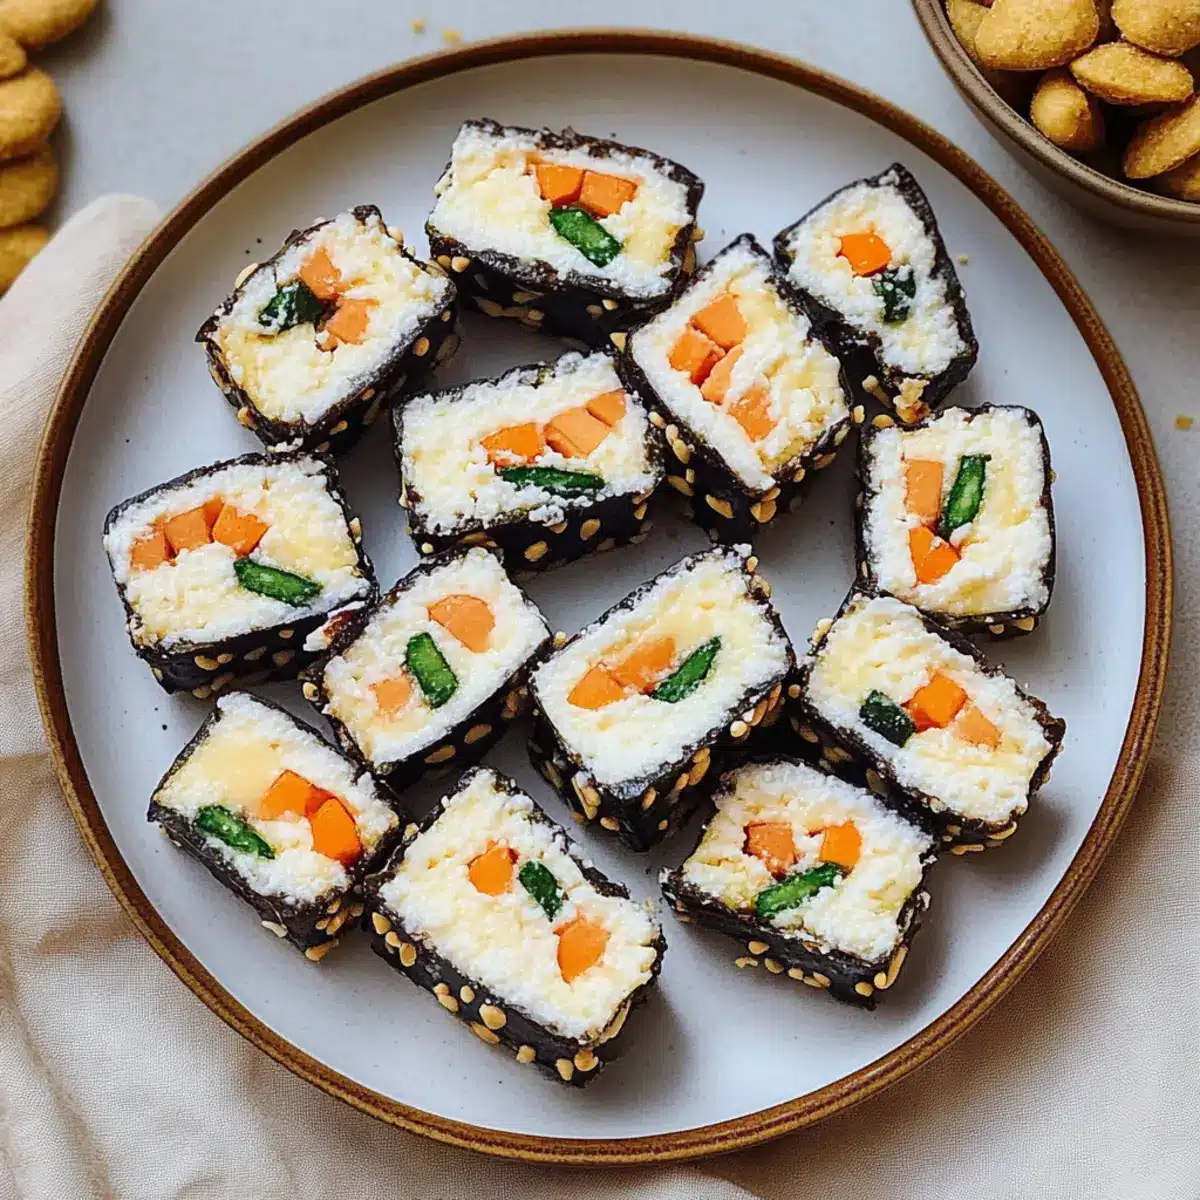
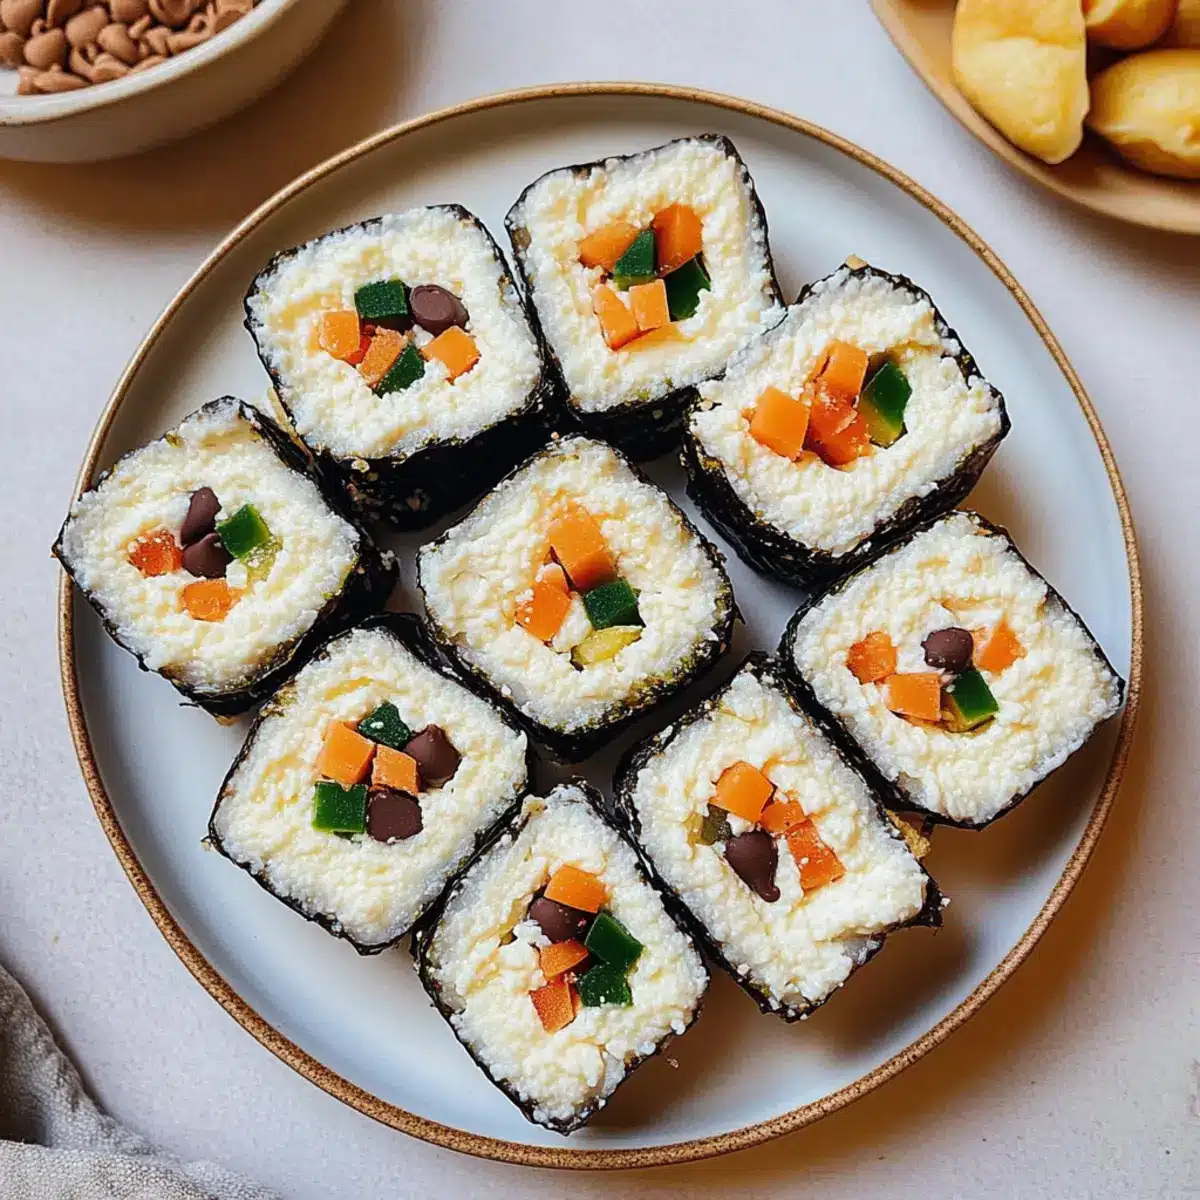
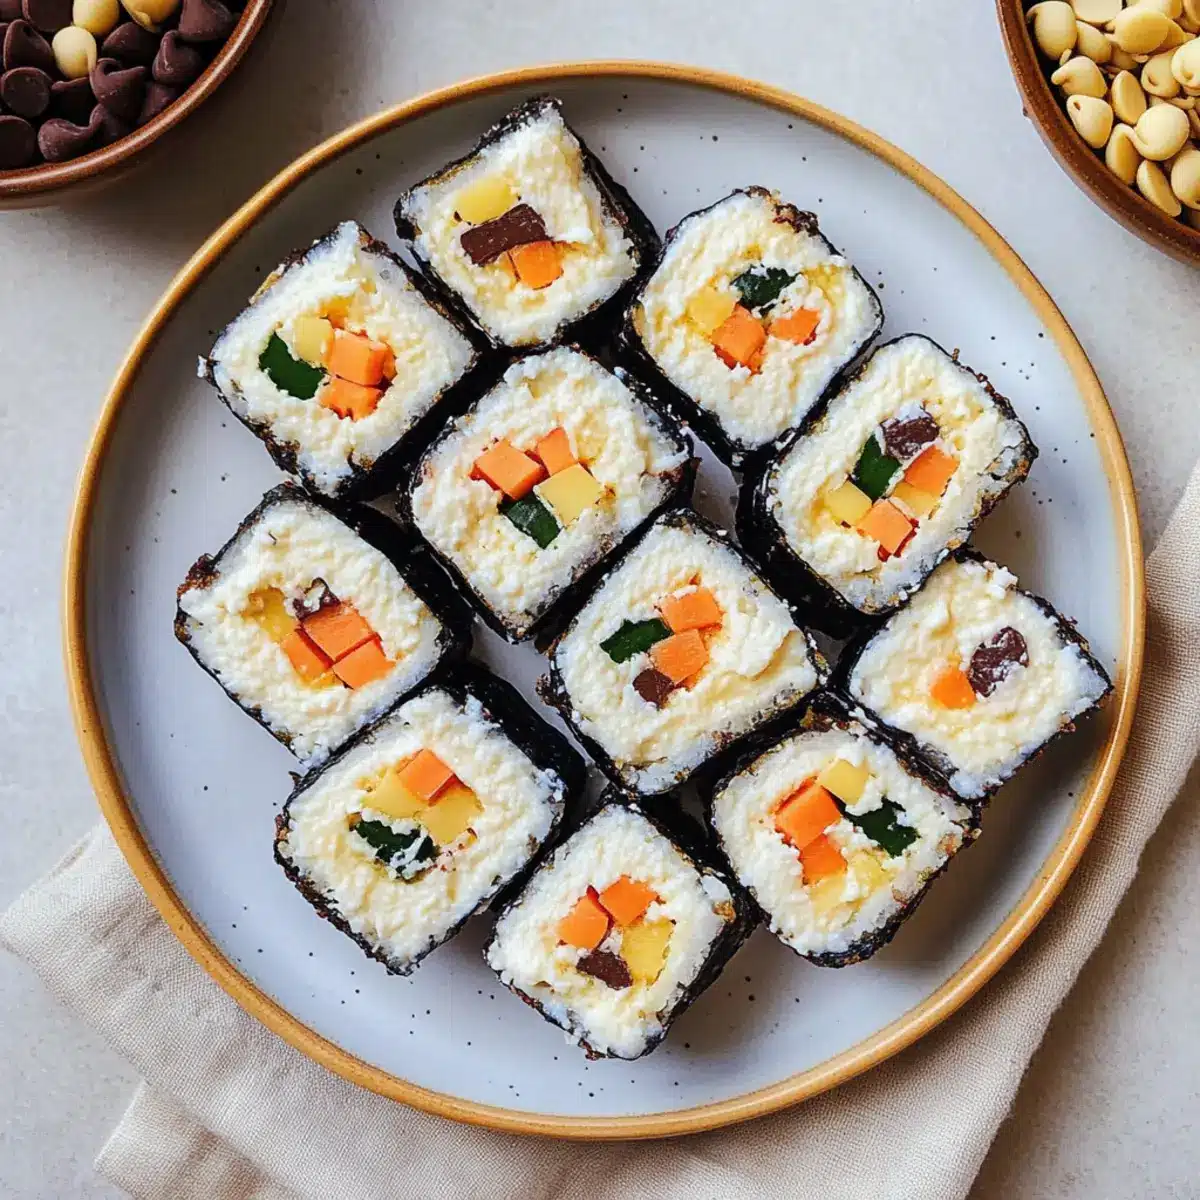
In a mixing bowl, combine 15 ounces of ricotta cheese, 1 cup of powdered sugar, 1 teaspoon of vanilla extract, 1 teaspoon of cinnamon, and ½ cup of mini chocolate chips. Use a spatula to mix until the ingredients are well blended and smooth, ensuring there are no lumps. This delightful filling is the heart of your Cannoli Squares, so make sure it’s creamy and inviting!
Step 2: Preheat Oven
Preheat your oven to 375°F (190°C) to get it ready for baking. This temperature will help achieve a beautifully golden-brown crust while ensuring the filling warms up perfectly. A preheated oven is key to maintaining consistent baking, so don’t skip this step!
Step 3: Roll Out Crust
Take your pre-made pie crusts (two are required for this recipe) and unroll them. Press the first crust into a greased 9×9-inch baking dish, making sure it covers the bottom evenly. Ensure the edges are slightly raised to hold the filling. The crust will be crisp and flaky, creating the perfect base for your Cannoli Squares.
Step 4: Add the Filling
Spread the ricotta mixture evenly over the base crust using a spatula. Smooth it out gently to cover the entire crust up to the edges. This luscious filling is key to capturing the traditional flavors of Cannoli, so take your time to ensure an even layer for the best results.
Step 5: Seal Top Crust
Roll out the second pie crust and carefully place it over the filling, pinching the edges to seal completely. Brush the top with a beaten egg to achieve that golden finish while baking, then sprinkle sugar generously across the top for added sweetness and crunch. This step ensures your Cannoli Squares will have a beautiful, inviting appearance.
Step 6: Bake
Place the baking dish in the preheated oven and bake for 30-35 minutes. Keep an eye on the squares, looking for a golden-brown surface as an indicator of doneness. The aroma of baked pastry will fill your kitchen, promising the delightful taste of your Cannoli Squares to come.
Step 7: Cool and Serve
Once baked, remove the dish from the oven and allow the Cannoli Squares to cool for at least 30 minutes. This cooling period helps set the filling and makes slicing much easier. Once cooled, cut into squares and serve, optionally garnishing with chopped pistachios or maraschino cherries for that extra touch!

Cannoli Squares: Fun Variations Await!
Feel free to get creative with these Cannoli Squares and elevate your dessert experience with delightful twists that cater to your taste!
-
Mascarpone Swap: For a richer filling, replace ricotta with mascarpone cheese. It adds a luxurious creaminess that will leave everyone wanting more.
-
Cottage Cheese Lightness: Use blended cottage cheese instead of ricotta for a lighter dessert. It’s a healthy alternative that still maintains a creamy texture.
-
Nutty Delight: Add a handful of chopped nuts—like walnuts or hazelnuts—to the filling for an extra crunch. This brings delightful texture and a nutty flavor that complements the creaminess.
-
Flavor Zing: Introduce lemon zest or a splash of almond extract to the ricotta mixture for a refreshing twist. It’ll brighten the flavors, making each bite pop with freshness.
-
Turn Up the Heat: If you’re a fan of spice, consider mixing in a pinch of cayenne pepper or cinnamon to the filling. It adds an unexpected kick that tantalizes the taste buds.
-
Drizzled Decadence: Top the baked squares with a drizzle of chocolate ganache or caramel sauce for an indulgent finish. It not only enhances sweetness but also looks stunning!
-
Gluten-Free Option: Replace the pie crust with gluten-free alternatives, like almond flour crusts, to cater to those avoiding gluten without sacrificing flavor.
-
Fruity Twist: Layer in some fresh berries like raspberries or strawberries between the filling and crust for a fruity contrast. It’s a beautiful way to add freshness and sweetness to your Cannoli Squares!
Feel free to explore these garnishing ideas to give your Cannoli Squares a unique flair, impressing your guests and adding that special touch to your home-baked delights!
What to Serve with Classic Cannoli Squares
Elevate your dessert experience with delightful pairings that complement these irresistibly creamy Cannoli Squares.
- Fresh Berries: Bright strawberries or juicy raspberries add a refreshing contrast to the rich cannoli filling.
- Espresso: A strong cup of espresso brings out the sweetness, making for a delightful Italian coffee break.
- Whipped Cream: Light and airy, whipped cream balances the richness of the cannoli while adding a luxurious touch.
- Chocolate Sauce: Drizzle warm chocolate sauce over the squares for an indulgent, extra layer of sweetness.
- Gelato: Creamy gelato in flavors like pistachio or vanilla offers a heavenly, cool companion to your dessert.
- Pistachio Brittle: Crushed pistachios or brittle on top enhance texture and nutty flavor, complementing the cannoli beautifully.
- Port Wine: A glass of sweet port wine adds a touch of sophistication, making your dessert feel even more special.
- Cinnamon Sugar Topping: Sprinkle cinnamon sugar on top for a warm, spicy contrast to the sweet filling and flaky crust.
- Honey Drizzle: A light drizzle of honey over the squares provides a floral sweetness that pairs wonderfully with the creamy filling.
Make Ahead Options
These Classic Cannoli Squares are a lifesaver for busy home cooks! You can prepare the ricotta filling and store it in an airtight container in the refrigerator up to 3 days in advance. Additionally, the crusts can be prepped and layered in the baking dish for up to 24 hours before baking, preventing unnecessary last-minute stress. To maintain the fresh taste, wrap the unbaked squares tightly in plastic wrap to avoid drying out. When you’re ready to enjoy, simply bake the layered filling and crust together straight from the fridge—no thawing necessary! You’ll achieve those delightful, restaurant-quality results with minimal effort and maximum convenience.
How to Store and Freeze Cannoli Squares
Fridge: Store Cannoli Squares in an airtight container in the refrigerator for up to 3 days to maintain their freshness and texture.
Freezer: For longer storage, wrap individually or place in a single layer in a freezer-safe container for up to 2 months. Thaw in the fridge before serving.
Reheating: Reheat squares in the microwave for 10-15 seconds, or enjoy them cold for a refreshing treat. Just ensure they are well-wrapped to prevent freezer burn!
Make Ahead: You can prepare the squares a day in advance and chill in the fridge overnight before serving, making hosting a breeze.
Expert Tips for Cannoli Squares
-
Drain Ricotta: Start with a fine-mesh sieve to remove excess moisture from ricotta before mixing for a thicker, creamier filling in your Cannoli Squares.
-
Watch the Baking Time: Keep an eye on the squares during baking to avoid over-browning. If needed, cover with foil to maintain color without burning.
-
Cool Before Slicing: Allow the Cannoli Squares to cool for at least 30 minutes before cutting into them to achieve clean, neat edges for a beautiful presentation.
-
Flavor Variations: Experiment by adding lemon zest or almond extract to the filling for unique taste twists that wow your guests.
-
Garnish for Elegance: For that impressive touch, sprinkle chopped pistachios or place a maraschino cherry on top before serving, adding both flavor and visual appeal.
Cannoli Squares Recipe FAQs
What type of ricotta cheese should I use for Cannoli Squares?
Absolutely, I recommend using whole milk ricotta for a rich and creamy filling. If you prefer a lighter option, low-fat ricotta works fine too. Just be sure to drain it in a fine-mesh sieve to remove any excess moisture; this helps achieve the perfect texture!
How should I store leftover Cannoli Squares?
Great question! To keep your Cannoli Squares fresh, store them in an airtight container in the refrigerator for up to 3 days. Placing parchment paper between layers can prevent them from sticking together.
Can I freeze Cannoli Squares?
Yes, you can! To freeze Cannoli Squares, wrap them individually in plastic wrap or store them in a single layer in a freezer-safe container. They can be frozen for up to 2 months. When you’re ready to enjoy, simply thaw them in the fridge overnight!
What if my filling seems too wet?
No problem! If your filling is too wet, it could be due to not draining the ricotta properly. For a thicker filling, use a fine-mesh sieve to drain it for at least 30 minutes before mixing. You can even press it gently to remove any excess moisture, ensuring a deliciously creamy consistency.
Are Cannoli Squares suitable for people with dietary restrictions?
Absolutely! You can make these squares gluten-free by using gluten-free pie crusts. Additionally, for vegan options, substitute the ricotta with a blended firm tofu or a vegan cream cheese, and use a plant-based egg wash alternative. Always check for allergies when selecting your ingredients.
Cannoli Squares: Easy Italian Dessert for Sweet Moments
Ingredients
Equipment
Method
- In a mixing bowl, combine ricotta cheese, powdered sugar, vanilla extract, cinnamon, and mini chocolate chips. Mix until smooth.
- Preheat your oven to 375°F (190°C).
- Unroll the first pie crust into a greased 9x9-inch baking dish, ensuring it covers the bottom evenly.
- Spread the ricotta mixture evenly over the base crust.
- Roll out the second pie crust and place it over the filling. Pinch the edges to seal.
- Brush the top with beaten egg and sprinkle sugar over it.
- Bake for 30-35 minutes until golden brown.
- Let cool for at least 30 minutes and then slice into squares.