

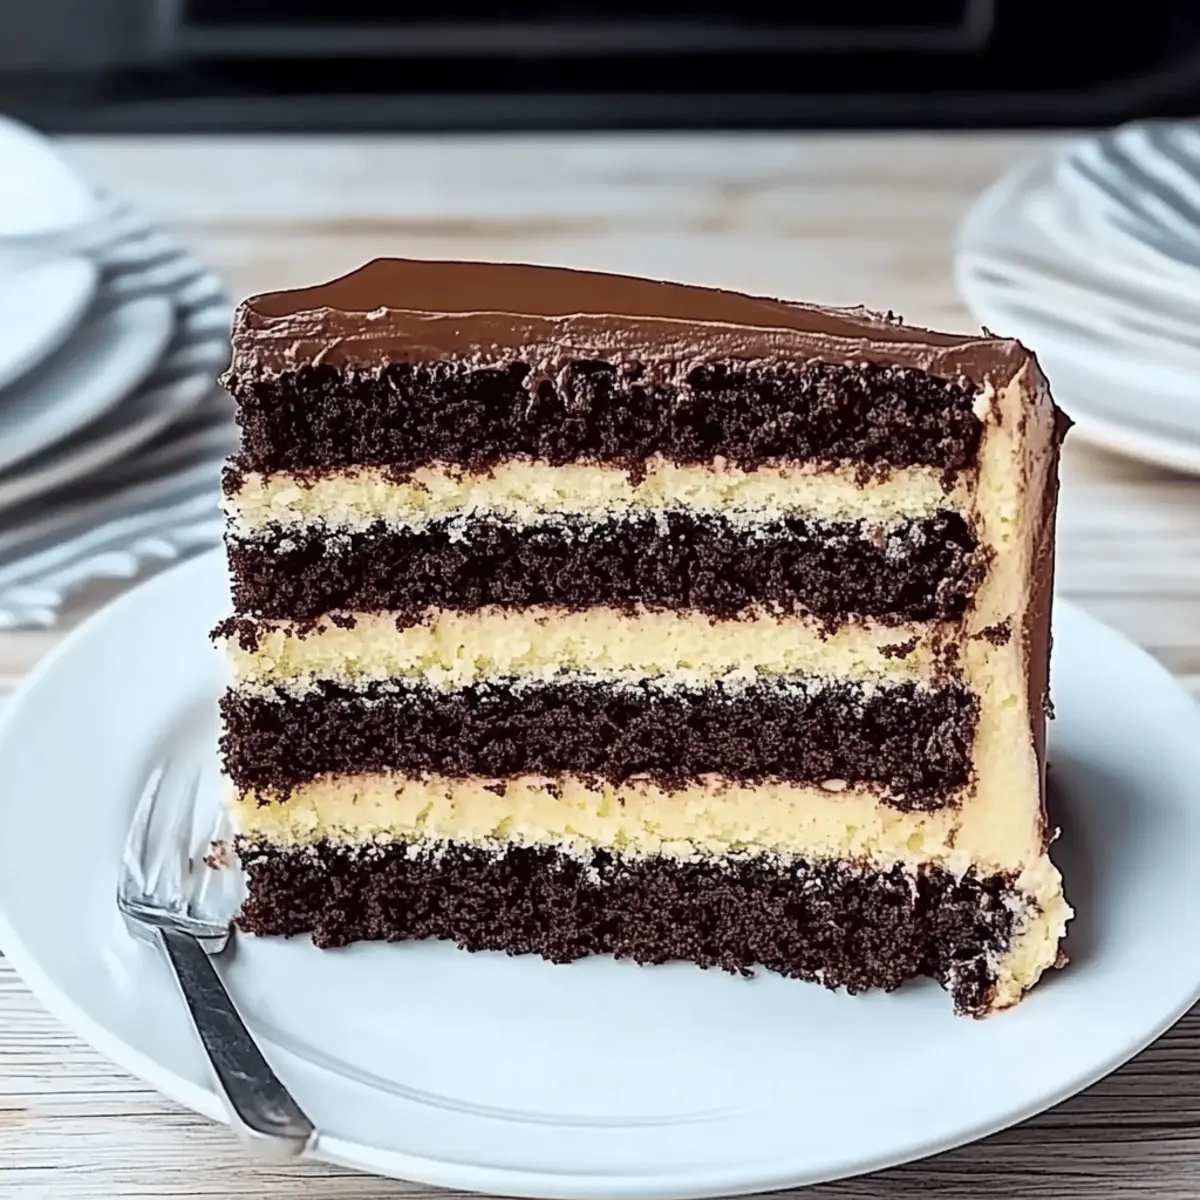
As the rich scent of chocolate mingles with the sweet aroma of vanilla, I can’t help but smile at the memories this Decadent Choco-nilla Layer Cake brings to life. This colorful masterpiece combines two beloved flavors into warm, inviting layers that are perfect for any celebration—or simply because! Not only is this cake a showstopper that impresses friends and family, but it’s surprisingly easy to whip up, making it suitable for both novice bakers and seasoned pros. Each slice delivers a comforting bite that feels like a big hug, giving you the perfect excuse to gather around the table. Are you ready to dive into this delightful baking adventure?
Why is Choco-nilla Cake a Must-Bake?
Irresistible Flavor: The blend of rich chocolate and light vanilla creates a flavor profile that captivates everyone.
Showstopping Appearance: This cake’s stunning layers not only taste fantastic but also make it a centerpiece for any gathering.
Quick and Easy: Perfect for busy bakers—this recipe comes together with simple steps, allowing you to impress with minimal effort.
Endless Customization: Looking for variety? Consider adding unique twists, like nuts or fruit purees, to make it your own!
Crowd Pleaser: Whether it’s a family celebration or a friendly get-together, this Choco-nilla cake will leave everyone asking for seconds.
For more delightful recipes, check out these Soft Chewy Chocolate cookies that are sure to please any sweet tooth!
Choco-nilla Cake Ingredients
For the Vanilla Cake
- Eggs – Provide structure and moisture for a tender crumb.
- Sugar – Adds sweetness and aids in browning for a beautiful finish.
- Vegetable Oil – Keeps the cake moist; can substitute with melted butter.
- Salt – Enhances overall flavor.
- Baking Powder – Critical leavening agent for rise.
- Vanilla Extract – Infuses rich flavor; pure vanilla is recommended.
- All-Purpose Flour – Main structure ingredient; can substitute with cake flour for a lighter texture.
- Heavy Cream – Adds moisture; buttermilk can be substituted.
For the Chocolate Cake
- Cocoa Powder – Provides deep chocolate flavor.
- Eggs – Assist with structure, just like in the vanilla cake.
- Vegetable Oil – Ensures the cake stays moist.
- Sugar – Sweetens the batter.
- Salt – Balances sweetness.
- All-Purpose Flour – Main building block; same substitution options apply.
- Baking Powder & Baking Soda – Critical leavening agents for a proper rise.
- Water – Adds moisture for a velvety batter.
For the Filling
- Butter – Creates a smooth, rich filling; unsalted is best.
- Confectioners’ Sugar – Sweetens and thickens the filling.
- Milk – Adjusts the filling consistency for desired texture.
- Vanilla Extract – Enhances the filling flavor.
For the Icing
- Chocolate Chips – For rich chocolate flavor; semi-sweet recommended.
- Heavy Cream – Facilitates a smooth texture for the icing.
Step‑by‑Step Instructions for Choco Nilla Cake
Step 1: Preheat Your Oven
Begin by preheating your oven to 350°F (175°C). While the oven warms up, grease and line two 9″ x 2″ round cake pans with parchment paper for easy release later. Make sure the pans are well-prepared, as this will help achieve a beautiful finish for each layer of your Choco Nilla Cake.
Step 2: Prepare the Vanilla Cake Batter
In a large mixing bowl, beat together the eggs and sugar until the mixture is fluffy and pale, about 4-5 minutes. Slowly add in the vegetable oil, baking powder, salt, and vanilla extract, mixing until combined. Gradually incorporate the all-purpose flour and heavy cream alternating between them until you have a smooth batter. Pour this luscious vanilla batter into one of the prepared pans.
Step 3: Bake the Vanilla Cake
Place the vanilla cake pan in the preheated oven and bake for 30-35 minutes. Keep an eye on the cake, and you’ll know it’s ready when it turns golden brown and a toothpick inserted in the center comes out clean. Once done, remove it from the oven and let it cool in the pan for about 10 minutes before transferring it to a wire rack.
Step 4: Make the Chocolate Cake Batter
In another large bowl, whisk together the dry ingredients for the chocolate cake, which includes the all-purpose flour, cocoa powder, baking powder, baking soda, and salt. Add the eggs and vegetable oil, then gradually mix in the water until the batter is velvety and well-combined. Pour the rich chocolate mixture into the second prepared pan, ensuring an even layer.
Step 5: Bake the Chocolate Cake
Place the chocolate cake in the oven and bake for 35 minutes. As it bakes, your kitchen will fill with a delightful aroma. When the cake springs back to touch and a skewer comes out clean, remove it from the oven. Let it cool in the pan for 10 minutes before transferring it to a wire rack to cool completely.
Step 6: Prepare the Filling
In a mixing bowl, beat the butter until creamy and smooth. Gradually add the confectioners’ sugar and mix until well incorporated. Pour in the milk and vanilla extract, then whip the filling until it reaches your desired consistency for smooth spreading. Set this delicious filling aside as you assemble your Choco Nilla Cake.
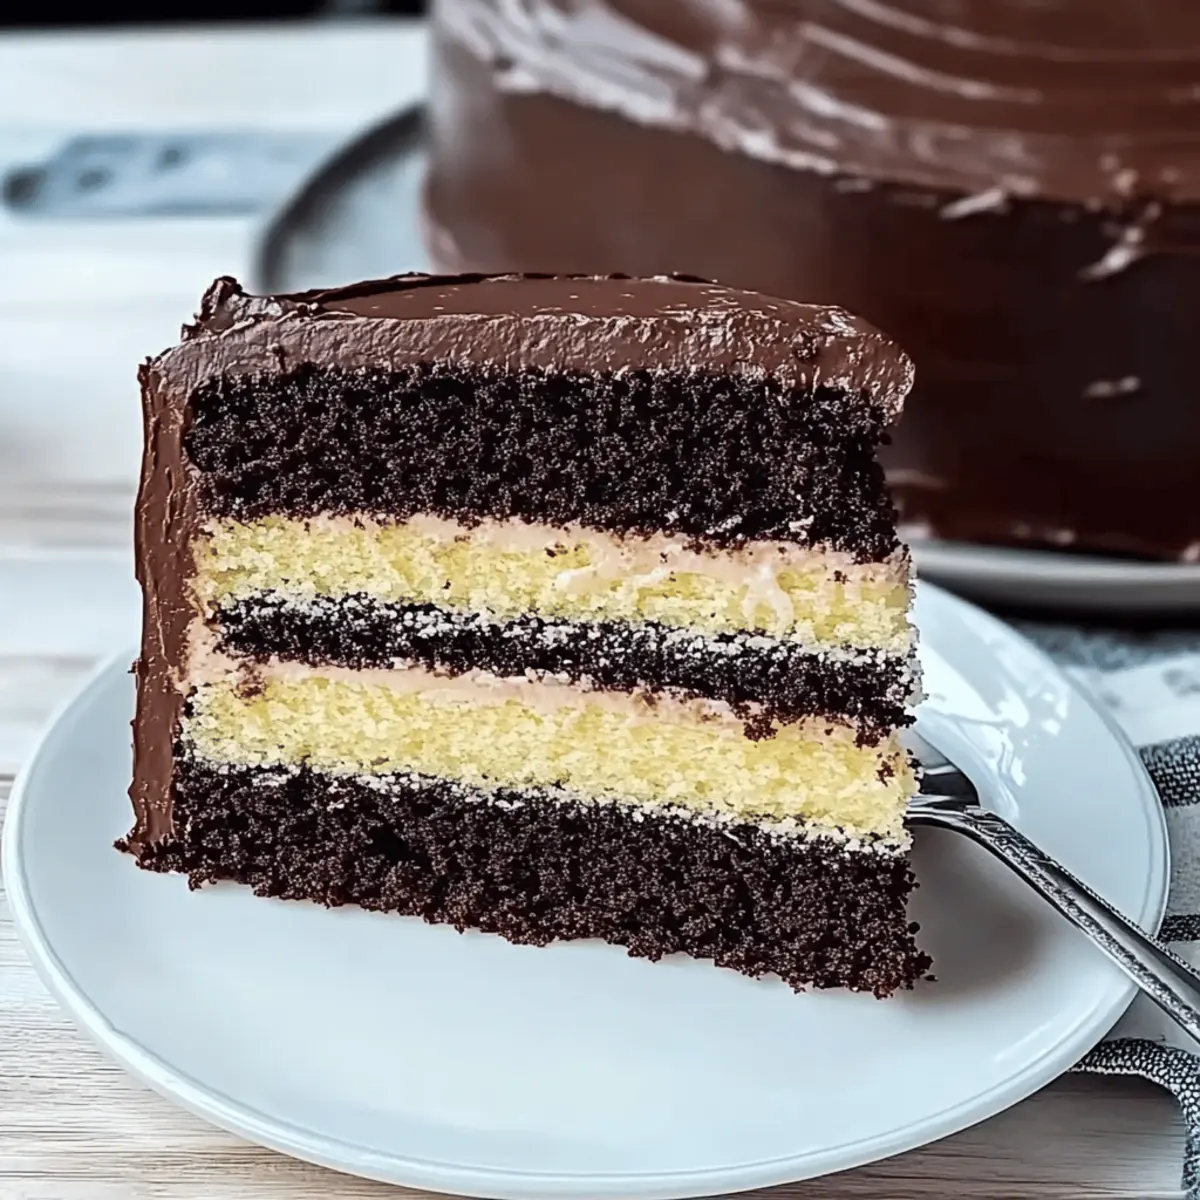
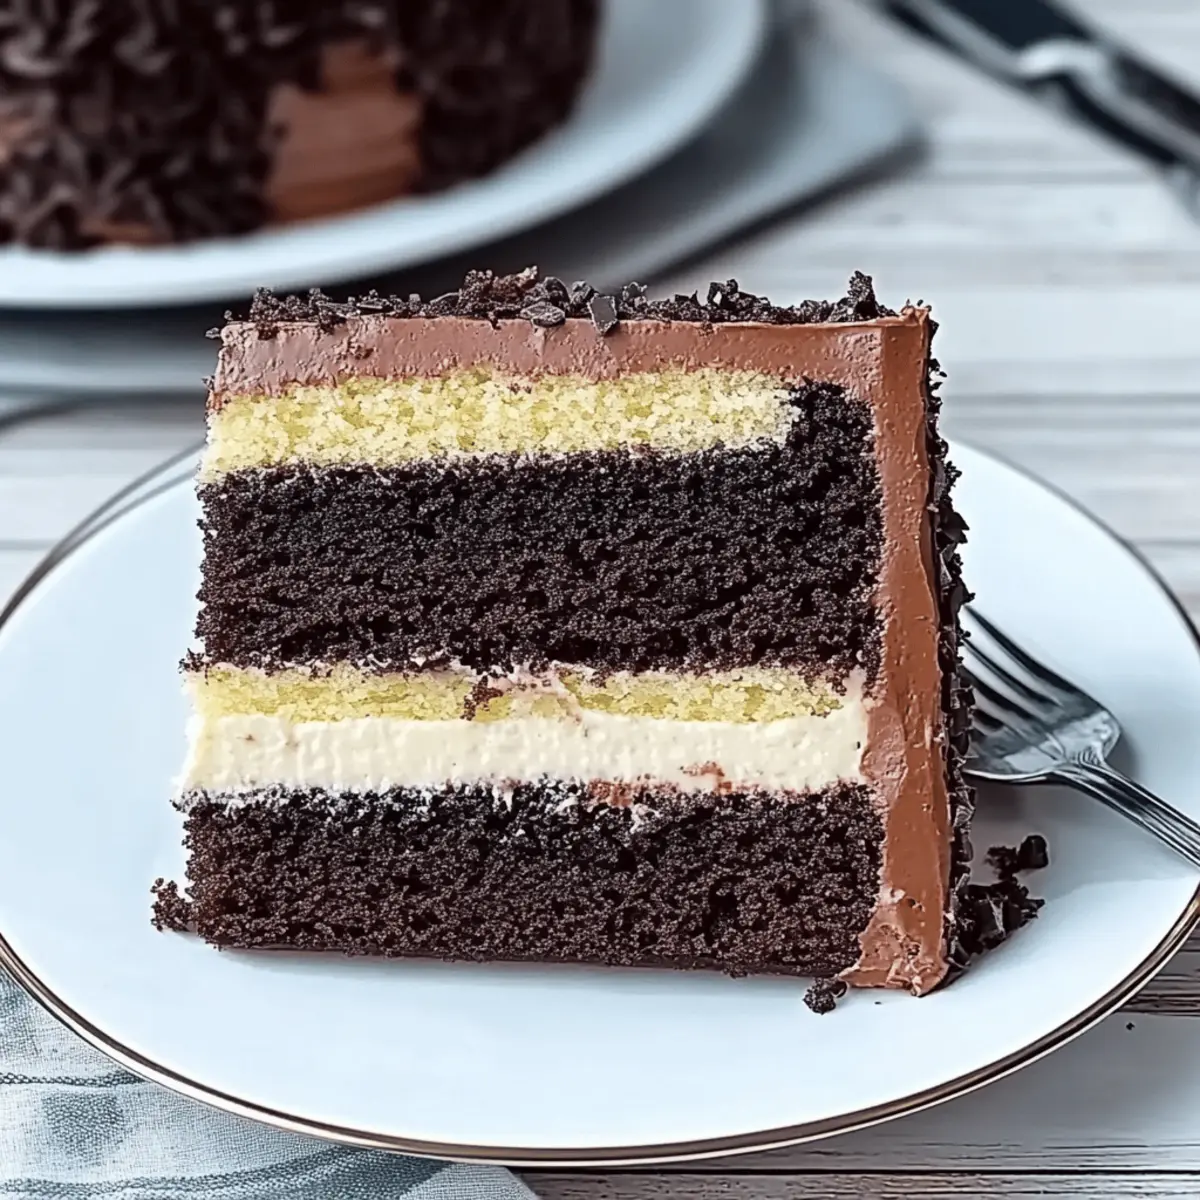
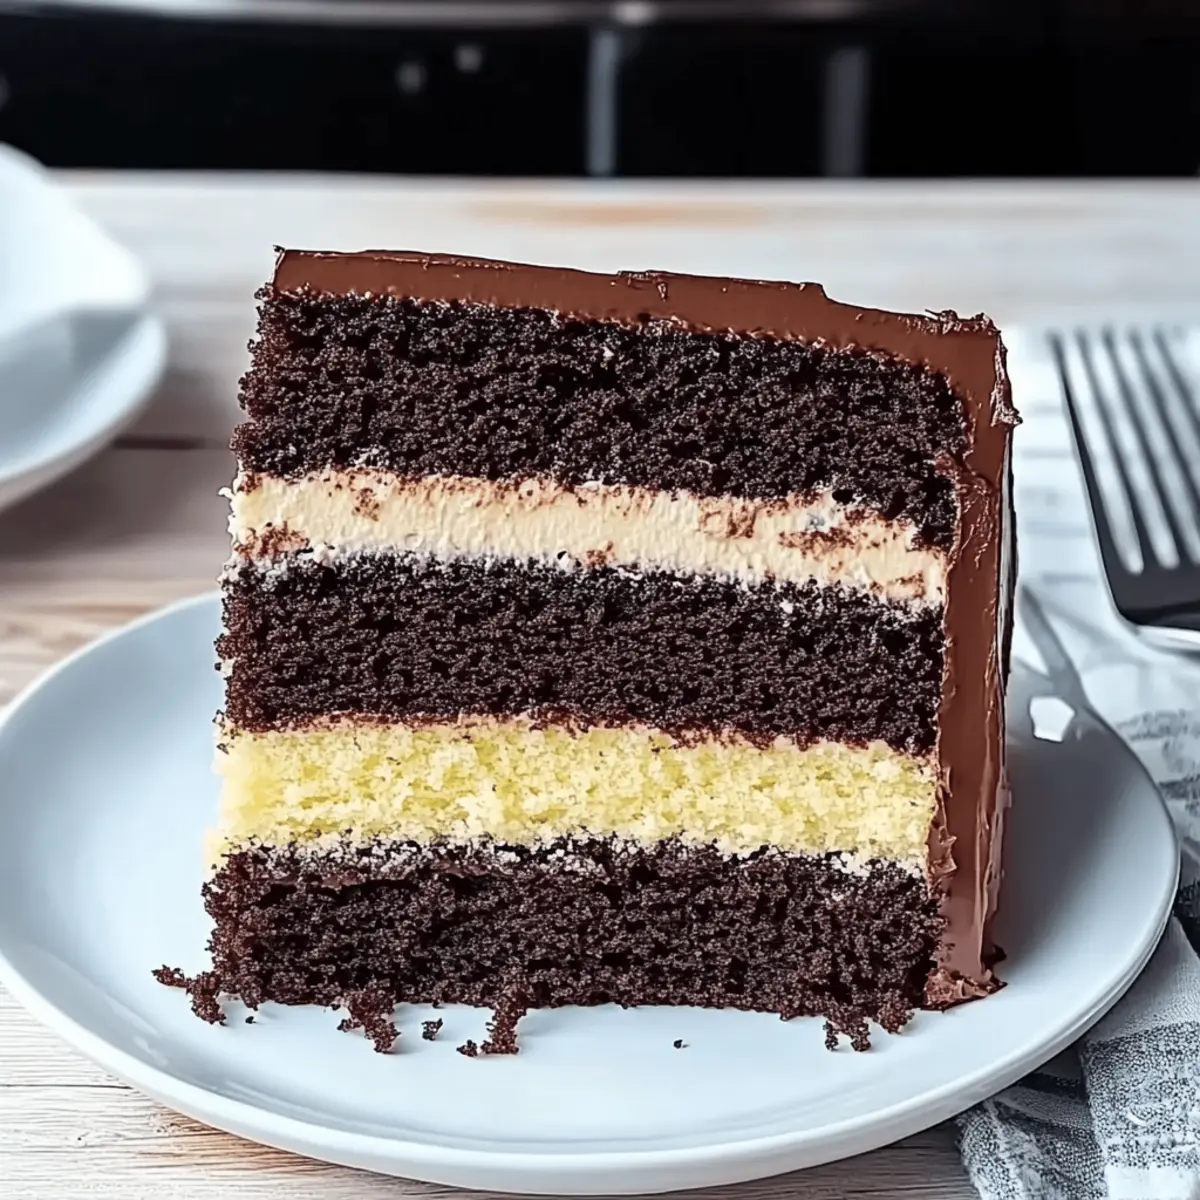
Step 7: Assemble the Cake
Once both cake layers have cooled completely, carefully cut each layer in half to create a total of four layers. Begin layering by placing one vanilla layer on a serving plate, spreading a generous amount of filling over it, then topping with a chocolate layer. Repeat this process, alternating between layers until all four are stacked, finishing with a chocolate layer on top.
Step 8: Make the Icing
In a small saucepan over low heat, combine the chocolate chips and heavy cream. Stir continuously until the chocolate has melted completely and the mixture is smooth. Once the icing is ready, pour it over the assembled Choco Nilla Cake, allowing it to drizzle down the sides. Let the icing set for a few minutes before serving, giving your cake a beautiful, glossy finish.
Make Ahead Options
These Choco-nilla Cakes are perfect for busy home cooks looking to save time during meal prep! You can bake and cool both the vanilla and chocolate cake layers up to 24 hours in advance. Keep them tightly wrapped in plastic wrap or in an airtight container to maintain their moisture and prevent any drying out. Additionally, you can prepare the filling and icing a day before, stored separately in the refrigerator. When you’re ready to assemble, simply layer the chilled cakes with the filling, pour over the icing, and allow it to set. By prepping ahead, you’ll have a stunning Choco-nilla Cake ready to impress your family with minimal effort!
Variations & Substitutions for Choco Nilla Cake
Feel free to get creative and personalize your cake with these delightful twists that will elevate your baking experience!
-
Gluten-Free: Substitute all-purpose flour with a gluten-free blend for a deliciously accommodating dessert.
-
Dairy-Free: Use almond or oat milk instead of regular milk and replace butter with dairy-free margarine for a lighter option.
-
Fruit-Infused: Incorporate fresh fruit purees, like raspberry or strawberry, into the filling for a refreshing burst of flavor.
-
Nutty Addition: Stir in some chopped walnuts or pecans throughout the batter for a delightful crunch and nutty richness.
-
Spiced Up: Enhance the flavors by adding a teaspoon of cinnamon or espresso powder to the chocolate batter, making each bite unforgettable.
-
Variations in Icing: Experiment with cream cheese frosting instead of chocolate icing for a tangy twist that balances the sweetness of the cake beautifully.
-
Miniature Versions: Bake mini Choco-nilla cakes in cupcake tins; these bite-sized delights are perfect for gatherings or whenever you’re craving a sweet bite.
-
Decorative Finishes: Top with fresh berries or sprinkle shaved chocolate on the icing for a stunning presentation that’s sure to impress!
For more inspired ideas, try pairing this cake with some Soft Chewy Chocolate cookies for an extra sweet treat or serving it alongside a scoop of Vanilla Bean Panna that will elevate your dessert table!
Expert Tips for Choco Nilla Cake
-
Room Temperature Matters: Ensure eggs, butter, and cream are at room temperature to promote optimal mixing and a fluffy texture in your Choco Nilla Cake.
-
Avoid Overmixing: Mix the batter just until ingredients are blended to prevent a dense cake. Overmixing can lead to tough layers, so be gentle!
-
Leveling Layers: If your cake layers have domed tops, use a serrated knife to level them off before stacking. This will help your Choco Nilla Cake stay stable and beautifully presented.
-
Chill Before Icing: For a cleaner icing finish, chill the assembled cake for about 30 minutes before pouring the warm icing over it. This allows the icing to set nicely.
-
Flavor Infusion: For an extra burst of flavor, consider adding a splash of espresso or almond extract to either the chocolate or vanilla batter. This will elevate your Choco Nilla Cake to new heights!
-
Storage Guide: Keep the cake in an airtight container at room temperature for up to 3 days to maintain its moistness and flavor.
How to Store and Freeze Choco-nilla Cake
Room Temperature: Store the Choco-nilla Cake in an airtight container for up to 3 days, ensuring it remains moist and delicious.
Refrigerator: If you have leftover cake, keep it in the fridge for up to 5 days. Use a cake cover or container to prevent it from drying out.
Freezer: Wrap slices tightly in plastic wrap and place them in a freezer bag for up to 3 months. Thaw overnight in the fridge before enjoying.
Reheating: If you prefer your cake warm, gently reheat slices in the microwave for about 10-15 seconds, or until just warmed through.
What to Serve with Choco-nilla Cake?
Indulging in a delightful slice of this layered masterpiece calls for equally delightful companions to elevate your dessert experience.
-
Creamy Vanilla Ice Cream: The smooth, cool richness of vanilla ice cream perfectly offsets the cake’s flavors, creating a blissful combination.
-
Fresh Berries: Juicy strawberries, raspberries, or blueberries add a refreshing sweetness that balances the cake’s richness and enhances its visual appeal.
-
Whipped Cream: Light and airy, whipped cream lends a cloud-like softness that harmonizes beautifully with the dense layers of chocolate and vanilla.
-
Chocolate Ganache Dipping Sauce: For chocolate lovers, a velvety ganache for dipping takes indulgence to another level. It’s rich, luscious, and utterly satisfying.
-
Hazelnut Praline Crunch: This adds a delightful crunch and nutty flavor, providing a textural contrast that enhances every bite of cake.
-
Coffee or Espresso: Serve with a warm cup of coffee or robust espresso to bring out the cake’s chocolatey notes, creating a cozy, comforting experience.
-
Fruit Salad: A light, refreshing fruit salad with citrus and melons can cleanse the palate and brighten the dessert table, making every slice more enjoyable.
Choco-nilla Cake Recipe FAQs
How do I choose ripe ingredients for my Choco-nilla Cake?
Absolutely! For the best results, use fresh, high-quality eggs. Look for eggs that are farm-fresh if possible. When selecting vanilla extract, opt for pure vanilla instead of imitation for a richer flavor. For cream quality, use heavy cream, which should be fresh and free from any sour smell.
How should I store leftover Choco-nilla Cake?
To keep your Choco-nilla Cake at its best, store it in an airtight container at room temperature for up to 3 days. If you anticipate leftovers beyond that, transfer it to the refrigerator where it will stay fresh for up to 5 days. Remember to cover it well to prevent drying out—nobody wants a cake that’s lost its moisture!
Can I freeze my Choco-nilla Cake?
Absolutely! To freeze your Choco-nilla Cake, wrap individual slices in plastic wrap, ensuring they’re tightly sealed to avoid freezer burn. Place them within a freezer-safe bag or container. It will keep nicely for up to 3 months. When you’re ready to enjoy it, simply thaw overnight in the fridge and savor the same deliciousness!
What should I do if my cake layers are domed or uneven?
Very common! If your cake layers rise with a dome shape, you can easily level them for a more polished look. Use a serrated knife and carefully slice off the dome to create a level surface. This ensures stability when stacking your layers, making your Choco-nilla Cake not only taste good but look impressive too!
Are there any dietary considerations I should be aware of?
For those with dietary restrictions, you can adapt the Choco-nilla Cake easily! To make it gluten-free, swap out all-purpose flour for a gluten-free blend. If you need it dairy-free, use almond milk instead of heavy cream and opt for dairy-free margarine in the filling. Always check your ingredients for possible allergens—and remember, it’s all about making delicious memories while catering to everyone’s needs!
Irresistible Choco Nilla Cake for Sweet Celebrations
Ingredients
Equipment
Method
- Preheat your oven to 350°F (175°C) and prepare the cake pans.
- Prepare the vanilla cake batter by mixing eggs and sugar, then add other ingredients.
- Pour the vanilla batter into one cake pan and bake for 30-35 minutes.
- Make the chocolate cake batter by whisking dry ingredients, then mix in wet.
- Pour chocolate batter into the second pan and bake for 35 minutes.
- Prepare the filling by mixing butter, confectioners’ sugar, milk, and vanilla.
- Assemble the layers by alternating vanilla and chocolate with filling.
- Make the icing by melting chocolate chips with heavy cream and drizzle over the cake.