

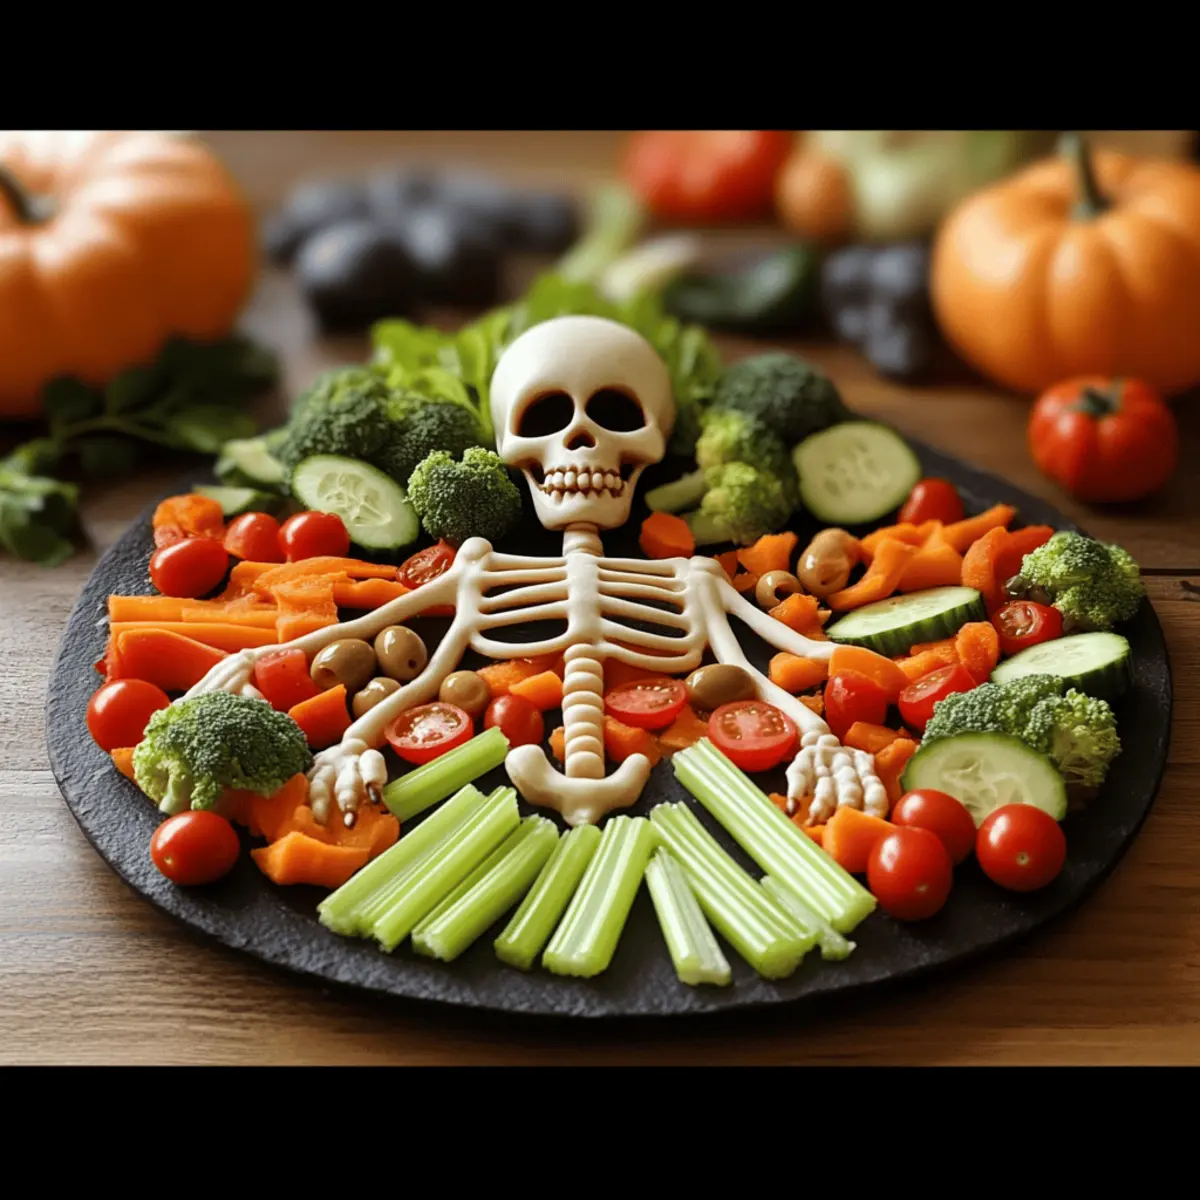
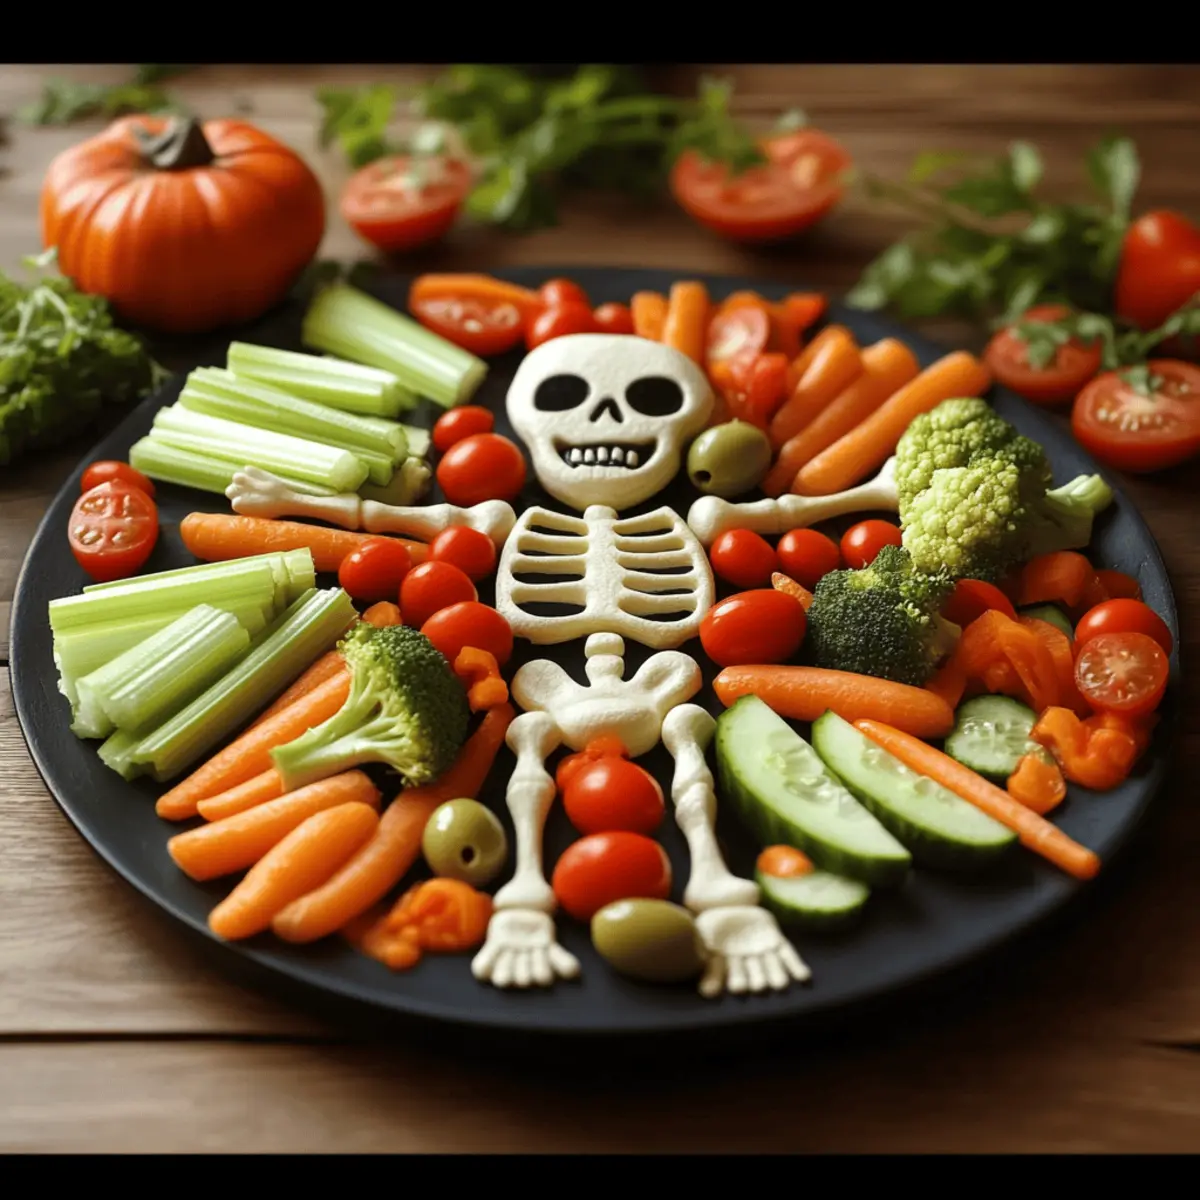
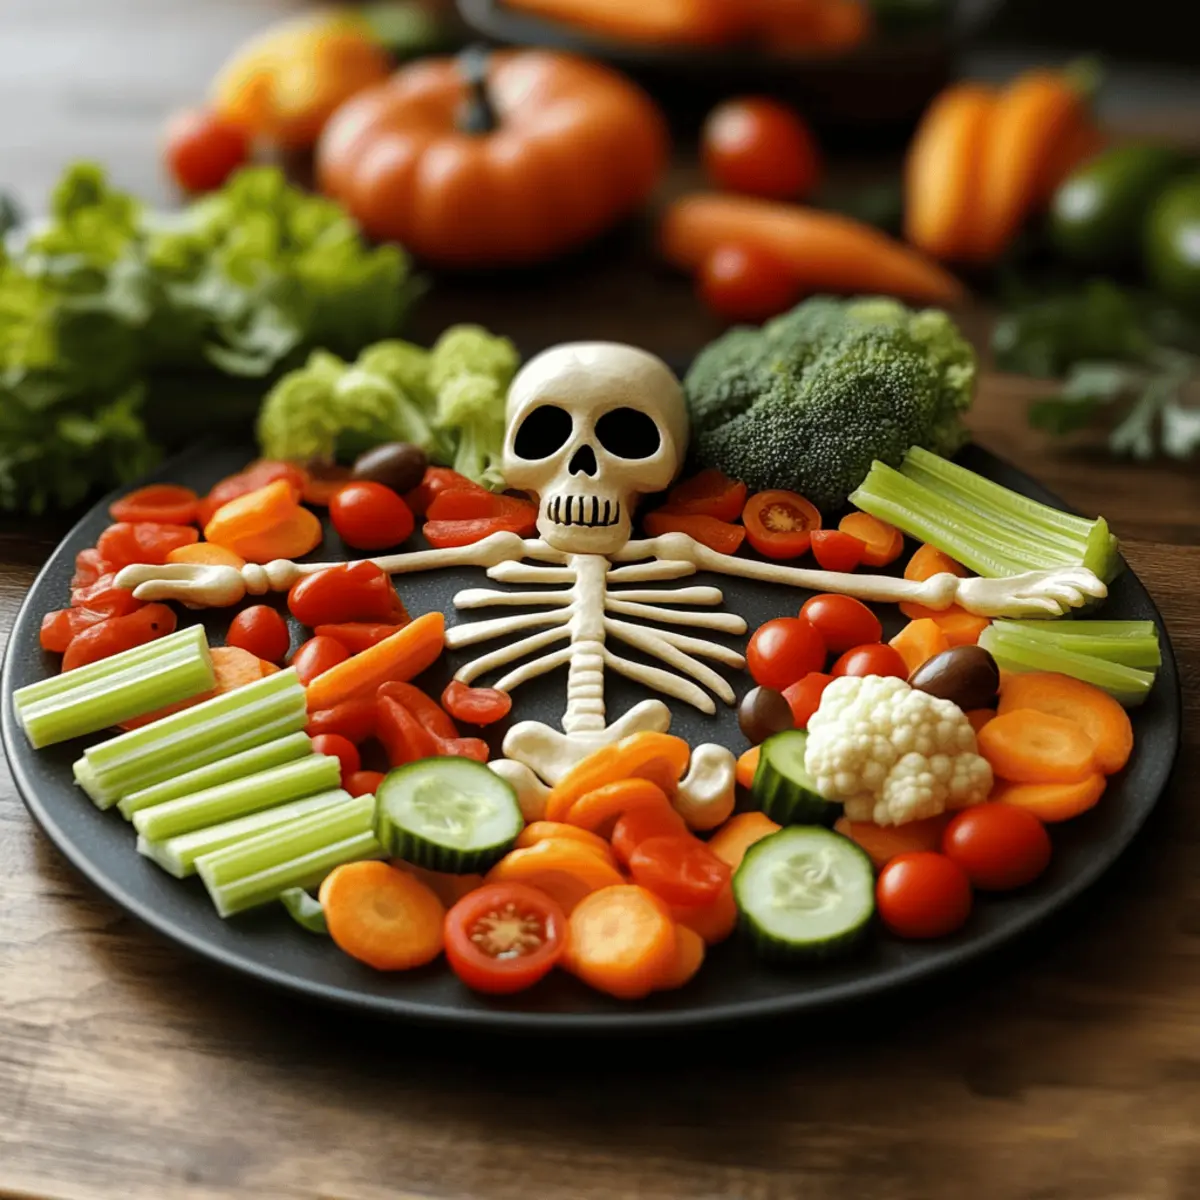
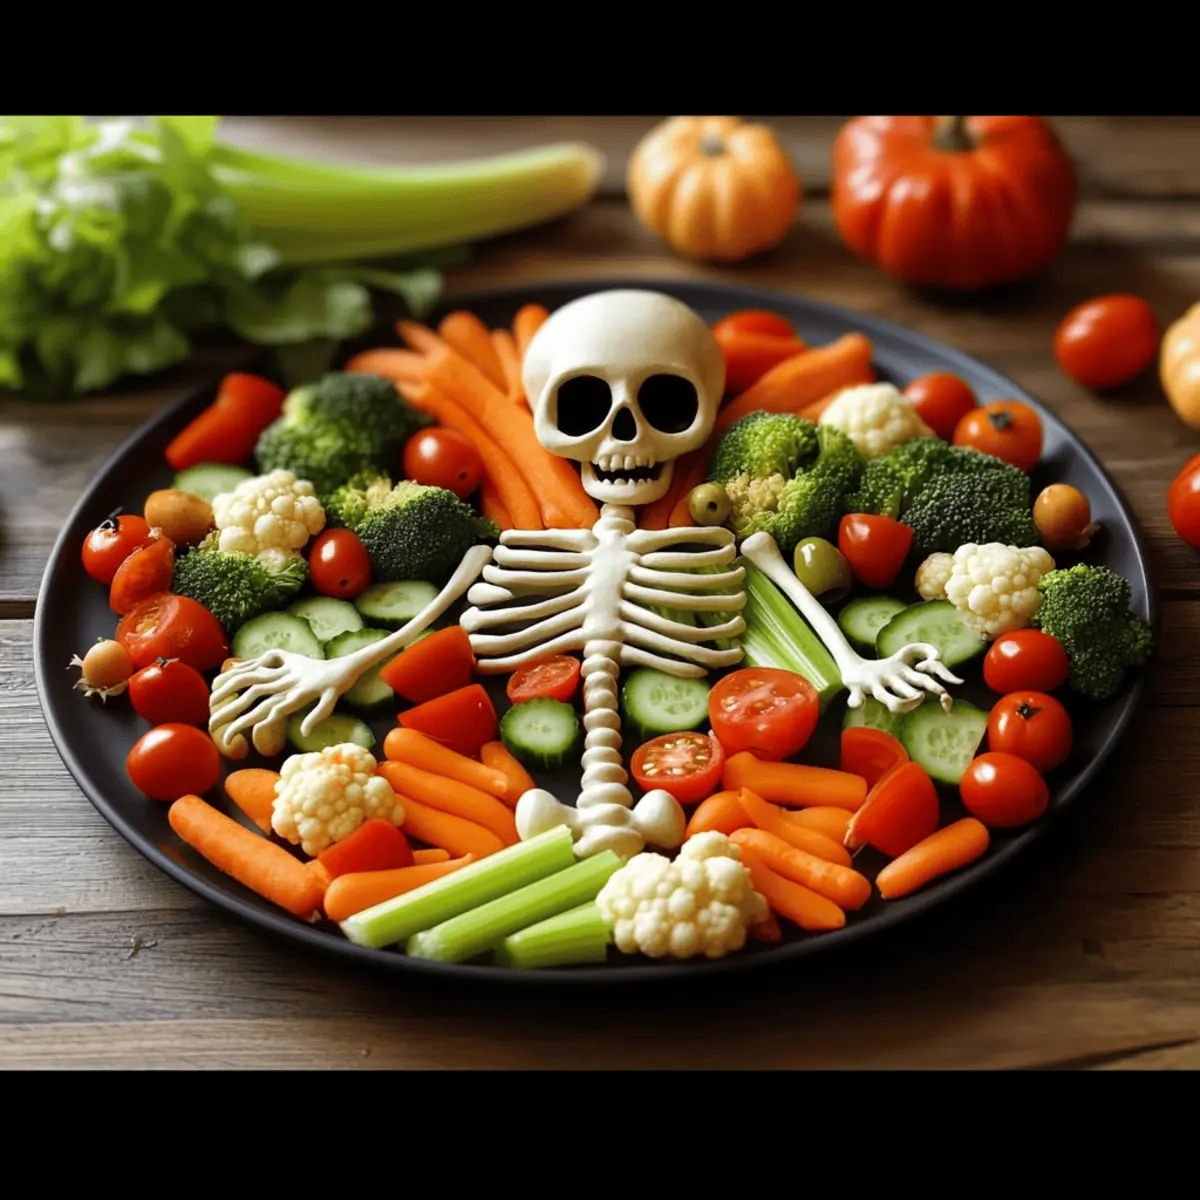
As I rummaged through the fridge, searching for something fun to whip up for Halloween, a vibrant idea struck me: a Skeleton Veggie Platter! This playful creation transforms ordinary fresh veggies into a spooky centerpiece that’s not only a feast for the eyes but also a healthy snack. The best part? My 20-Minute Skeleton Veggie Platter is both customizable and easy to prepare, allowing for personal twists based on your favorite colors and crunches. This is the dish that will have your family and friends laughing while munching on something nutritious—perfect for parties or a family gathering! So, why settle for boring snacks when we can celebrate in a more delicious and playful way? Ready to dive into some veggie-inspired Halloween magic? Let’s get started!
Why Choose the Skeleton Veggie Platter?
Fun, Creative Presentation: This platter takes your usual veggie dip to a whole new level with its playful skeleton design!
Quick and Easy: With just 20 minutes of prep time, you can whip up a stunning centerpiece that delights both kids and adults.
Customizable Features: Favorite veggies can easily be swapped in or out, so everyone gets to enjoy their preferred flavors.
Healthy Alternative: Packed with vitamins and minerals, this platter is a guilt-free treat compared to traditional Halloween snacks.
Perfect for Every Occasion: Whether for a Halloween party or a themed family dinner, it’s a visually appealing dish that’s bound to impress!
Dipping Delights: The variety of dip options enhances flavor while encouraging healthy snacking habits, making this a hit among friends and family.
20-Minute Skeleton Veggie Platter Ingredients
Get ready to discover the perfect blend of spooky and nutritious with these veggie platter essentials!
For the Skeleton Base
- Carrots – Adds vibrant color and crunch for the skeleton’s ribs; yellow bell peppers or sweet potatoes make great substitutes.
- Celery – Provides a refreshing crunch for the skeleton’s arms and legs; cucumber slices or zucchini are excellent alternatives.
- Cauliflower – Forms the skeleton’s skull; feel free to swap it with cabbage or a large turnip for variation.
- Broccoli – Acts as the ribcage and spine, offering a deep green color; use small florets for ribs for an adorable look!
For the Skeleton Features
- Cherry Tomatoes – Bright and juicy for the skeleton’s eyes; black olives can create a more dramatic effect.
- Olives – Perfect for making contrasting eyes and nose; raisins or gummy eyeballs add a playful twist!
For the Limbs
- Cucumber Slices – Fresh and crisp for delightful legs; strip bell peppers can create a colorful alternative.
For the Dip (optional)
- Hummus – Creamy and nutritious to pair with veggies; consider ranch dressing or guacamole for classic flair. Yogurt-based or tahini dressing can offer healthier choices.
This 20-Minute Skeleton Veggie Platter is bursting with freshness and fun, making it a charming addition to your Halloween festivities!
Step‑by‑Step Instructions for 20-Minute Skeleton Veggie Platter
Step 1: Prep Ingredients
Start by washing all your fresh vegetables thoroughly under cool running water. Peel the carrots, then slice them into sticks for the ribs, and cut the cucumber into rounds for the legs. Break the broccoli into smaller florets for the ribcage, and chop the cauliflower into pieces, keeping them aside for later assembly.
Step 2: Assemble Skull
Next, grab a large serving platter and place the cauliflower florets in the center, creating a skull shape with the largest pieces on top. Aim for a rounded look that mimics a skull, leaving space for decoration later. Ensure there’s enough room around the skull for the other veggie features to fit in seamlessly.
Step 3: Create Features
Now it’s time to bring the skull to life! Using cherry tomatoes or olives, position two pieces for eyes within the cauliflower base. For the nose, choose a larger olive or tomato and place it slightly lower in the center. This adds a fun, spooky character to your 20-Minute Skeleton Veggie Platter!
Step 4: Add Ribs and Spine
Arrange the broccoli florets vertically to form ribs on either side of the cauliflower skull, spacing them evenly for a symmetrical appearance. For the spine, use a larger cluster of broccoli, making it central and prominent. This layout gives your skeletal veggie display a striking presentation full of colors and textures!
Step 5: Form Limbs
On either side of the platter, lay out celery sticks for the skeleton’s arms, angling them outward for a lively pose. At the bottom of the platter, create the skeleton’s legs with the cucumber slices, ensuring they balance well with the overall design. Be creative with the placement to enhance the playful aesthetic!
Step 6: Add Details
To make your skeleton vibrant and engaging, place additional veggies around the platter for character. Use extra cherry tomatoes or even small pieces of carrots for hands and feet. This step allows you to showcase your creativity while making the 20-Minute Skeleton Veggie Platter visually stunning and inviting!
Step 7: Serve with Dip
Finally, add some fun by including small bowls of hummus, ranch dressing, or guacamole around the platter. This not only enhances the flavors but also encourages dipping. Your 20-Minute Skeleton Veggie Platter is now ready to be a delightful centerpiece at any gathering, capturing the spirit of Halloween in a healthy way!
How to Store and Freeze the Skeleton Veggie Platter
Fridge: Store leftover veggies in an airtight container for up to 3 days. Keep them fresh by placing a damp paper towel inside to maintain moisture without wilting.
Prep Ahead: For best presentation, assemble the 20-Minute Skeleton Veggie Platter shortly before serving. However, you can prep and chop your ingredients up to a day in advance for convenience.
Reheating: If serving with warm dips, gently heat them in the microwave or on the stove before serving to enhance flavor. The veggies should be enjoyed fresh and crisp rather than reheated.
Freezer: To freeze, individually wrap fresh veggies in plastic wrap and store them in a freezer bag for up to 2 months. Note that freezing may alter the texture; it’s recommended to use them in cooked dishes instead of raw.
What to Serve with 20-Minute Skeleton Veggie Platter?
Elevate your Halloween gathering with delightful companions that balance flavors and textures alongside this whimsical veggie creation!
- Creamy Hummus: Rich and savory, it enhances the fresh crunch of the veggies while encouraging healthy snacking habits.
- Zesty Ranch Dip: The cool and tangy flavor contrasts nicely with the sweetness of the vegetables, appealing to both kids and adults alike.
- Guacamole: Creamy and luscious, it adds an avocado twist that pairs wonderfully with crisp cucumbers and carrots.
- Pita Chips: These crunchy bites provide a delightful texture that complements the platter’s freshness and adds a fun element to dipping.
- Stuffed Mini Peppers: Colorful and flavorful, they can be stuffed with cheese or beans for an additional treat that fits the theme.
- Fruit Kabobs: Juicy and sweet, the fruity flavors offer a refreshing contrast to the veggie platter, balancing savory and sweet in each bite.
- Apple Slices with Nut Butter: The crunchiness of fresh apples paired with creamy nut butter makes for a delicious post-veggie snack!
- Sparkling Apple Cider: A festive drink that brings a refreshing sweetness, making it perfect for those who prefer a non-alcoholic option for Halloween festivities.
- Chocolate-Dipped Strawberries: For a sweet ending, these add a luxurious treat that’s still light and cheeky amid the ghoulish fun!
- Pumpkin Spice Mini Muffins: These seasonal bites subtly echo Halloween flavors, making for a comforting complement to your veggie display.
20-Minute Skeleton Veggie Platter Variations
Feel free to let your creativity shine by customizing this fun platter with these exciting ideas!
- Dairy-Free: Use a cashew-based dip instead of traditional dressings for a creamy, plant-based option.
- Colorful Crunch: Swap out the broccoli for vibrant purple cauliflower for a striking visual twist that catches the eye.
- Extra Fiber: Add sliced bell peppers or snap peas for an unexpected crunch and a pop of color that enhances the skeleton’s limbs.
- Nutty Boost: Toss in a handful of sunflower seeds or almonds around the veggies for a delightful crunch and added nutrition.
- Heat Factor: Incorporate sliced jalapeños or sprinkle red pepper flakes for those who crave a little heat with their healthy snacks.
- Herb Infusion: Mix fresh herbs like dill or parsley into your dip for a burst of flavor that elevates the overall taste experience.
- Fruit Fun: Add small chunks of fruit like apple slices or grapes as unexpected sweetness, which contrasts beautifully with the savory veggies.
- Themed Shapes: Use cookie cutters to make different veggie shapes to keep the platter visually playful while staying healthy.
Explore these customizable options, and for more delicious ideas, check out our veggie-packed dishes or dive into a world of flavorful plant-based recipes! Enjoy experimenting!
Expert Tips for the Skeleton Veggie Platter
- Fresh is Best: Always choose fresh vegetables for optimal flavor and presentation. Wilted veggies can ruin the entire look; aim for vibrant colors!
- Balancing Act: When assembling, ensure your veggie skeleton is well-balanced to prevent tipping. A sturdy base will hold everything in place.
- Customize Creatively: Don’t hesitate to swap out vegetables based on seasonal availability or family preferences. Make this 20-Minute Skeleton Veggie Platter uniquely yours!
- Prep Ahead: To save time, wash and cut your veggies a few hours in advance. This means less stress and more time for spooky fun!
- Engage Everyone: Involve family members in the assembly process. It’s a playful way to ensure everyone enjoys their favorite veggies while making festive memories!
- Mind the Dip: Choose dips that complement the flavors of your veggies. Experiment with different ones to keep the snack exciting and versatile.
Make Ahead Options
Making the 20-Minute Skeleton Veggie Platter ahead of time is a fantastic way to save precious minutes on busy days! You can wash, peel, and cut all vegetables up to 24 hours in advance, storing them in airtight containers in the refrigerator to maintain their freshness and crunch. To assemble, simply place the prepped cauliflower in the center as the skull, then arrange the ribs with pre-cut broccoli and position the limbs with celery and cucumber just before serving. This prep-in-advance method ensures that the vibrant colors and textures of your veggie platter remain just as delightful, making the Skeleton Veggie Platter an easy and fun centerpiece for your gathering!
20-Minute Skeleton Veggie Platter Recipe FAQs
How do I choose the best vegetables for my Skeleton Veggie Platter?
Absolutely! For optimal freshness and flavor, choose vibrant, unblemished vegetables. Look for carrots that are firm and bright orange, celery that is crisp with minimal dark spots, and cauliflower that’s tight and white. Avoid any vegetables showing signs of wilting or decay, which can include soft spots or discoloration.
How should I store leftovers from the Skeleton Veggie Platter?
Very! Store leftover veggies in an airtight container in the refrigerator for up to 3 days. To keep them fresh, I recommend placing a damp paper towel in the container. This helps maintain moisture while preventing the veggies from wilting. Just remember, the fresher, the better—so enjoy within a couple of days!
Can I prepare the Skeleton Veggie Platter in advance?
Certainly! You can wash and chop all the vegetables a day ahead of time. Just keep them stored in an airtight container, preferably with a damp paper towel, to keep them crisp for up to 24 hours. However, I recommend assembling the platter fresh right before serving for the best visual appeal and texture!
Is it possible to freeze vegetables for the Skeleton Veggie Platter?
Absolutely, but with a few considerations! To freeze, wash and chop your veggies, then individually wrap them in plastic wrap and store in a freezer-safe bag for up to 2 months. Note that freezing alters the texture, so I suggest using the thawed veggies in cooked dishes rather than serving raw. If you have some leftovers, let’s say for a soup or stew, they’ll work beautifully!
Are there any dietary considerations I should keep in mind for guests?
Definitely! Always check for allergies, as some guests might be sensitive to specific ingredients like olives or certain dips. If you’re catering to vegan or vegetarian diets, the Skeleton Veggie Platter can be an excellent plant-based option. Furthermore, feel free to customize the dip choices to cater to your guests’ preferences—like using a dairy-free yogurt dip for those avoiding animal products.
What can I do if my veggies wilt before I can assemble?
Very! If your veggies start wilting, revive them by placing them in an ice water bath for 20 to 30 minutes. This trick works wonders to crisp up many fresh vegetables, making them ideal for your 20-Minute Skeleton Veggie Platter! I often do this to ensure my presentation is as vibrant as possible. Just be sure to pat them dry before assembly!
20-Minute Skeleton Veggie Platter for Fun Healthy Snacking
Ingredients
Equipment
Method
- Wash all vegetables under cool running water. Peel carrots and slice into sticks. Cut cucumber into rounds.
- Place cauliflower florets in the center of a large platter, creating a skull shape.
- Use cherry tomatoes or olives for eyes and a larger olive for the nose.
- Arrange broccoli florets vertically to form ribs and a larger cluster for the spine.
- Lay out celery sticks for arms and cucumber slices for legs.
- Add additional veggies for hands and feet, showcasing creativity.
- Include small bowls of hummus for dipping.