

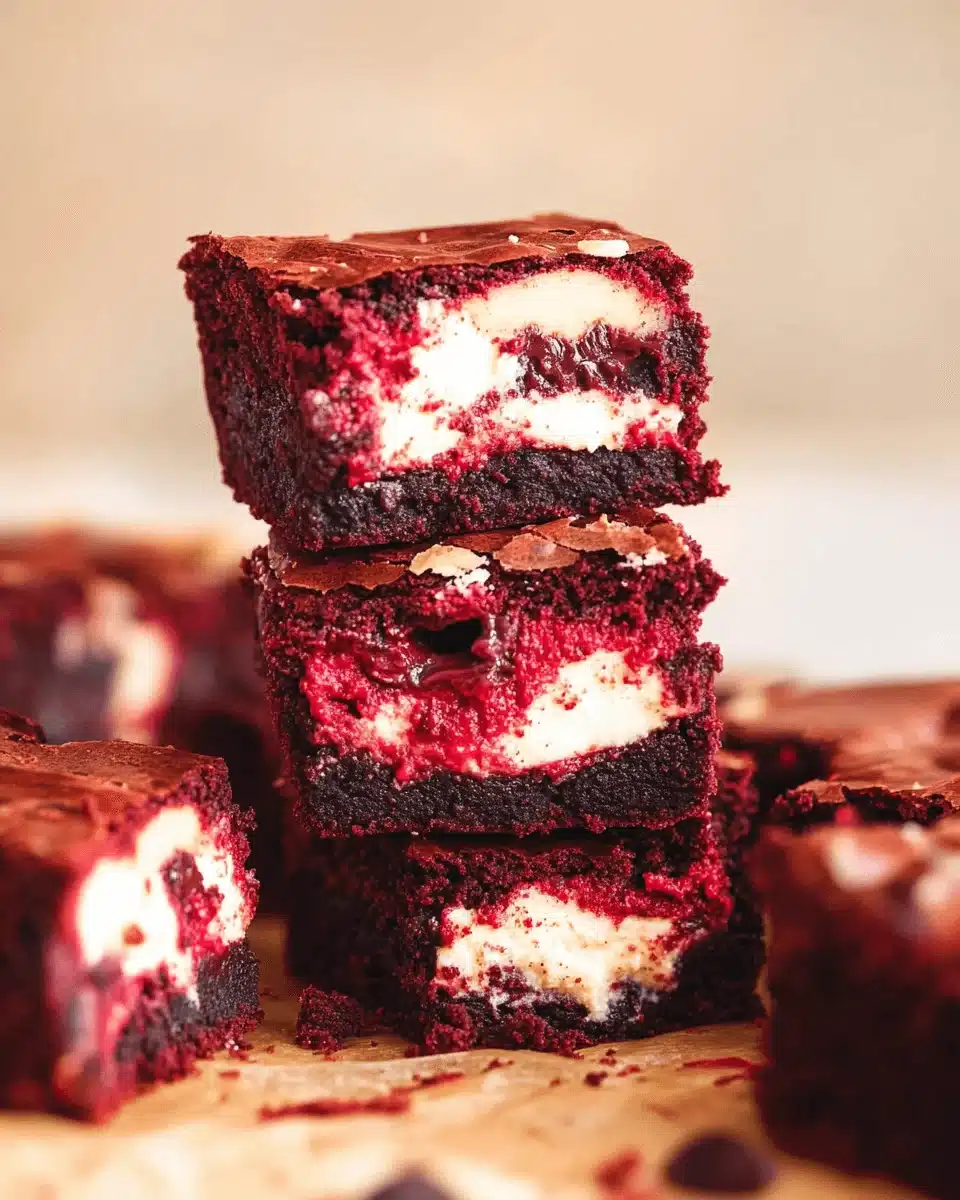
Red Velvet Chocolate Cheesecake Brownies
There’s something magical about the combination of red velvet and cheesecake, isn’t there? When I first stumbled upon the idea of Red Velvet Chocolate Cheesecake Brownies, I knew I had to try it. These brownies are not just a dessert; they’re a celebration of flavors and textures that can brighten any day. Whether you’re looking to impress friends at a gathering or simply treat yourself after a long week, this recipe is your go-to. With a rich, creamy layer of cheesecake nestled between decadent red velvet, these brownies are sure to become a favorite in your kitchen.
Why You’ll Love This Red Velvet Chocolate Cheesecake Brownies
These Red Velvet Chocolate Cheesecake Brownies are a dream come true for any home cook. They’re easy to whip up, making them perfect for busy weeknights or last-minute gatherings. The rich, velvety texture combined with the creamy cheesecake layer creates a taste sensation that’s hard to resist. Plus, they look stunning on any dessert table, ensuring you’ll impress your guests without spending hours in the kitchen.
Ingredients for Red Velvet Chocolate Cheesecake Brownies
Gathering the right ingredients is the first step to creating these delightful Red Velvet Chocolate Cheesecake Brownies. Here’s what you’ll need:
- Unsalted butter: This adds richness and moisture to the brownies, making them fudgy.
- Granulated sugar: Sweetens the batter and helps create that perfect chewy texture.
- Large eggs: Essential for binding the ingredients together and adding structure.
- Vanilla extract: A splash of vanilla enhances the overall flavor, making it more aromatic.
- All-purpose flour: The backbone of the brownies, providing the necessary structure.
- Cocoa powder: Adds a rich chocolate flavor that complements the red velvet beautifully.
- Baking powder: This leavening agent helps the brownies rise, giving them a light texture.
- Salt: A pinch of salt balances the sweetness and enhances the flavors.
- Red food coloring: This is what gives the brownies their signature vibrant hue. You can also use beet juice for a natural alternative.
- Cream cheese: The star of the cheesecake layer, providing a creamy and tangy contrast to the sweet brownies.
- Powdered sugar: Sweetens the cheesecake layer and gives it a smooth texture.
- Additional egg: Another egg for the cheesecake layer ensures it sets perfectly.
For exact measurements, check the bottom of the article where you can find everything listed for easy printing. Happy baking!
How to Make Red Velvet Chocolate Cheesecake Brownies
Step 1: Preheat and Prepare
Start by preheating your oven to 350°F (175°C). While it warms up, grab a 9×13 inch baking pan and grease it well. This ensures your brownies won’t stick, making it easier to cut them into perfect squares later. A little prep goes a long way!
Step 2: Mix the Wet Ingredients
In a large mixing bowl, combine the melted butter and granulated sugar. Stir until the mixture is smooth and creamy. Next, add the eggs one at a time, mixing well after each addition. Finally, stir in the vanilla extract for that extra flavor boost. It’s all about building a solid base!
Step 3: Combine Dry Ingredients
In another bowl, whisk together the all-purpose flour, cocoa powder, baking powder, and salt. This step is crucial as it ensures even distribution of the dry ingredients. A well-mixed dry blend will help your brownies rise beautifully and taste amazing!
Step 4: Create the Red Velvet Batter
Gradually add the dry ingredients to the wet mixture, stirring until just combined. Be careful not to overmix; we want those brownies to stay tender. Once combined, add the red food coloring and mix until the batter is a vibrant red. It’s like painting a masterpiece!
Step 5: Prepare the Cheesecake Layer
In a separate bowl, beat the softened cream cheese until it’s smooth and creamy. Add the powdered sugar, an egg, and a splash of vanilla extract. Mix until everything is well combined. This cheesecake layer is the secret to the rich, creamy texture of your brownies!
Step 6: Layer and Swirl
Pour half of the red velvet batter into the prepared baking pan, spreading it evenly. Next, drop spoonfuls of the cheesecake mixture over the red velvet layer. Pour the remaining red velvet batter on top and gently swirl with a knife to create a marbled effect. It’s all about that beautiful presentation!
Step 7: Bake
Place the pan in the preheated oven and bake for 30-35 minutes. Keep an eye on them! You’ll know they’re done when a toothpick inserted into the center comes out with a few moist crumbs. Let them cool in the pan before cutting into squares. Patience is key here!
Tips for Success
- Use room temperature ingredients for a smoother batter.
- Don’t overmix the batter; it keeps the brownies tender.
- For a richer flavor, add a teaspoon of espresso powder to the brownie mix.
- Let the brownies cool completely before cutting for cleaner edges.
- Store leftovers in an airtight container to maintain freshness.
Equipment Needed
- 9×13 inch baking pan: A standard size for brownies; you can use a glass or metal pan.
- Mixing bowls: A set of various sizes will help with mixing wet and dry ingredients.
- Whisk: Perfect for blending ingredients smoothly; a fork can work in a pinch.
- Spatula: Great for spreading batter evenly; a wooden spoon can also do the job.
- Measuring cups and spoons: Essential for accuracy; you can use a kitchen scale for precision.
Variations
- Nutty Delight: Add chopped walnuts or pecans to the brownie batter for a crunchy texture.
- Minty Fresh: Incorporate a few drops of peppermint extract into the cheesecake layer for a refreshing twist.
- Gluten-Free Option: Substitute all-purpose flour with a gluten-free blend to accommodate dietary needs.
- Chocolate Lovers: Fold in chocolate chips into the red velvet batter for an extra chocolatey experience.
- Fruit Fusion: Top the brownies with fresh raspberries or strawberries before serving for a fruity contrast.
Serving Suggestions
- Pair these brownies with a scoop of vanilla ice cream for a delightful contrast.
- Serve with a drizzle of chocolate or cream cheese frosting for added indulgence.
- Accompany with a hot cup of coffee or a glass of cold milk.
- Garnish with fresh berries or a sprinkle of powdered sugar for a beautiful presentation.
FAQs about Red Velvet Chocolate Cheesecake Brownies
Can I make these brownies ahead of time?
Absolutely! These Red Velvet Chocolate Cheesecake Brownies can be made a day in advance. Just store them in an airtight container in the fridge. They’ll taste even better the next day as the flavors meld together.
What can I substitute for red food coloring?
If you prefer a natural alternative, beet juice works wonderfully! It gives the brownies a lovely red hue without any artificial ingredients. Just keep in mind that the color may vary slightly.
How do I know when the brownies are done baking?
Check for doneness by inserting a toothpick into the center. If it comes out with a few moist crumbs, they’re ready! Avoid overbaking to keep that fudgy texture.
Can I freeze these brownies?
Yes, you can freeze them! Just wrap the brownies tightly in plastic wrap and then in aluminum foil. They’ll stay fresh for up to three months. Thaw them in the fridge before serving.
What’s the best way to store leftovers?
Store any leftover brownies in an airtight container at room temperature for up to three days. If you want to keep them longer, refrigerate them for up to a week. Enjoy them at their best!
Final Thoughts
Creating these Red Velvet Chocolate Cheesecake Brownies is more than just baking; it’s about crafting a moment of joy. The rich, velvety texture paired with the creamy cheesecake layer brings a smile to anyone who takes a bite. Whether you’re sharing them at a gathering or savoring them solo, each square is a little piece of happiness. Plus, the vibrant color adds a festive touch to any occasion. So, roll up your sleeves, embrace the process, and let these brownies become a cherished part of your dessert repertoire. Trust me, they’ll leave a lasting impression!
Red Velvet Chocolate Cheesecake Brownies: A Must-Try!
Ingredients
Method
- Preheat your oven to 350°F (175°C) and grease a 9x13 inch baking pan.
- In a large mixing bowl, combine the melted butter and granulated sugar. Mix well until smooth.
- Add in the eggs one at a time, mixing well after each addition. Stir in the vanilla extract.
- In another bowl, whisk together the flour, cocoa powder, baking powder, and salt.
- Gradually add the dry ingredients to the wet mixture, stirring until just combined.
- Mix in the red food coloring until the batter is evenly colored.
- In a separate bowl, beat the cream cheese until smooth. Add the powdered sugar, egg, and vanilla extract, mixing until creamy and well combined.
- Pour half of the red velvet batter into the prepared baking pan, spreading it evenly.
- Drop spoonfuls of the cheesecake mixture over the red velvet layer.
- Pour the remaining red velvet batter on top and gently swirl with a knife to create a marbled effect.
- Bake for 30-35 minutes, or until a toothpick inserted into the center comes out with a few moist crumbs.
- Allow to cool in the pan before cutting into squares.
Nutrition
Notes
- For a richer flavor, try adding a teaspoon of espresso powder to the brownie batter.
- You can substitute the red food coloring with beet juice for a natural alternative.