

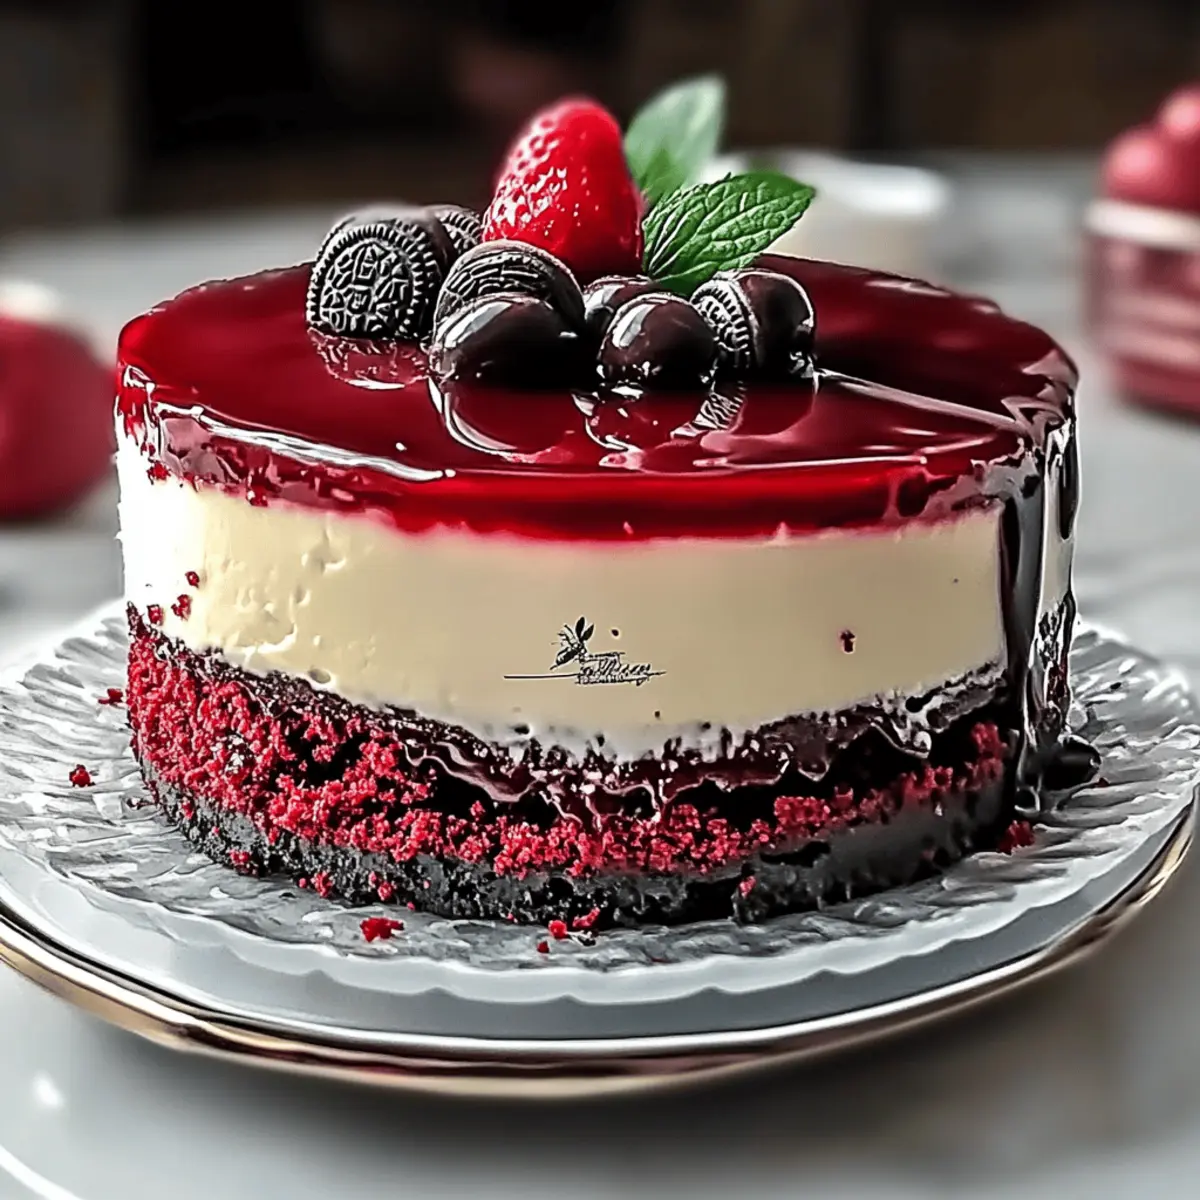
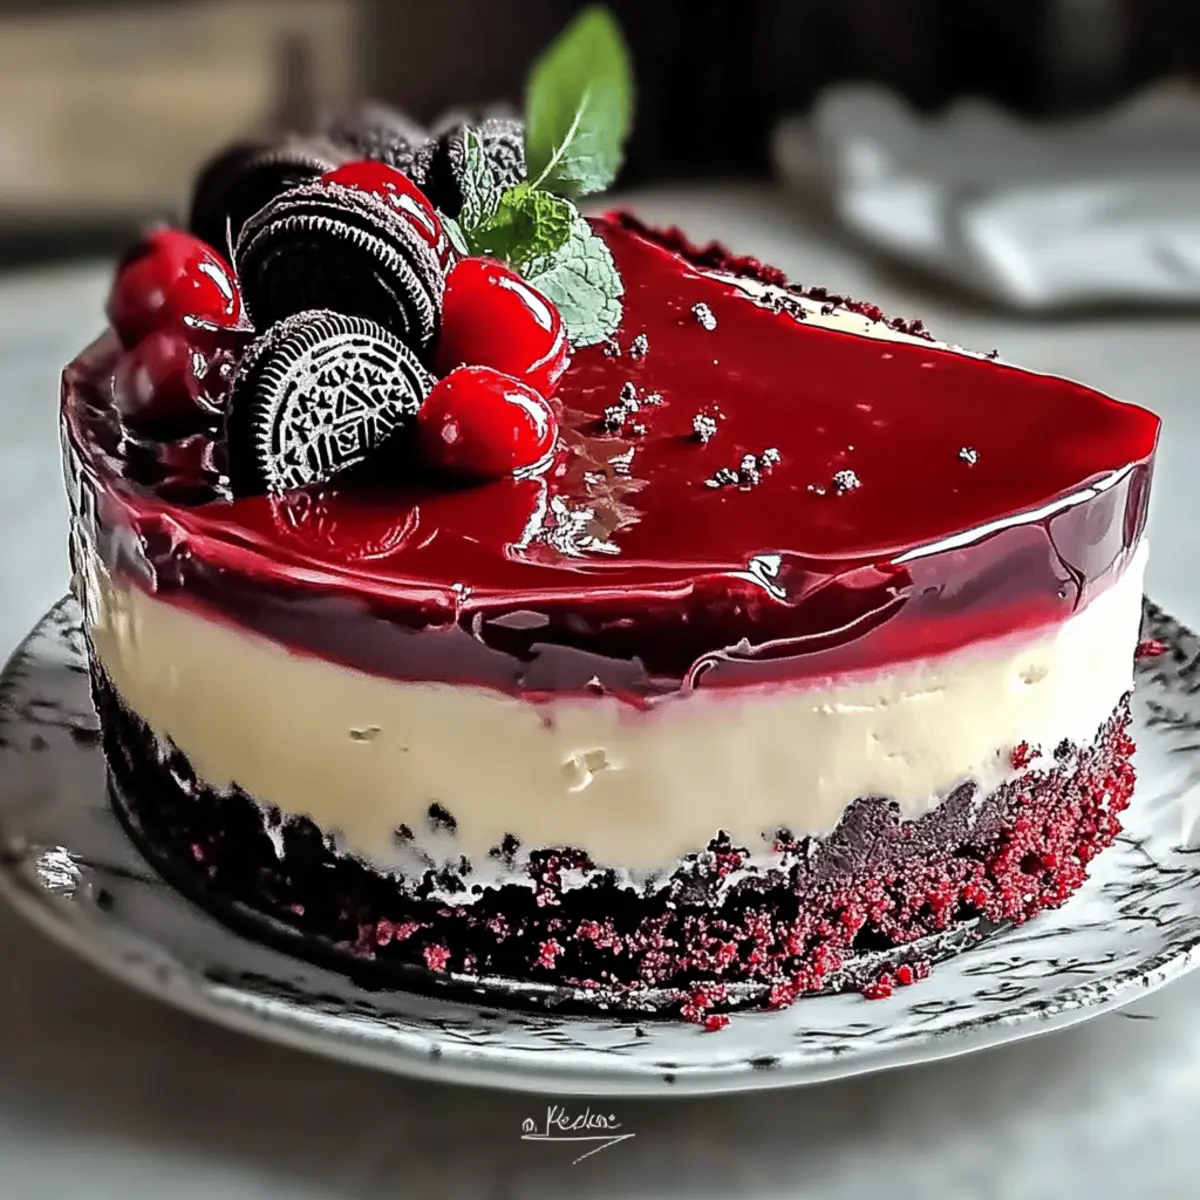
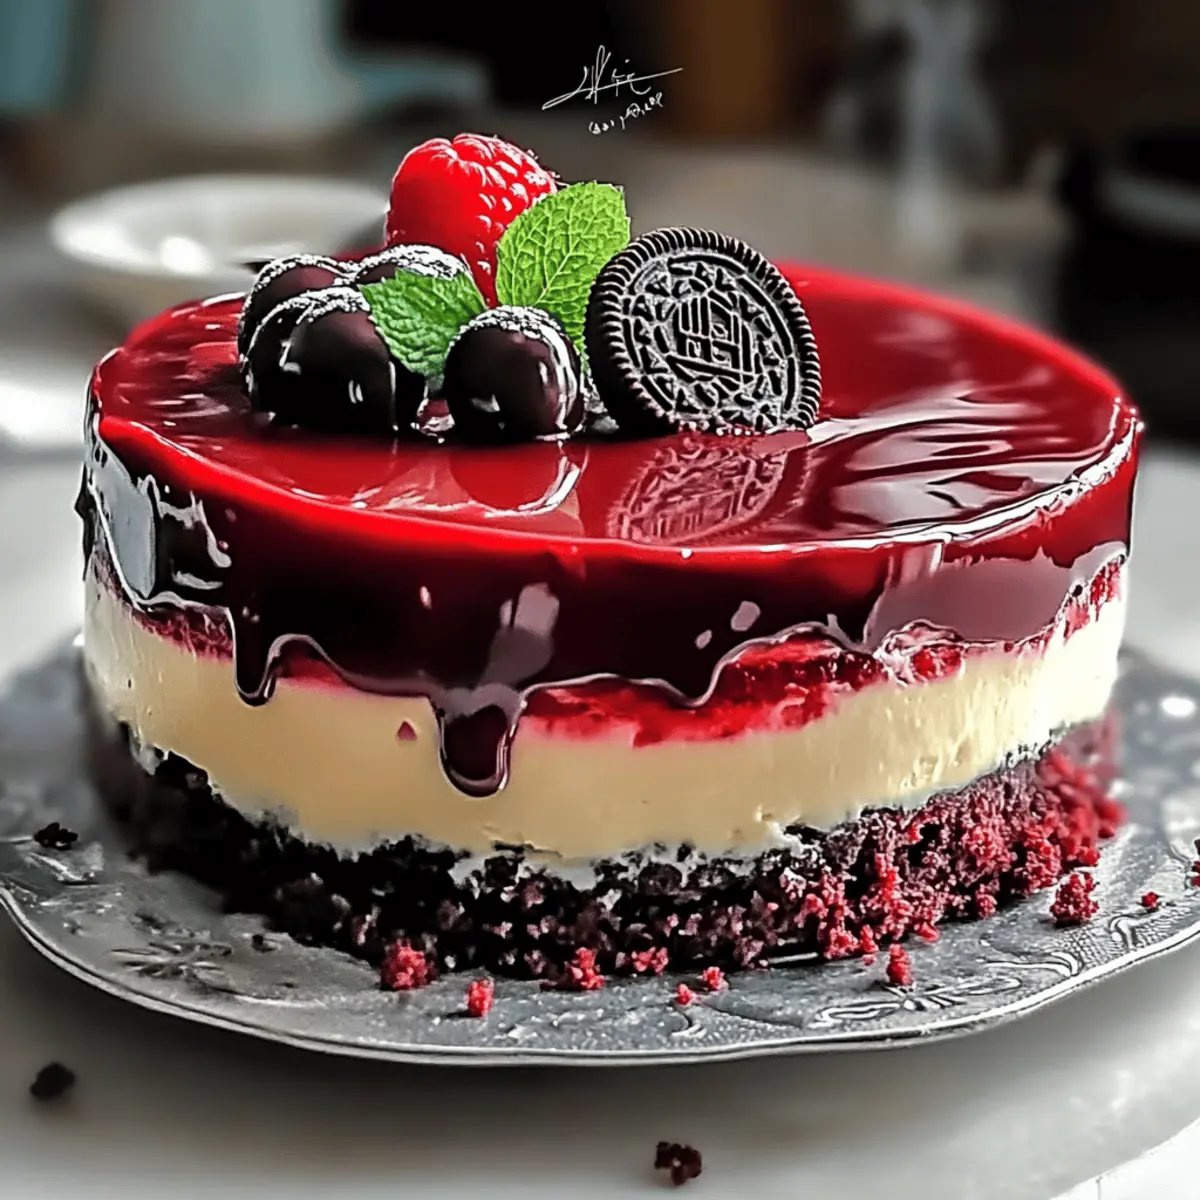
As I sifted through my kitchen, a burst of inspiration struck—what if I could combine rich, velvety goodness with creamy cheesecake magic? That’s how I fell in love with my Irresistible Red Velvet Cheesecake with Oreo Delight. This stunning dessert, with its vibrant crimson layers and luscious filling, transforms any gathering into an unforgettable celebration. It’s quick to prepare and offers a gluten-free option, making it accessible for everyone to dive into something truly special. Whether you’re marking a birthday or simply indulging in a sweet treat with loved ones, this dessert promises to be the star of your table. Ready to create something extraordinary? Let’s dive into the recipe!

Why is Red Velvet Cheesecake a Must-Try?
Irresistible Flavor: The rich combination of creamy cheesecake and luscious red velvet creates a flavor explosion that will captivate your taste buds.
Crowd-Pleasing Delight: This dessert shines at any celebration, effortlessly impressing friends and family, from birthdays to holiday gatherings.
Quick to Prepare: With straightforward steps, whipping up this masterpiece can fit easily into your busy schedule—no extensive baking skills required!
Versatile Options: Customizable for various diets, this recipe allows for a gluten-free twist, ensuring everyone can indulge. For more delicious variations, try our Pecan Pie Cheesecake or our Tiramisu Cheesecake Dessert.
Visual Showstopper: The stunning layers and decadent toppings make this cheesecake a feast for the eyes as well as the palate, perfect for sharing those precious moments!
Red Velvet Cheesecake Ingredients
Get ready to gather the essentials for this delightful dessert!
For the Cake
- All-Purpose Flour – Provides the perfect structure; to simplify for gluten-free diets, substitute with a gluten-free flour blend.
- Cocoa Powder – Packs in a rich chocolate flavor, perfect for enhancing that velvety texture.
- Salt – Balances out the sweetness and elevates the flavors in your cake.
- Butter – Adds richness and moisture; opt for unsalted to control salt levels better.
- Granulated Sugar – Sweetens the cake beautifully and contributes to a luscious texture.
- Sour Cream – Introduces tanginess and moisture for that extra kick.
- Vegetable Oil – Keeps your cake tender and moist; a key to a delightful bite.
- Vanilla Extract – Enhances the overall flavor, making each slice more irresistible.
- Eggs – Provide essential binding and structure; always best to use room temperature for smoother mixing.
- Red Food Coloring – Gives that iconic vibrant red hue to your cake.
- Buttermilk – Adds moisture and acidity, ensuring a tender crumb every time.
- Baking Soda & Vinegar – Work together to create a light and airy cake that rises beautifully.
For the Cheesecake Filling
- Oreos – Crushed Oreos add delightful flavor and texture to the rich cheesecake.
- Cream Cheese – The creamy foundation for the cheesecake; use full-fat for the best results.
- Cornstarch – Stabilizes the filling to help prevent cracks, keeping it looking gorgeous.
- Sour Cream (for Cheesecake) – Adds creaminess and a subtle tang to the filling.
- Vanilla Extract (for Cheesecake) – Boosts the cheesecake flavor profile even further.
- Eggs (for Cheesecake) – Essential for binding; make sure they’re at room temperature for the best mixing.
For the Ganache
- Heavy Cream – Used to make the luxurious ganache that tops off this treat perfectly.
- Dark Chocolate Chips – Create a rich ganache topping that adds depth and a touch of indulgence to every slice.
With this wonderfully curated list of ingredients at your fingertips, it’s time to bring your irresistible Red Velvet Cheesecake to life!
Step‑by‑Step Instructions for Irresistible Red Velvet Cheesecake with Oreo Delight
Step 1: Preheat and Prepare Pans
Begin by preheating your oven to 350°F (175°C). Prepare a 9-inch springform pan and an 8-inch round cake pan by lining the bottom with parchment paper and greasing the sides. This step ensures that your layers bake evenly and release easily after cooling—a vital part of crafting a beautiful Red Velvet Cheesecake.
Step 2: Mix Dry Ingredients
In a large mixing bowl, whisk together 2 cups of all-purpose flour, 1 tablespoon of cocoa powder, and 1 teaspoon of salt until well combined. This mixture will contribute to the structure and flavor of your cake layers. The rich cocoa will enhance the deep red color while balancing the sweetness, ensuring a delightful taste throughout the cheesecake.
Step 3: Cream Butter and Sugar
In another bowl, cream together 1 cup of unsalted butter and 2 cups of granulated sugar until the mixture is light and fluffy, approximately 3-5 minutes. This step introduces air into the batter, which will create a tender cake. Once fluffy, mix in 1 cup of sour cream, ½ cup of vegetable oil, 2 teaspoons of vanilla extract, 3 room-temperature eggs, and 2 tablespoons of red food coloring until smoothly combined.
Step 4: Combine Wet and Dry Ingredients
Gradually add the dry ingredient mixture to the wet ingredients, alternating with 1 cup of buttermilk, starting and ending with the dry ingredients. Mix until just combined, ensuring not to overmix. Then, add 1 teaspoon of baking soda and 1 tablespoon of vinegar, which will activate the leavening process, helping your Red Velvet layers rise beautifully in the oven.
Step 5: Bake the Cake Layers
Divide the cake batter evenly between the prepared pans and bake in the preheated oven for 18-20 minutes or until a toothpick inserted into the center comes out clean. Once baked, remove the pans from the oven and cool completely on wire racks. This cooling step is crucial for creating stable layers that will support the creamy cheesecake filling.
Step 6: Prepare the Cheesecake Filling
Crush 1 ½ cups of Oreos into fine crumbs and set aside. In a large mixing bowl, beat 16 ounces of cream cheese until smooth and creamy. Gradually incorporate the crushed Oreos, 1 cup of granulated sugar, 2 tablespoons of cornstarch, 1 cup of sour cream, 2 teaspoons of vanilla extract, and 3 eggs. Ensure the mixture is well blended for a rich cheesecake experience.
Step 7: Assemble the Cheesecake
Pour the cheesecake filling over the cooled red velvet cake layers in the springform pan, smoothing it evenly with a spatula. This is the moment where the layers join, creating a stunning Red Velvet Cheesecake. Make sure the filling is distributed uniformly to achieve an even bake.
Step 8: Bake in a Water Bath
Prepare a water bath by placing the springform pan in a larger baking dish filled with hot water, and bake at 300°F (150°C) for 90 minutes. The water bath helps maintain moisture, preventing cracks during baking. Once done, turn off the oven and let the cheesecake cool gradually inside the oven for at least 1 hour.
Step 9: Chill Overnight
After cooling, refrigerate the cheesecake overnight to let it set properly. This step enhances the flavors and transforms your dessert into a rich, creamy delight. The chilling process is crucial in achieving that perfect texture that makes your Red Velvet Cheesecake so irresistible.
Step 10: Prepare the Ganache
To make the ganache, heat 1 cup of heavy cream in the microwave until just boiling, then pour it over 1 cup of dark chocolate chips in a mixing bowl. Let it sit for a few moments, then stir until smooth and glossy. This decadent topping will elevate the cheesecake, adding a luscious chocolatey finish.
Step 11: Top and Serve
Once the ganache has cooled slightly, pour it over the chilled cheesecake, allowing it to drip down the sides. For an extra special touch, decorate with crumbled red velvet cake and a dollop of cream cheese frosting. This beautiful presentation will have everyone eager to indulge in your remarkable Irresistible Red Velvet Cheesecake with Oreo Delight!
Expert Tips for Red Velvet Cheesecake
-
Room Temperature Ingredients: Ensure all ingredients, especially eggs and cream cheese, are at room temperature for a smooth batter and even baking.
-
Mix Carefully: Avoid overmixing after adding eggs to prevent cracks in the cheesecake during baking.
-
Use a Water Bath: Bake with a water bath to maintain moisture, helping your Red Velvet Cheesecake remain creamy without drying out.
-
Gradual Cooling: Cool the cheesecake gradually inside the oven after baking to minimize surface cracks and ensure the perfect texture.
-
Chill Overnight: Refrigerating overnight enhances flavor and ensures the cheesecake sets properly, resulting in a beautifully cohesive dessert.
Make Ahead Options
These Irresistible Red Velvet Cheesecakes are perfect for meal prep, making your celebrations smoother and more enjoyable! You can bake the red velvet layers up to 3 days in advance; simply cool them completely, wrap them tightly in plastic wrap, and refrigerate to preserve their moisture and texture. Additionally, the cheesecake filling can be prepared up to 24 hours before assembly. Just store it in the refrigerator in an airtight container to keep it fresh and flavorful. When you’re ready to serve, layer the cheesecake and red velvet cake, bake in a water bath, cool gradually, and refrigerate overnight for optimal taste—resulting in a stunning dessert that tastes just as delicious as the day it was made!
How to Store and Freeze Red Velvet Cheesecake
Fridge: Store your Red Velvet Cheesecake covered in the fridge for up to 5 days to keep it fresh and flavorful.
Freezer: If you want to enjoy this indulgent treat later, freeze it tightly wrapped in plastic wrap and aluminum foil for up to 3 months.
Thawing: When ready to enjoy, thaw the frozen cheesecake in the refrigerator overnight for the best texture and taste.
Reheating: While serving, it’s best to enjoy it chilled; however, you can briefly microwave individual slices for 10-15 seconds if you prefer it slightly warm.
Red Velvet Cheesecake Variations
Feel free to let your creativity shine and customize this dessert to suit your tastes!
-
Gluten-Free: Swap out all-purpose flour for a gluten-free flour blend to make this cheesecake suitable for gluten-sensitive friends and family.
-
Cookie Variety: Substitute Oreos for other cookie types like chocolate sandwich cookies or even graham crackers for a different flavor profile that excites your palate.
-
Extra Chocolate: For chocoholics, add in some mini chocolate chips to the cheesecake filling to enhance the decadence and create a delightful texture.
-
Fruit Toppings: Top with fresh strawberries or raspberries for a refreshing contrast that brightens the rich cheesecake while adding a burst of fruity flavor.
-
Spiced Up: Add a pinch of cinnamon or nutmeg to the cake batter for a subtle warmth that elevates the overall flavor of your Red Velvet Cheesecake.
-
Caramel Drizzle: Drizzle with salted caramel sauce for a sweet and salty twist that brings a gourmet touch to your dessert and takes it to new heights.
-
Nutty Crunch: Incorporate chopped pecans or walnuts in the crust for added texture and a pleasant nutty flavor that pairs beautifully with sweet cheesecake layers.
-
Mini Cheesecakes: Transform this recipe into mini cheesecakes by using a muffin tin, perfect for portion control and fun single-serve treats for gatherings!
Explore these ideas to create a Red Velvet Cheesecake that’s uniquely yours. For more delightful desserts, consider trying our No-Bake Oreo Cheesecake or indulge in a slice of Caramel Swirl Cheesecake.
What to Serve with Irresistible Red Velvet Cheesecake with Oreo Delight
Elevate your celebration with delightful pairings that complement the lush appeal of this stunning dessert.
-
Cold Vanilla Ice Cream: The creamy, cold treat balances the richness, creating a delightful contrast that enchants each bite.
-
Fresh Berries: A handful of juicy strawberries or raspberries adds a refreshing tartness, perfect for cutting through the sweetness.
-
Chocolate-Covered Strawberries: A decadent addition that mirrors the cheesecake’s flavors, it’s the ultimate indulgence for chocolate lovers.
-
Whipped Cream: Light and airy, it offers a soft texture that pairs beautifully with the dense layers of the cheesecake.
-
Mint Leaves: A touch of fresh mint brightens up the platter, introducing a fragrant note that elevates the dessert experience.
-
Sparkling Water: The effervescence refreshes the palate, making it a perfect non-alcoholic option for drinks.
-
Espresso or Coffee: The deep, rich tones of coffee enhance the dessert and provide a warm contrast to its creamy texture.
-
Chocolate Ganache Truffles: For a double dose of indulgence, these truffles echo the cheesecake’s flavors, creating a luxurious finish.
-
Caramel Sauce: Drizzling a bit of caramel provides a sweet layer that enhances the overall richness and elevates the gorgeous presentation.
With these pairings, not only will you flatter the magnificent Red Velvet Cheesecake, but you will also create a picnic of flavors that will keep your guests talking long after the plates are empty!
Red Velvet Cheesecake Recipe FAQs
How do I choose the right color of red food coloring for my Red Velvet Cheesecake?
Absolutely! Choose a high-quality red food coloring that is specifically meant for baking. Gel food coloring often gives the best results, providing a vibrant hue without altering the cake’s texture. I recommend using 1-2 tablespoons depending on how deep a red you desire—just remember to add it slowly and mix until you achieve your perfect shade!
What’s the best way to store leftover Red Velvet Cheesecake?
Very easy! Store your leftovers covered in the fridge for up to 5 days. Make sure to use an airtight container to maintain that scrumptious flavor. If you want to save some for later, wrap your cheesecake tightly in plastic wrap, followed by aluminum foil, and freeze for up to 3 months. Just remember to let it thaw in the refrigerator overnight before serving again for the best texture!
Can I freeze Red Velvet Cheesecake, and if so, how?
Absolutely! To freeze your Red Velvet Cheesecake, first allow it to cool completely after baking and chilling. Next, wrap it tightly in plastic wrap, and then wrap it again in aluminum foil. This double-layering protects it from freezer burn. You can safely keep it in the freezer for up to 3 months. When you’re ready to indulge, simply thaw it overnight in the refrigerator to preserve its creamy texture.
What should I do if my cheesecake cracks while baking?
No worries, this happens to the best of us! If your cheesecake cracks, it’s often due to rapid temperature changes or overmixing. To prevent this in the future, make sure to gradually cool your cheesecake by leaving it in the oven with the door slightly ajar. Additionally, using a water bath while baking helps maintain moisture and regulates heat. If cracks do happen, a lovely ganache topping can cover any imperfections beautifully!
Is this Red Velvet Cheesecake suitable for those with gluten allergies?
Definitely! I’ve included a gluten-free option in this recipe—just substitute the all-purpose flour with a gluten-free flour blend. Make sure to check the labels on all other ingredients like Oreo cookies if you’re making it for someone with gluten sensitivities. Your gluten-free friends will surely appreciate the thought and love put into their indulgence!
What types of toppings go well with Red Velvet Cheesecake?
The more, the merrier! You can keep things classic with a drizzle of ganache and a sprinkle of crushed Oreos, or try fresh berries for a fruity twist. Crumbled pieces of red velvet cake or chocolate shavings also elevate the presentation, transforming your cheesecake into an even more decadent delight that’s perfect for sharing at any celebration!
Decadent Red Velvet Cheesecake That Will Steal Hearts
Ingredients
Equipment
Method
- Preheat your oven to 350°F (175°C) and prepare a 9-inch springform pan and an 8-inch round cake pan.
- In a large mixing bowl, whisk together the dry ingredients (flour, cocoa powder, and salt).
- In another bowl, cream together the butter and sugar until light and fluffy, then mix in the sour cream, oil, vanilla extract, eggs, and red food coloring.
- Gradually add the dry ingredients and buttermilk to the wet ingredients, mixing until just combined.
- Divide the batter between the pans and bake for 18-20 minutes. Cool on wire racks.
- For the cheesecake filling, beat the cream cheese until smooth, then mix in the crushed Oreos and remaining filling ingredients.
- Pour the cheesecake filling over the cooled cake layers and smooth it out.
- Bake the cheesecake in a water bath at 300°F (150°C) for 90 minutes, then cool gradually inside the oven.
- Refrigerate the cheesecake overnight to let it set.
- For the ganache, heat the cream and pour it over the chocolate chips. Stir until smooth.
- Pour the ganache over the chilled cheesecake and let it set before serving.