

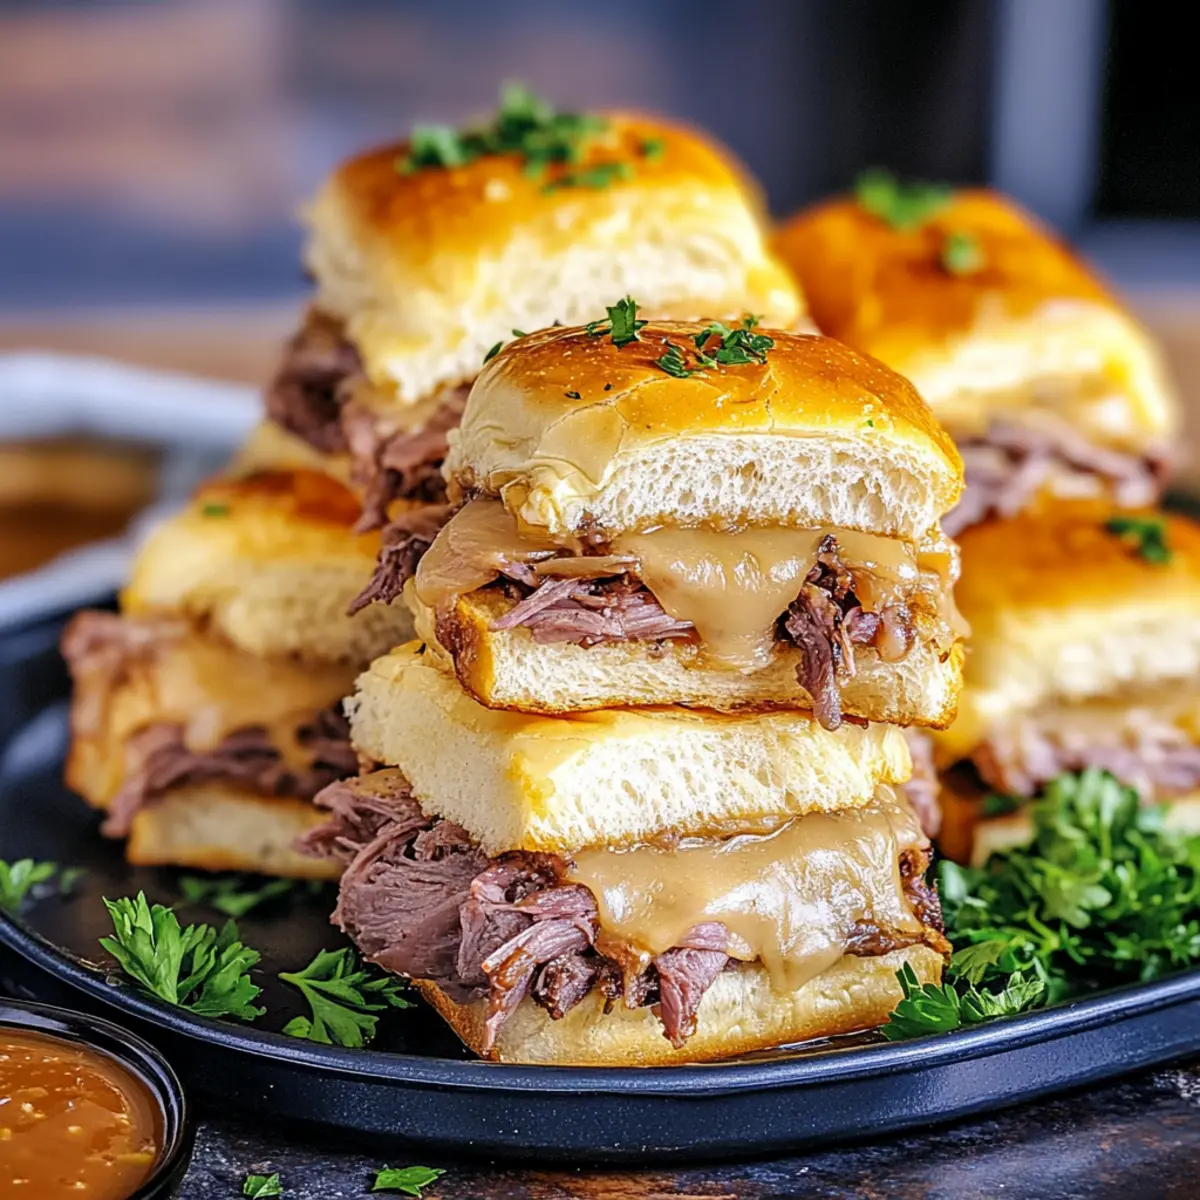
As I was stirring the pot of savory goodness on my stovetop, the delightful aroma of caramelized onions filled the air, instantly transporting me to my favorite deli. That’s the magic behind these Melty French Dip Sliders—comfort food at its finest! Crafted for everything from casual weeknight dinners to festive gatherings, these sliders are a crowd-pleasing hit. Imagine tender roast beef, ooey-gooey provolone cheese, and soft buttery rolls coming together in a warm, inviting embrace. The best part? Not only are they quick to prepare, but they’re an ingenious way to use up leftover meats! Let’s dive into the recipe and discover together how we can create these mouthwatering sliders that will have everyone coming back for seconds. Are you ready to elevate your next meal?

Why are French Dip Sliders a game changer?
Simplicity at Its Best: These sliders are incredibly easy to prepare, making them perfect for busy weekday dinners or surprise guests.
Comforting Indulgence: Each bite features a harmonious blend of savory roast beef and gooey provolone, nestled between soft, buttery rolls.
Crowd-Pleaser: Whether it’s a family gathering or a casual get-together, these sliders are sure to impress and satisfy.
Adaptable for Leftovers: Transform your leftover meats into a delightful meal that everyone will rave about! The combination of ingredients can also cater to different tastes, making it easy to modify for your palate.
Perfect for Dipping: Served with au jus, these sliders take comfort food to a whole new level, giving you that truly authentic French dip experience. Enjoy them alongside a simple salad or some crispy potato wedges for a complete meal!
French Dip Sliders Ingredients
• The perfect components for your delicious sliders await!
For the Sliders
- Unsalted Butter – Adds richness and moisture to each slider.
- Medium Onion – Provides a savory foundation; caramelizing enhances sweetness!
- Fresh Thyme – Infuses aromatic flavor; use half the amount of dried thyme if needed.
- Kosher Salt – Elevates the overall taste; adjust if using table salt.
- Black Pepper – Adds a touch of heat; adjust to fit your personal preference.
- Sweet Rolls – The ideal base, offering a sweet touch; Hawaiian rolls are a favorite choice.
- Provolone Cheese – Melts beautifully for that gooey texture; swap with mozzarella for milder flavor.
- Sliced Deli Roast Beef – The star of the show; leftover pot roast works fantastically as a substitute.
For the Topping
- Melted Unsalted Butter – Brush over rolls for a gorgeous, golden finish.
- Dried Onion Soup Mix – Introduces a depth of flavor; fresh sautéed onions are a great alternative.
For the Au Jus
- Au Jus Gravy Mix – Enhances the dipping experience; highly recommended for an authentic touch!
- Water – Necessary for preparing the au jus mix.
For Garnish
- Fresh Chopped Parsley – Adds a pop of color and freshness to your presentation.
Remember, these French Dip Sliders will bring your comfort food cravings to life!
Step‑by‑Step Instructions for French Dip Sliders
Step 1: Sauté the Onions
In a large skillet, melt 3 tablespoons of unsalted butter over medium heat. Add thinly sliced medium onions and sauté for about 12-15 minutes, until they become soft and golden brown. Stir in fresh thyme, kosher salt, and black pepper to enhance the flavor. Once done, transfer the onions to a plate and set aside while you prepare the baking dish.
Step 2: Prepare the Baking Dish
Preheat your oven to 350°F (175°C). Meanwhile, take your sweet rolls and slice them in half horizontally, keeping the bottom halves intact. Place the bottom half of the rolls cut-side up in an 11×7 baking dish. Make sure they fit snugly together, as this will hold all the delicious flavors of your French Dip Sliders.
Step 3: Layer the Ingredients
Start building your sliders by layering half of the provolone cheese on the bottom halves of the rolls. Next, add a generous layer of sliced deli roast beef, followed by the sautéed onions you prepared earlier. Finally, top this with the remaining provolone cheese to ensure each slider is melty and indulgent. Place the top halves of the rolls over the filling.
Step 4: Brush with Butter Mixture
In a separate bowl, mix the melted unsalted butter with the dried onion soup mix until well combined. Brush this flavorful mixture over the top of the rolls using a pastry brush, ensuring each roll is coated for that golden, crispy finish during baking. This step is crucial for infusing extra flavor into your French Dip Sliders.
Step 5: Bake the Sliders
Cover the baking dish with aluminum foil, being careful not to let it touch the tops of the rolls. Bake the sliders in the preheated oven for 25 minutes. After this time, remove the foil and bake for an additional 5 minutes, or until the tops are golden brown and slightly crispy. This creates the perfect texture for your sliders.
Step 6: Prepare the Au Jus
While the sliders are baking, prepare the au jus according to the package instructions using water. Heat it in a small saucepan over medium heat until it’s hot and slightly thickened. This savory dipping sauce is essential for the ultimate French Dip experience, complementing the rich flavors of the sliders wonderfully.
Step 7: Serve and Garnish
Once your French Dip Sliders are finished baking, take them out of the oven and let them cool for a couple of minutes. Garnish with freshly chopped parsley for a pop of color and added freshness. Serve the sliders warm alongside the au jus for dipping, inviting everyone to indulge in this delightful comfort food treat!

Make Ahead Options
These French Dip Sliders are a meal prep dream come true! You can assemble the sliders up to 24 hours in advance, keeping them covered in the refrigerator to maintain freshness. Simply prep the filling with sautéed onions and layers of roast beef and cheese, then store everything assembled but unbaked. When you’re ready to serve, preheat your oven and bake as directed for a golden, bubbly finish. To ensure that each bite is just as delicious as if they were made fresh, avoid adding the butter mixture until just before baking. This way, you’ll save time without sacrificing flavor, perfect for busy weeknights or impromptu gatherings!
How to Store and Freeze French Dip Sliders
Fridge: Keep leftover French Dip Sliders in an airtight container for up to 3 days to maintain freshness and flavor. Reheat them in the oven to restore the crispy texture.
Freezer: If you want to freeze them, wrap individual sliders tightly in plastic wrap and then in aluminum foil. They can be frozen for up to 2 months.
Reheating: To reheat thawed sliders, place them in a preheated oven at 350°F for about 10-12 minutes until heated through. This helps keep the rolls soft while warming the fillings.
Make-Ahead Tip: Assemble the French Dip Sliders unbaked and refrigerate for up to 24 hours. Just pop them in the oven when you’re ready to serve!
Expert Tips for French Dip Sliders
- Roll Preparation: Toast the bottoms of the sweet rolls in melted butter to add flavor and prevent sogginess; it’s a game-changer!
- Onion Cooking: Caramelize the onions until they are deeply golden for maximum sweetness; avoid rushing this step for better flavor.
- Filling Distribution: Ensure even layering of roast beef, onions, and cheese to guarantee every slider packs a flavorful punch.
- Adjusting Flavors: Feel free to mix up the herbs and seasonings; adding Italian herbs or Worcestershire sauce can enhance your French Dip Sliders.
- Cooling Time: Allow the sliders to cool slightly after baking; this helps with easy serving and ensures they hold together beautifully.
- Make-Ahead Option: Assemble your sliders in advance and refrigerate; you can bake them just before serving for ultimate convenience!
French Dip Sliders Variations & Substitutions
Feel free to get creative with these sliders! There are endless possibilities to tailor them to your taste buds and dietary needs.
- Meat Swap: Substitute the roast beef with turkey, ham, or shredded chicken for exciting flavor variations. The beauty of this dish lies in its adaptability!
- Cheese Choices: Experiment with different cheeses like sharp cheddar or creamy Swiss to find your personal favorite. Each cheese brings a unique taste that elevates the sliders.
- Herb Infusion: Add fresh basil or rosemary for a fragrant twist on the classic. A sprinkle of Italian seasoning can elevate your sliders, merging comforting flavors with a gourmet touch.
- Spice it Up: For a bit of heat, incorporate sliced jalapeños or a dash of hot sauce in the filling. The added kick will delight spice lovers and make the dish more intriguing.
- Condiment Customization: Try using BBQ sauce or a creamy horseradish spread instead of au jus for a thicker, flavorful sauce option. Each quick dip will surprise your palate!
- Veggie Boost: Add sautéed bell peppers or mushrooms to the filling for extra veggies. This not only enhances flavor but also adds nutritional value to your tasty sliders.
- Gluten-Free: Use gluten-free rolls if you’re looking to make this a gluten-free meal. This simple swap ensures everyone at your table can enjoy it without worry.
- Vegetarian Version: Replace the meat with a combination of grilled portobello mushrooms and cheese for a hearty vegetarian twist. Pair it with a savory oil for depth.
With so many options, your French Dip Sliders can evolve into new family favorites! And for even more inspiration, don’t forget to check out delicious side dishes like crispy potato wedges or a refreshing simple salad to complete your meal.
What to Serve with French Dip Sliders
Create the ultimate comfort meal to wow your family and friends with these delectable sliders!
-
Crispy Potato Wedges: Crunchy on the outside and fluffy inside, these wedges add a satisfying contrast to the sliders’ gooeyness. Dip them in a tangy ranch sauce for an extra flavor boost.
-
Classic Coleslaw: A refreshing and crunchy side, coleslaw enhances the meal by adding a zingy zest that balances the savory flavors of the sliders. Plus, it’s a colorful addition to your table!
-
Garlic Butter Green Beans: These vibrant veggies, tossed in garlic butter, offer a fresh bite that beautifully complements the rich sliders. The crunch of perfectly cooked green beans creates a delightful textural harmony.
-
Simple Garden Salad: A light salad featuring crisp lettuce, cherry tomatoes, and cucumber drizzled with balsamic vinaigrette brings brightness to the table, making it a wholesome addition alongside your sliders.
-
Homemade Onion Rings: Crispy onion rings bring that crunch factor to your meal while echoing the onion flavor found in the sliders. Serve them with a side of zesty dipping sauce for a fun twist!
-
Cold Brewed Iced Tea: A refreshing glass of iced tea with a hint of lemon offers a cooling contrast that pairs wonderfully with the hearty sliders. A treat for the senses on a cozy evening!
-
Molten Lava Cake: End your meal on a sweet note with a rich, gooey dessert that promises satisfaction in every bite. The indulgent chocolate oozes as you dig in, resulting in pure bliss after those hearty sliders!
French Dip Sliders Recipe FAQs
How do I choose the right bread for my sliders?
Absolutely! For the best flavor and texture, I recommend using Hawaiian sweet rolls. They are soft, slightly sweet, and hold up beautifully with the hearty ingredients. If you prefer something sturdier, try using brioche or potato rolls as alternatives. Just make sure they’re fresh for that perfect bite!
What’s the best way to store leftover sliders?
To keep your leftover French Dip Sliders fresh, place them in an airtight container in the refrigerator. They can last for up to 3 days. When you’re ready to enjoy them again, simply reheat in the oven at 350°F for about 10-12 minutes, which helps restore the crispy texture you love.
Can I freeze French Dip Sliders for later?
Definitely! To freeze, wrap each slider individually in plastic wrap, followed by aluminum foil to prevent freezer burn. They can be stored in the freezer for up to 2 months. When you want to enjoy them, thaw in the refrigerator overnight and reheat in the oven at 350°F for about 10-12 minutes until heated through.
What do I do if my sliders turn out soggy?
Very! Soggy sliders can be prevented easily. Ensure that you toast the bottom halves of the rolls in melted butter before layering your ingredients. This step creates a barrier against moisture. Additionally, avoid overfilling the sliders and let them cool slightly after baking for better structural integrity.
Are there any dietary considerations I should keep in mind?
Absolutely! If you or someone you’re serving has dietary restrictions, consider using gluten-free rolls or alternative meats like turkey or even plant-based proteins. Make sure to check the ingredients of your au jus mix and onion soup mix for any allergens, as they may contain gluten or artificial additives.
Can I prepare these sliders ahead of time?
Of course! To make ahead, simply assemble the sliders, cover them tightly with plastic wrap, and refrigerate unbaked for up to 24 hours. When you’re ready to serve, bake them directly from the fridge, adding an extra 5 minutes to the cooking time to ensure they’re perfectly warm and bubbly on game day!

Delicious French Dip Sliders for Cozy Family Gatherings
Ingredients
Equipment
Method
- In a large skillet, melt 3 tablespoons of unsalted butter over medium heat. Add thinly sliced medium onions and sauté for about 12-15 minutes, until they become soft and golden brown. Stir in fresh thyme, kosher salt, and black pepper to enhance the flavor. Once done, transfer the onions to a plate and set aside while you prepare the baking dish.
- Preheat your oven to 350°F (175°C). Meanwhile, take your sweet rolls and slice them in half horizontally, keeping the bottom halves intact. Place the bottom half of the rolls cut-side up in an 11x7 baking dish. Make sure they fit snugly together, as this will hold all the delicious flavors of your French Dip Sliders.
- Start building your sliders by layering half of the provolone cheese on the bottom halves of the rolls. Next, add a generous layer of sliced deli roast beef, followed by the sautéed onions you prepared earlier. Finally, top this with the remaining provolone cheese to ensure each slider is melty and indulgent. Place the top halves of the rolls over the filling.
- In a separate bowl, mix the melted unsalted butter with the dried onion soup mix until well combined. Brush this flavorful mixture over the top of the rolls using a pastry brush, ensuring each roll is coated for that golden, crispy finish during baking. This step is crucial for infusing extra flavor into your French Dip Sliders.
- Cover the baking dish with aluminum foil, being careful not to let it touch the tops of the rolls. Bake the sliders in the preheated oven for 25 minutes. After this time, remove the foil and bake for an additional 5 minutes, or until the tops are golden brown and slightly crispy. This creates the perfect texture for your sliders.
- While the sliders are baking, prepare the au jus according to the package instructions using water. Heat it in a small saucepan over medium heat until it’s hot and slightly thickened. This savory dipping sauce is essential for the ultimate French Dip experience, complementing the rich flavors of the sliders wonderfully.
- Once your French Dip Sliders are finished baking, take them out of the oven and let them cool for a couple of minutes. Garnish with freshly chopped parsley for a pop of color and added freshness. Serve the sliders warm alongside the au jus for dipping, inviting everyone to indulge in this delightful comfort food treat!