

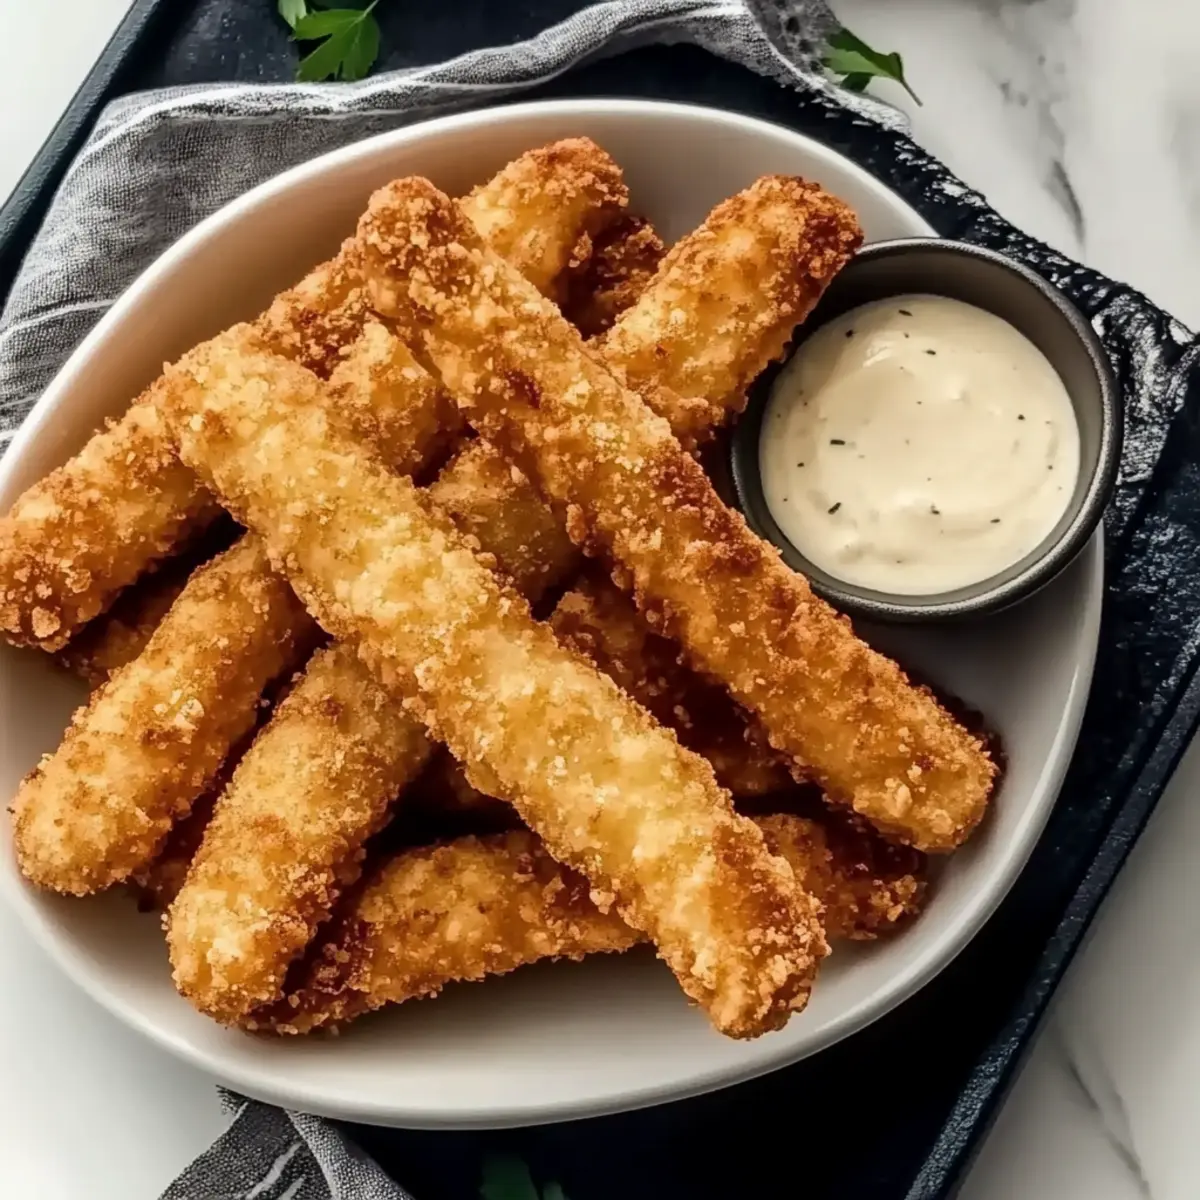
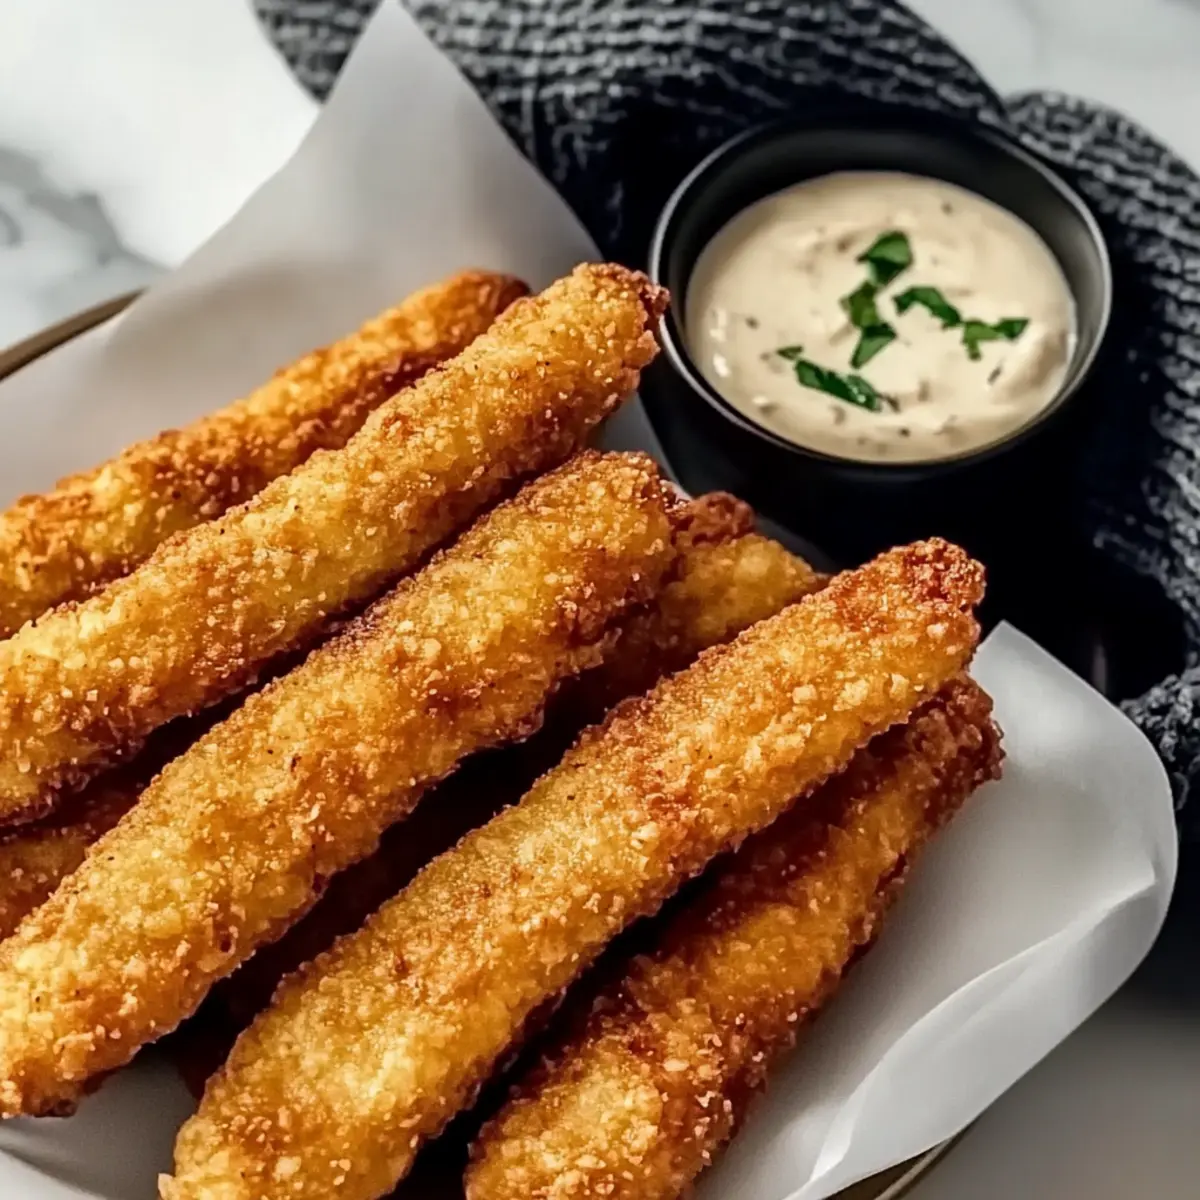
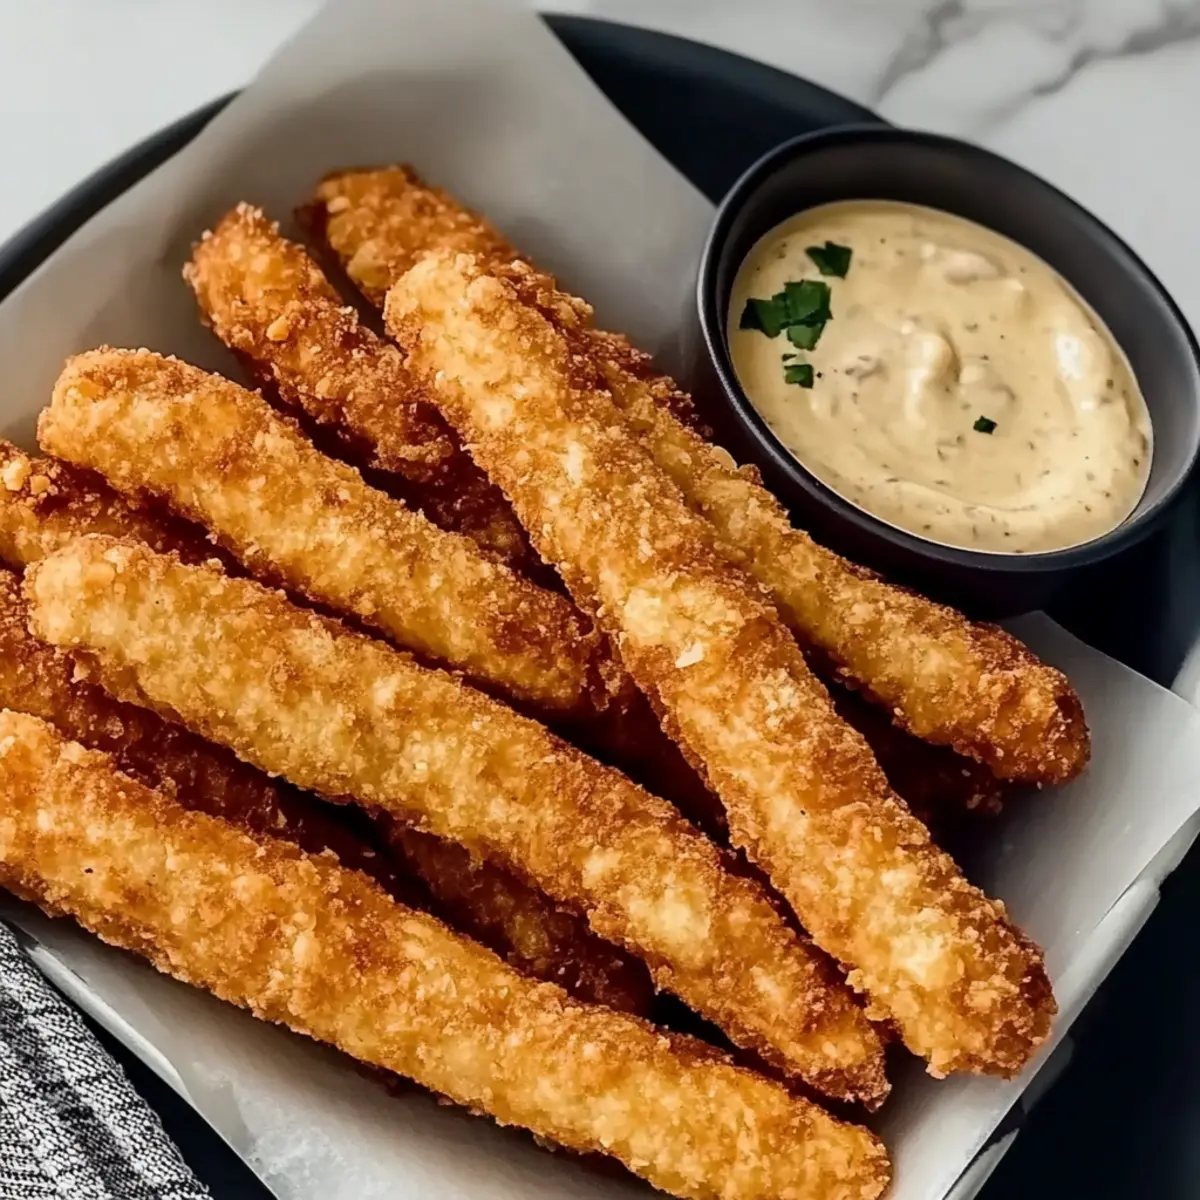
A satisfying crunch reaches your ears as you pull these vibrant Baked Canned Tuna Fish Sticks from the oven. It’s a delightful moment that even the most seasoned home-chef will appreciate. Packed with cheesy goodness and seasoned just right, this quick dinner solution transforms humble canned tuna into a crispy family favorite. These fish sticks are perfect for busy weeknights when time is tight and kids are hungry, offering a healthy and budget-friendly option that everyone can enjoy. With simple ingredients and easy prep, you’ll have a delightful dish ready in no time. Curious about how to whip up this crowd-pleaser? Let’s dive into the recipe!

Why Are These Tuna Fish Sticks So Special?
Crispy Texture: The perfect balance of a crunchy outside and a cheesy, moist interior makes every bite irresistible.
Budget-Friendly: Utilizing canned tuna as the base means you can create an amazing meal without breaking the bank.
Kid-Approved: Even picky eaters will devour these delightful fish sticks, making dinner stress-free!
Quick Prep: With just a few simple steps and minimal time required, you can get dinner on the table in no time.
Versatile Dipping Options: Pair them with your favorite sauces, like tartar or spicy mayo, to suit every family member’s taste preferences.
Transform your dinner routine with these baked tuna sticks; they are an easy-to-make alternative that can stand alongside other favorites like Baked Chicken Thighs or Savory Baked Meatballs. Enjoy a satisfying meal that’s sure to become a staple!
Baked Canned Tuna Fish Sticks Ingredients
• All you need for this delightful dish!
For the Tuna Mixture
- Canned Tuna – The main protein base; use tuna packed in water, well-drained for the best texture.
- Shredded Cheddar Cheese – Adds flavor and helps bind the ingredients together; a great alternative is mozzarella or a dairy-free cheese.
- Egg – Acts as a binding agent; be sure it’s well beaten for even incorporation into the mixture.
For the Coating
- Crushed Pork Rinds – Provides a crispy exterior that everyone loves; can substitute with crushed potato chips if desired.
For Seasoning
- Seasonings (e.g., salt, pepper) – Enhances the flavor; feel free to experiment with herbs and spices to customize the taste of your baked canned tuna fish sticks.
Step‑by‑Step Instructions for Baked Canned Tuna Fish Sticks
Step 1: Preheat and Prepare
Begin by preheating your oven to 400°F (200°C). While it warms up, grab a baking sheet, and line it with parchment paper to prevent sticking and ensure easy clean-up later. This will be the base for your Baked Canned Tuna Fish Sticks, setting the stage for that delightful crispy finish.
Step 2: Drain and Dry the Tuna
Open the cans of tuna and thoroughly drain the liquid. It’s essential to pat the tuna dry with paper towels, ensuring all excess moisture is removed. This simple step will help achieve the desired texture for your Baked Canned Tuna Fish Sticks by preventing sogginess during cooking.
Step 3: Mix the Ingredients
In a spacious mixing bowl, combine the drained tuna, shredded cheddar cheese, and a beaten egg. Sprinkle in your chosen seasonings like salt and pepper. Use a fork to mix everything together until the mixture is sticky and holds together well, forming the perfect base for your fish sticks.
Step 4: Shape the Fish Sticks
With clean hands, take portions of the mixture and shape them into uniform sticks, about the size of your fingers. Aim for a consistent thickness so that all Baked Canned Tuna Fish Sticks cook evenly. Place each stick onto the prepared baking sheet with space in between for airflow and crispness.
Step 5: Coat with Crushed Pork Rinds
Once all sticks are shaped, take the crushed pork rinds and sprinkle them generously over the top of each fish stick. This will create the deliciously crispy crust you’ll love. For an extra crunch, gently press the sticking mixture into the rinds to ensure they adhere well before baking.
Step 6: Bake to Perfection
Slide the baking sheet into the preheated oven and bake the tuna sticks for 20 minutes. Keep an eye on them; they are done when they turn a beautiful golden brown and feel firm to the touch. Your kitchen will soon be filled with an irresistible aroma, signaling that dinner is close!
Step 7: Cool and Serve
Once out of the oven, allow the Baked Canned Tuna Fish Sticks to cool slightly on the baking sheet for about 5 minutes. This resting period helps them firm up, making them easier to handle. Serve them warm with your favorite dipping sauces like tartar sauce or ranch dressing for a delightful meal.
How to Store and Freeze Baked Canned Tuna Fish Sticks
Fridge: Keep leftover baked canned tuna fish sticks in an airtight container for up to 3 days. Placing a paper towel in the container can help maintain their crispiness.
Freezer: For longer storage, freeze the sticks in a single layer on a baking sheet, then transfer to a freezer bag, separating layers with parchment paper. They can be frozen for up to 2 months.
Reheating: To regain their crunch, reheat in an air fryer at 350°F for 3-4 minutes or bake at 375°F for 5-7 minutes, checking to ensure they’re heated through.
Make-Ahead: You can prepare the mixture ahead of time and refrigerate it for up to a day before shaping and baking, making mealtime even quicker.
Expert Tips
• Drain Well: Always ensure your canned tuna is thoroughly drained and patted dry. Extra moisture can lead to soggy Baked Canned Tuna Fish Sticks.
• Chill the Mixture: Let the fish stick mixture rest in the fridge for about 15 minutes before shaping. This helps create the ideal texture for consistent sticks.
• Uniform Shapes: Aim for uniform thickness when shaping the fish sticks. This ensures even baking and a perfectly crispy exterior!
• Crush Finely: For the best crisp, crush pork rinds into fine bits. Larger pieces won’t adhere well and may lead to uneven crunchiness.
• Experiment with Spices: Feel free to get creative! Try adding herbs or even some garlic powder to your seasonings for flavorful Baked Canned Tuna Fish Sticks.
Make Ahead Options
These Baked Canned Tuna Fish Sticks are perfect for meal prep enthusiasts looking to simplify their busy weeknights! You can prepare the tuna mixture up to 24 hours in advance—simply combine the canned tuna, cheese, egg, and seasonings, then store it in an airtight container in the refrigerator. To maintain quality, cover the mixture tightly to prevent drying out. When you’re ready to enjoy, shape the mixture into sticks and coat them with crushed pork rinds before baking. This way, you’ll have delicious, homemade fish sticks ready to go with minimal effort, making dinner time both quick and enjoyable!
Baked Canned Tuna Fish Sticks Variations
Feel free to get creative and make these Baked Canned Tuna Fish Sticks your own!
-
Spicy Twist: Stir in some diced jalapeños or red pepper flakes to the mixture for a zesty kick. Spice lovers will appreciate this punch of flavor!
-
Veggie Boost: Add finely chopped spinach, carrots, or bell peppers to the tuna mixture. It not only enhances nutrition but also introduces vibrant colors and textures.
-
Herb Infusion: Incorporate fresh herbs like parsley or dill into the mixture for a refreshing twist that brightens each bite. A little herb magic goes a long way!
-
Cheese Variety: Experiment with different cheeses such as pepper jack for a spicy twist or cream cheese for a creamy texture. Each cheese brings its unique flavor to the dish!
-
Crispy Coating: Swap crushed pork rinds with panko breadcrumbs for a lighter, airy crunch. This addition will provide a delicious contrast to the tender interior.
-
Inside-Out Sticks: Form the mixture into mini patties rather than sticks and stuff them with a piece of string cheese for a melty surprise inside. Kids will find this twist irresistible!
-
Breakfast Option: Use this mixture to create a breakfast burrito by adding scrambled eggs and fresh veggies. Pair it with a side of salsa, and you’ve got a delectable morning meal.
Feel inspired? Make sure to check out some other delightful recipes like Baked Chicken Parmesan or Chicken Twice Baked for more culinary adventures that your family will love!
What to Serve with Baked Canned Tuna Fish Sticks
Elevate your meal experience with delightful pairings that perfectly complement the flavors and textures of these crispy fish sticks.
-
Creamy Coleslaw: The cool, crunchy slaw adds a refreshing contrast that balances the warm, crispy fish sticks. A tangy dressing elevates the meal’s flavor profile.
-
Sweet Potato Fries: These naturally sweet and crispy fries provide a satisfying side that pairs beautifully with the savory fish sticks, creating a delicious flavor combination.
-
Garlic Parmesan Roasted Broccoli: A vibrant, roasted side that introduces a garlicky, cheesy element, enhancing your meal while offering a nutritious boost to keep things light.
-
Dip Trio: Offer a selection of tartar sauce, spicy mayo, and zesty marinara. This variety not only caters to different tastes but makes dinner interactive and fun.
-
Classic Caesar Salad: The crisp romaine and creamy dressing bring a delightful crunch, balancing the fish’s texture, and adding a touch of elegance to your meal.
-
Chilled Lemonade: A refreshing drink that cuts through the richness of the baked fish sticks while offering a burst of citrus flavor to brighten the dining experience.
Each of these pairings adds a delightful twist, making dinner feel special and enjoyable for everyone at the table.
Baked Canned Tuna Fish Sticks Recipe FAQs
How do I choose the best canned tuna for this recipe?
Absolutely! For the best results, look for canned tuna packed in water, as it provides a better texture and flavor. Opt for brands that use sustainable fishing practices for an environmentally friendly choice.
How should I store leftover Baked Canned Tuna Fish Sticks?
You can keep leftover Baked Canned Tuna Fish Sticks in an airtight container in the fridge for up to 3 days. I recommend placing a paper towel inside the container to absorb excess moisture and help maintain their crispiness.
Can I freeze the tuna fish sticks?
Yes, you can! To freeze, arrange the sticks in a single layer on a baking sheet lined with parchment paper, ensuring they are not touching. Freeze for about an hour until solid, then transfer to a freezer bag, layering parchment paper between stacks. They’ll stay good for up to 2 months.
What’s the best way to reheat frozen fish sticks?
To reheat, preheat your air fryer to 350°F (about 175°C) and cook for 3-4 minutes until heated through and crispy. Alternatively, if using an oven, bake at 375°F for 5-7 minutes. Keep a close eye on them to avoid drying out!
Can these be made gluten-free?
Very! For a gluten-free option, simply use gluten-free crushed pork rinds or substitute with gluten-free breadcrumbs. Always check the labels on ingredients for hidden gluten sources and ensure your canned tuna is gluten-free as well.
Are there any allergens I should be aware of?
Yes, this recipe contains eggs and cheese, which can be allergens. If you’re preparing for someone with dietary restrictions, consider using egg substitutes like flaxseed meal mixed with water or a dairy-free cheese alternative that suits their needs. Enjoy crafting this delightful dish!
Crispy Baked Canned Tuna Fish Sticks Your Family Will Love
Ingredients
Equipment
Method
- Preheat your oven to 400°F (200°C) and line a baking sheet with parchment paper.
- Open the cans of tuna and drain the liquid. Pat the tuna dry with paper towels.
- Combine the drained tuna, shredded cheddar cheese, and beaten egg in a mixing bowl. Add the chosen seasonings and mix until sticky.
- Shape the mixture into uniform sticks and place them on the prepared baking sheet with space between each.
- Sprinkle crushed pork rinds over each fish stick, pressing them in slightly for better adherence.
- Bake in the preheated oven for 20 minutes, or until golden brown and firm to the touch.
- Allow the fish sticks to cool on the baking sheet for about 5 minutes before serving.