

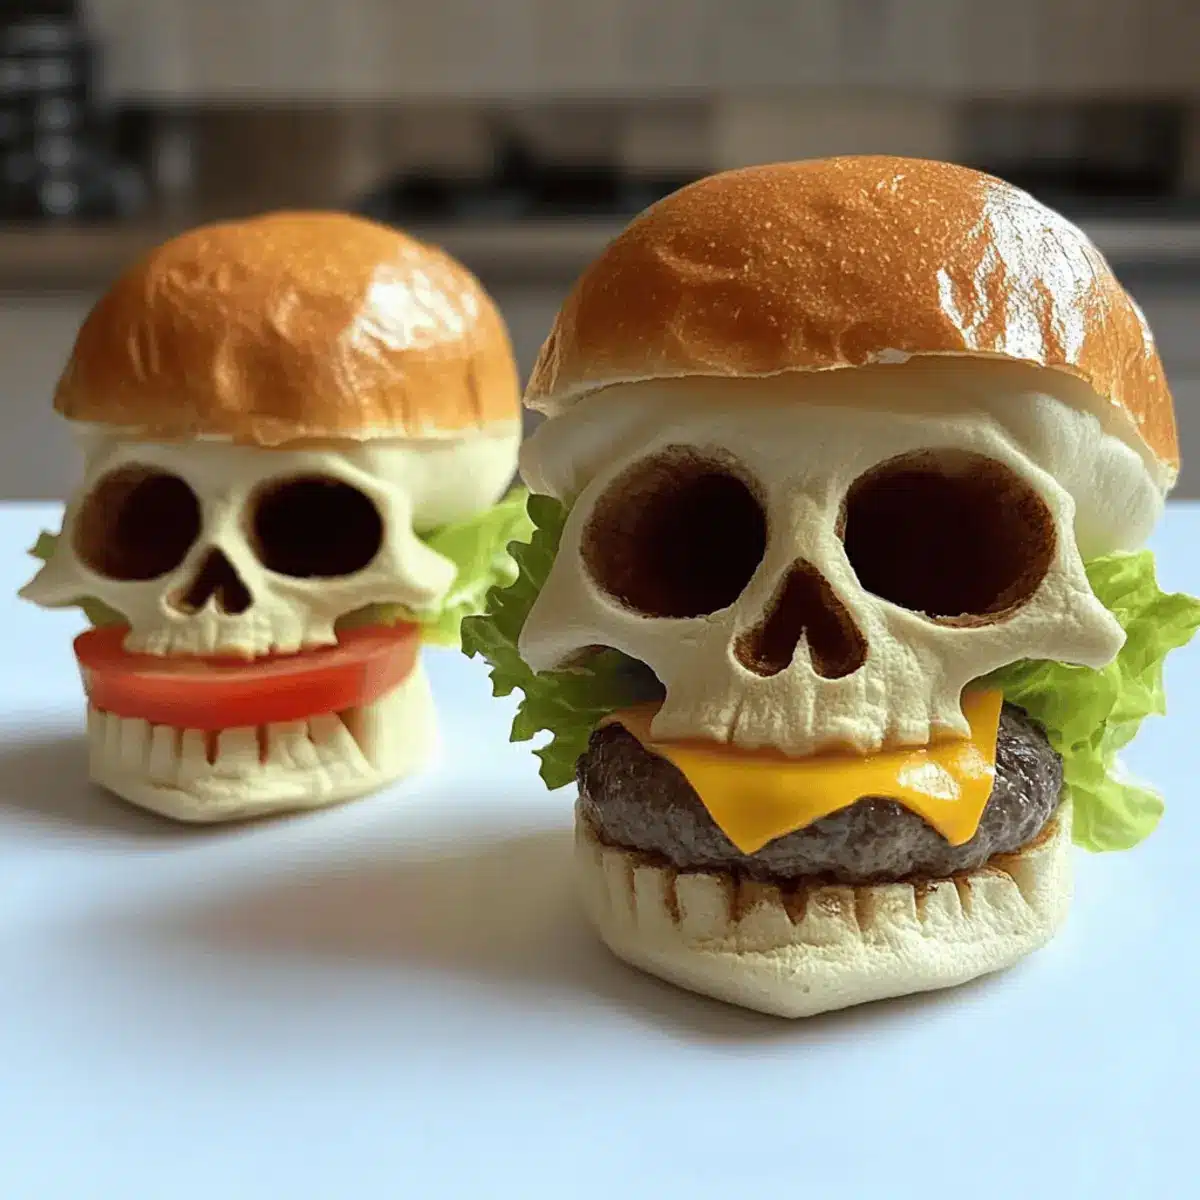
As I unwrapped these delightful skull-shaped buns fresh from the oven, a wave of excitement washed over me; it was as if Halloween had come early! Welcome to the world of Spooky Cheeseburger Skulls—where comfort food meets festive fun. This recipe is perfect for inspiring laughter and creativity around the dinner table, making it a unique addition to your Halloween celebrations. Not only are these eerie burgers family-friendly and easy to whip up, but they also promise to keep even the pickiest eaters engaged. Imagine juicy, melty cheeseburgers snuggled inside fluffy, golden buns that look like a spooky spectacle—your guests will be grinning from ear to ear. Are you ready to bring your Halloween culinary skills to the next level? Let’s dive into the delicious details!
Why Are Cheeseburger Skulls So Irresistible?
Fun and Festive: These Cheeseburger Skulls offer a playful twist that transforms your Halloween dinner into a memorable feast, making it perfect for family gatherings or themed parties.
Easy to Make: The simple recipe requires just a few ingredients and basic techniques, allowing you to focus more on having fun than stressing over complicated steps.
Customizable Toppings: You can personalize each skull with your favorite toppings, whether it’s crispy lettuce or zesty jalapeños, ensuring that everyone’s taste buds are satisfied.
Showstopper Appeal: Imagine your guests’ faces when they see these delightful skull-shaped buns—they’re bound to impress and spark conversation around the table!
Make sure to pair them with roasted sweet potato fries for a complete Halloween experience that everyone will love. Ready for a spooky culinary adventure? Let’s get started!
Spooky Cheeseburger Skull Ingredients
For the Buns
- Flour – Use all-purpose flour for the perfect texture in your spooky cheeseburger skulls.
- Egg – Acts as a binding agent; substitute with a flax egg for a vegan option.
- Sugar – Adds sweetness; consider brown sugar for a richer flavor profile.
- Salt – Essential for enhancing overall taste; don’t skip this step!
- Instant yeast – Helps the buns rise; you can use regular yeast if you proof it first.
- Water – Lukewarm water is crucial for activating the yeast effectively.
- Butter – Adds moisture and flavor; you can use margarine as a substitute if desired.
For the Patties
- Ground beef – The main protein for these spooky treats; turkey or plant-based alternatives work well, too.
- Cheese slices – Choose from cheddar, mozzarella, or even vegan cheese for your cheeseburger skulls.
For Toppings
- Lettuce, tomato, onion, pickles – Fresh ingredients that add crunch; feel free to customize with your favorites or even add jalapeños for a kick!
Step‑by‑Step Instructions for Spooky Cheeseburger Skull
Step 1: Prepare Skull Buns
Begin by greasing your skull pan with butter to ensure easy release. In a large mixing bowl, combine cold butter chunks, flour, egg, sugar, salt, and instant yeast. Gently pour in lukewarm water and mix until a shaggy dough forms. Knead the dough on a floured surface for 5–7 minutes until it reaches a smooth texture, then cover and let it rise in a warm area until doubled in size, about 1 to 2 hours.
Step 2: Shape Buns
Once the dough has risen, gently deflate it and divide it into 8 equal pieces, each weighing approximately 95 grams. Take each piece and press it into the greased cavities of your skull pan, ensuring even coverage. Allow the shaped buns to rise again for about 1 hour, until they puff up nicely. Meanwhile, preheat your oven to 375°F to prepare for baking.
Step 3: Bake Buns
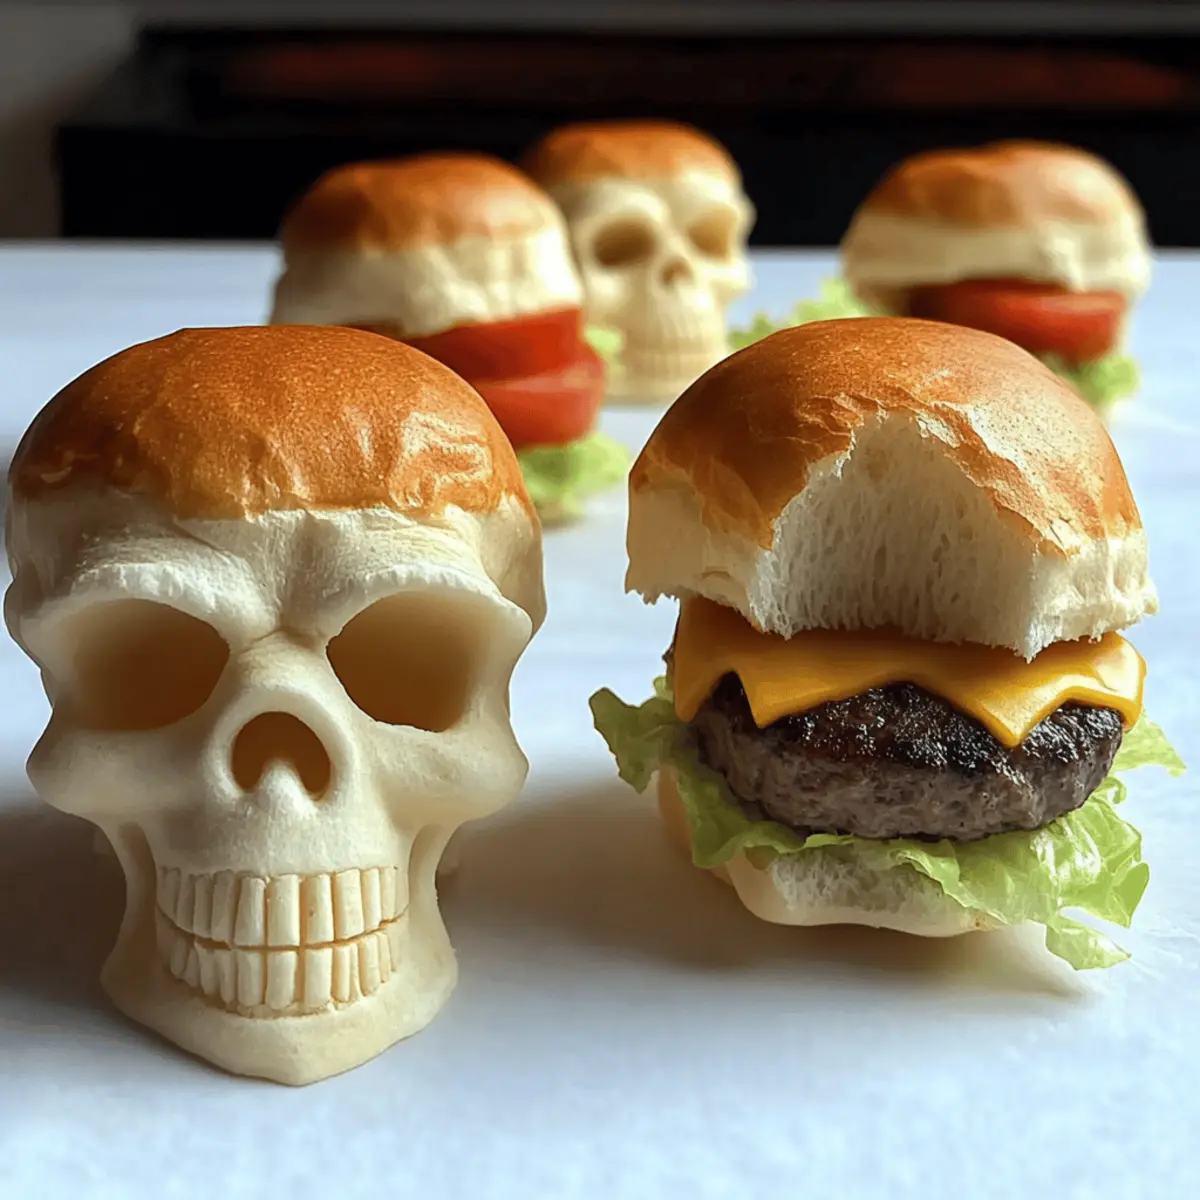
Carefully place the skull pan in your preheated oven and bake for 14 to 18 minutes. You’ll know the buns are done when they turn a beautiful golden-brown and sound hollow when tapped on the bottom. As soon as they come out, brush them generously with melted butter for a shiny finish. Allow the buns to cool completely before slicing them open to prepare for the filling.
Step 4: Prepare Burgers
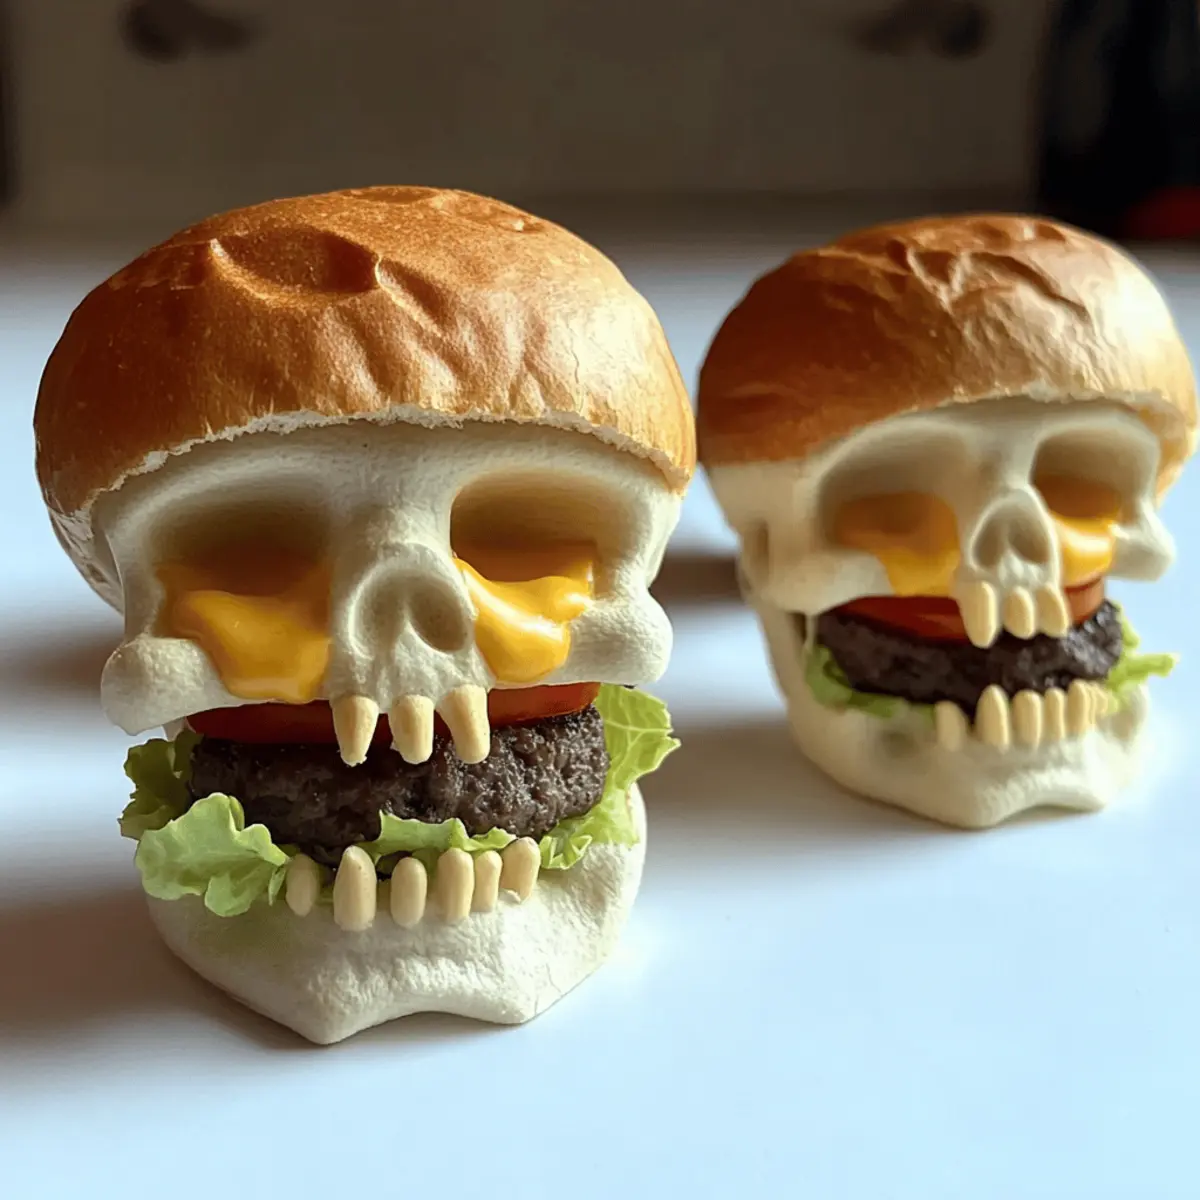
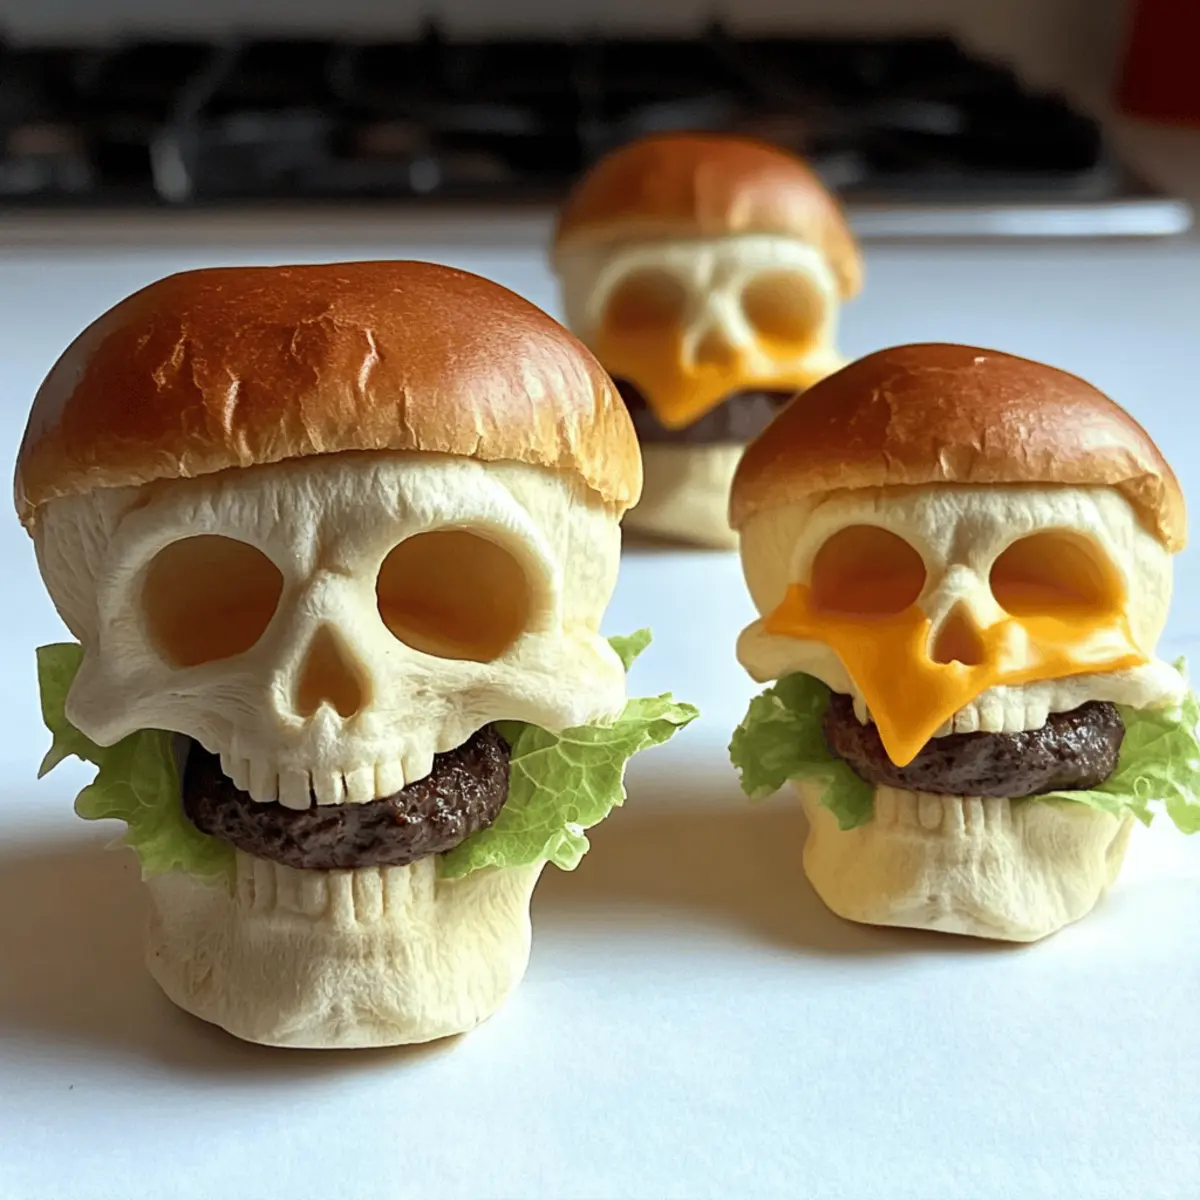
Shape the ground beef into skull forms, using your hands to mold them into lovely, spooky patties. Chill the patties in the refrigerator for about 30 minutes to help them keep their shape during cooking. When you’re ready, season them with your favorite spices and heat a skillet over medium-high heat. Cook the skull-shaped patties for 3 minutes per side until a nice crust forms, adding cheese slices in the last minute to melt perfectly.
Step 5: Assemble
Slice open your cooled skull buns and gently place a juicy cheeseburger patty inside each. Add your choice of fresh toppings, like crunchy lettuce, juicy tomato slices, onions, and zesty pickles for a festive touch. Place the tops back on the skull buns, and your Spooky Cheeseburger Skulls are ready to be served warm and enjoyed by all!
Expert Tips for Spooky Cheeseburger Skulls
-
Pan Preparation: Grease the skull pan thoroughly to ensure that your buns release easily. A well-greased pan makes all the difference in presentation!
-
Chill for Shape: Chill your shaped burger patties in the fridge for about 30 minutes before cooking. This helps them maintain their spooky skull forms during the cooking process.
-
Even Baking: To achieve a uniform golden color, rotate your pans halfway through baking. This step ensures equal heat distribution for perfectly baked skulls.
-
Cheesy Delight: Consider experimenting with fun-shaped cheese to add a festive touch. Cut cheese into skull shapes or other holiday-themed designs to elevate the look!
-
Flavor Boost: Don’t hesitate to season your burger patties with spices or herbs before cooking. This adds depth to your spooky cheeseburger skulls and enhances the overall flavor.
-
Top Wisely: Customize each skull with toppings that resonate with your family’s tastes. Feel free to mix and match to create the perfect Spooky Cheeseburger Skull for everyone at the table!
What to Serve with Spooky Cheeseburger Skulls
Make your Halloween meal a true feast that tantalizes all the senses and brings laughter to the table.
-
Roasted Sweet Potato Fries: The natural sweetness and crispy edges of these fries provide a delightful contrast to the savory cheeseburgers, making them a perfect sidekick.
-
Pumpkin Soup: This creamy, spiced soup offers a warm and inviting start to your Halloween dinner, balancing the flavors of the burgers beautifully.
-
Crispy Caesar Salad: The crunch of romaine lettuce and the richness of Caesar dressing add a refreshing element that complements the hearty cheeseburger skulls.
-
Ghostly Garlic Bread: Soft, buttery garlic bread fashioned into spooky shapes can add a whimsical touch to your meal, delightful for kids and adults alike.
-
Spooky Halloween Punch: A vibrant, fruity punch infused with floating gummy eyeballs or ghost-shaped ice cubes brings a festive drink option that keeps spirits high.
-
Graveyard Dirt Cups: For dessert, these chocolate pudding cups layered with crushed cookies and creepy candy can take the Halloween theme to another level, making for a sweet treat to end the meal.
Serve these alongside your Spooky Cheeseburger Skulls for a gathering that guarantees smiles and hearty appetites.
Make Ahead Options
These Spooky Cheeseburger Skulls are perfect for meal prep, allowing you to enjoy the festive fun without the last-minute rush! You can prepare the skull buns up to 24 hours in advance; simply let them cool completely, then store them in an airtight container in the refrigerator. For the patties, shape them and chill for up to 3 days ahead of cooking—this helps maintain their shape and flavor. When you’re ready to serve, just cook the patties from the fridge, assembling them in the pre-prepared buns. This way, your burger feast will come together with minimal effort, ensuring that your Halloween celebration is both enjoyable and stress-free!
Variations & Substitutions for Spooky Cheeseburger Skull
Feel free to get creative with these ideas and make this spooky dish your own!
- Turkey or Plant-Based: Swap out ground beef for ground turkey or a plant-based alternative like Beyond Meat to cater to different diets.
- Spicy Cheese: Add a kick by using pepper jack cheese in place of standard cheese slices, giving each bite a flavorful punch.
- Bun Flavors: Experiment with different bread flavors, such as garlic or onion rolls, to add a unique spin to your skull buns.
- Topping Twists: Instead of typical toppings, try sweet barbecue sauce or sliced avocados for a fresh twist that’ll surprise your taste buds.
- Seasoning for Heat: If you like a bit of heat, incorporate diced jalapeños or sprinkle some cayenne pepper into your burger mix for an exciting flavor boost.
- Shape Variation: Instead of skulls, shape your hamburger patties like ghosts or bats to keep the Halloween spirit alive and add a fun surprise!
- Herb Boost: Mix in some fresh herbs or garlic powder into your ground meat for an aromatic layer of flavor that elevates your spooky burgers.
- Lettuce Wraps: For a lower-carb option, consider using large lettuce leaves instead of buns, making your delightful creation gluten-free.
Ready to mix things up? Use these variations to create a Halloween feast that’s uniquely yours. And while you’re at it, why not pair these spooky treats with some crunchy roasted sweet potato fries to add a deliciously festive crunch? Your family will love these creative twists as they dive into the Halloween spirit!
How to Store and Freeze Spooky Cheeseburger Skulls
Room Temperature: Keep baked skull buns at room temperature in a sealed container for up to 1 day. If you’re not consuming them right away, it’s best to store them in the fridge.
Fridge: Store cooked cheeseburger patties and buns separately in airtight containers for up to 3 days to maintain freshness and avoid sogginess.
Freezer: For longer storage, freeze assembled Spooky Cheeseburger Skulls individually wrapped in plastic wrap and a layer of aluminum foil for up to 2 months.
Reheating: To reheat, thaw in the fridge overnight and warm in the oven at 350°F for about 10 minutes, restoring their delightful texture before serving.
Spooky Cheeseburger Skull Recipe FAQs
What type of flour is best for the buns?
Using all-purpose flour will provide the best texture for your Spooky Cheeseburger Skulls. It gives the buns a light and fluffy result, essential for that perfect bite. If you want to experiment, you could try bread flour for a chewier texture!
How should I store leftover cheeseburger skulls?
Store cooked cheeseburger patties and skull buns separately in airtight containers in the fridge for up to 3 days. This keeps them fresh and avoids sogginess. If you plan to enjoy them later, consider freezing them for longer preservation.
Can I freeze the assembled Spooky Cheeseburger Skulls?
Absolutely! To freeze, individually wrap your assembled Spooky Cheeseburger Skulls in plastic wrap, then place them in a freezer-safe bag or container. They can be stored for up to 2 months. When you’re ready to enjoy, thaw in the fridge overnight and reheat in the oven.
What if my buns don’t rise properly?
If your buns don’t rise well, it could be due to the yeast not being activated properly. Make sure you’re using lukewarm water (about 110°F) for the yeast, and allow it to proof if using regular yeast. If your dough feels too dry, try adding a bit more water during kneading until it reaches a smooth, soft texture.
Are these cheeseburgers safe for my pet?
While the ingredients in Spooky Cheeseburger Skulls are safe for humans, it’s best to avoid giving them to pets. Foods like onions, certain toppings, and excessive fat can be harmful to dogs. It’s always a good idea to double-check any ingredient for its safety if you’re considering sharing.
Can I make these skulls vegan?
Absolutely! To make vegan Spooky Cheeseburger Skulls, substitute the egg with a flax egg (1 tbsp ground flaxseed + 2.5 tbsp water, let it sit for 5 minutes) and use plant-based proteins along with vegan cheese. This way, you can still enjoy the festive fun while sticking to your dietary preferences!
Spooky Cheeseburger Skull: Fun Halloween Treat for All
Ingredients
Equipment
Method
- Grease your skull pan with butter. Combine cold butter chunks, flour, egg, sugar, salt, and instant yeast in a bowl. Pour in lukewarm water and mix into a shaggy dough. Knead for 5–7 minutes until smooth, then let it rise for 1-2 hours until doubled.
- Deflate risen dough, divide into 8 equal pieces, and press into the skull pan. Let the shaped buns rise for about 1 hour. Preheat oven to 375°F.
- Bake the skull pan in the preheated oven for 14-18 minutes until golden-brown. Brush with melted butter after baking and cool completely.
- Shape ground beef into skull forms, chill for 30 minutes. Season, then cook patties in a skillet over medium-high heat for 3 minutes per side, adding cheese in the last minute.
- Slice open cooled skull buns and place a cheeseburger patty inside each. Add toppings like lettuce, tomato, onion, and pickles. Replace tops and serve warm.