

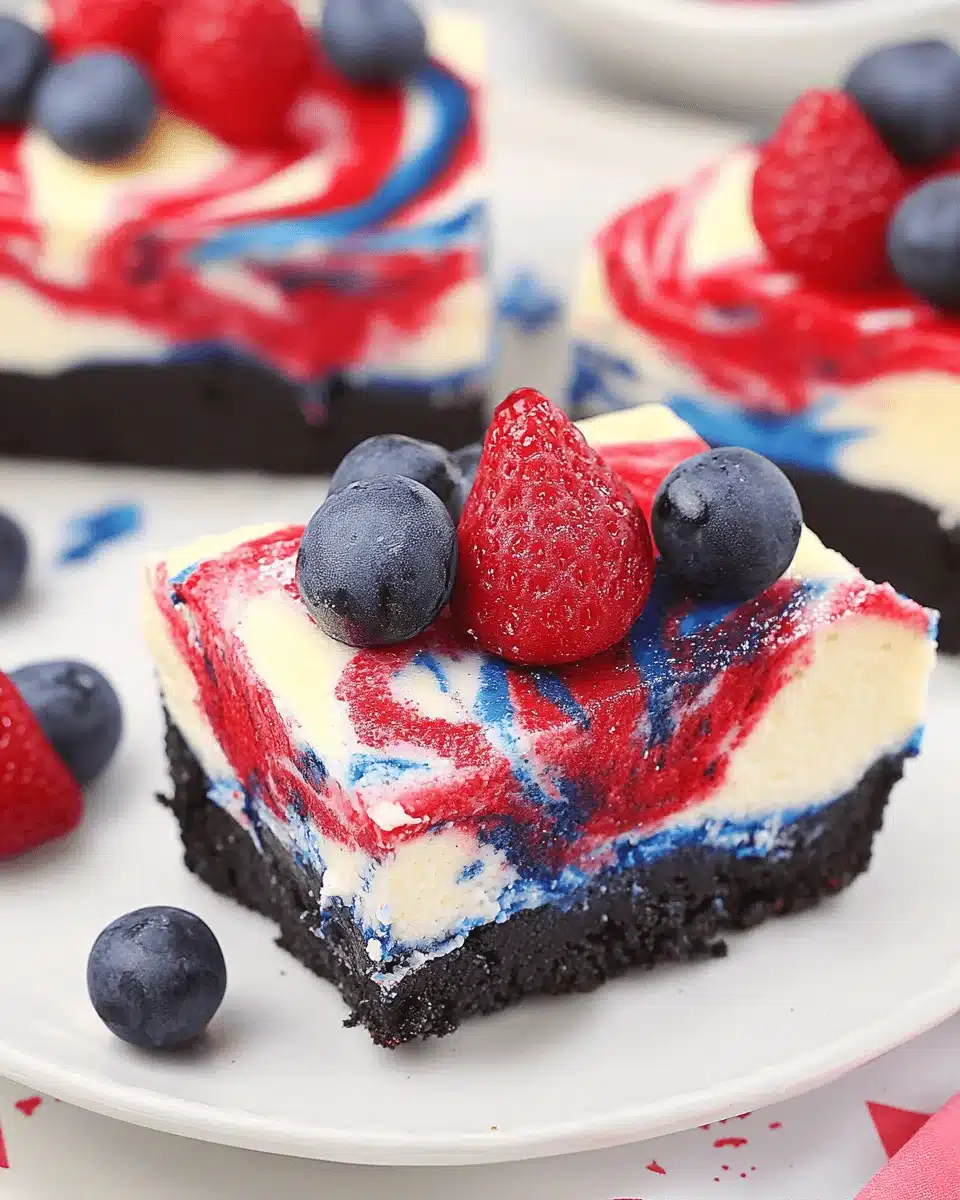
Patriotic Swirl Cheesecake
When I think of summer gatherings, my mind drifts to vibrant colors and delicious desserts. The *Patriotic Swirl Cheesecake* perfectly captures that spirit. It’s not just a dessert; it’s a centerpiece that sparks joy and conversation.
Whether you’re celebrating Independence Day or just want to impress your friends at a backyard barbecue, this cheesecake is a quick solution that dazzles. With its stunning red, white, and blue swirls, it’s a feast for the eyes and the taste buds. Trust me, this recipe will become a staple in your festive repertoire!
Why You’ll Love This Patriotic Swirl Cheesecake
This *Patriotic Swirl Cheesecake* is a game-changer for any celebration.
It’s easy to whip up, making it perfect for busy days when you want to impress.
The creamy texture and delightful flavors of cream cheese, fresh berries, and a hint of vanilla create a taste sensation that everyone will love.
Plus, the vibrant colors make it a showstopper on any dessert table.
You’ll be the star of the party!
Ingredients for Patriotic Swirl Cheesecake
Creating the *Patriotic Swirl Cheesecake* is a delightful journey, and it all starts with the right ingredients. Here’s what you’ll need:
- Cream Cheese: The star of the show! It gives the cheesecake its rich and creamy texture.
- Sugar: Sweetens the mix, balancing the tanginess of the cream cheese.
- Vanilla Extract: Adds a warm, aromatic flavor that enhances the overall taste.
- Eggs: These bind everything together, providing structure and richness.
- Sour Cream: Contributes to the cheesecake’s creaminess and adds a slight tang.
- Blueberries: Fresh and vibrant, they create the blue swirl and pack a fruity punch.
- Strawberries: Juicy and sweet, they bring the red color and a burst of flavor.
- Flour: A small amount helps stabilize the batter, ensuring a perfect texture.
- Heavy Cream: This adds extra richness and creaminess to the cheesecake.
Feel free to get creative! You can swap out the berries for other fruits like raspberries or blackberries if you prefer.
For those looking for a lighter option, consider using low-fat cream cheese or Greek yogurt.
All ingredient quantities are listed at the bottom of the article for easy reference and printing.
How to Make Patriotic Swirl Cheesecake
Making the *Patriotic Swirl Cheesecake* is a fun and rewarding experience.
Follow these simple steps, and you’ll have a stunning dessert that’s sure to impress.
Step 1: Preheat the Oven
Start by preheating your oven to 325°F (160°C).
This ensures that your cheesecake bakes evenly, giving it that perfect creamy texture.
Step 2: Prepare the Cream Cheese Mixture
In a large bowl, beat the cream cheese until it’s smooth and creamy.
This is where the magic begins!
Add in the sugar and vanilla extract, mixing until everything is well combined.
You want a silky mixture that’s free of lumps.
Step 3: Incorporate the Eggs
Now, it’s time to add the eggs.
Incorporate them one at a time, mixing well after each addition.
This step is crucial for achieving that rich, velvety texture.
Don’t rush it; take your time to blend them in thoroughly.
Step 4: Add Sour Cream and Flour
Next, stir in the sour cream and flour until the mixture is smooth.
The sour cream adds a delightful tang, while the flour helps stabilize the batter.
Make sure there are no dry spots; a well-mixed batter is key to a great cheesecake.
Step 5: Create the Colorful Batters
Divide the batter into three bowls.
In one bowl, mix in the blueberries to create a vibrant blue batter.
In another, add the strawberries for a bright red batter.
Leave the last bowl white.
This is where your *Patriotic Swirl Cheesecake* starts to take shape!
Step 6: Swirl the Batters
Grab a greased springform pan and start pouring the batters.
Alternate between the red, white, and blue batters to create a beautiful swirl effect.
Don’t worry about perfection; the swirls will look stunning once baked!
Step 7: Bake the Cheesecake
Place the pan in the preheated oven and bake for 50-60 minutes.
You’ll know it’s done when the center is set but still slightly jiggly.
This ensures a creamy texture that melts in your mouth.
Step 8: Cool and Refrigerate
Once baked, let the cheesecake cool at room temperature.
Then, refrigerate it for at least 4 hours before serving.
This chilling time allows the flavors to meld beautifully.
Trust me, the wait will be worth it!
Tips for Success
- Ensure all ingredients are at room temperature for a smoother batter.
- Use a water bath while baking to prevent cracks on the surface.
- Don’t overmix the batter; it can lead to a dense cheesecake.
- Let the cheesecake cool completely before refrigerating for best results.
- Garnish with fresh berries and whipped cream for an extra festive touch.
Equipment Needed
- Springform Pan: Essential for easy removal. A regular cake pan works too, but it may be trickier to serve.
- Mixing Bowls: Use a large bowl for the batter and smaller ones for dividing the colors.
- Electric Mixer: A hand mixer or stand mixer makes blending easier.
- Spatula: Perfect for scraping down the sides and folding in ingredients.
Variations
- Fruit Swaps: Try using raspberries or blackberries for a different flavor profile. They’ll still give you that vibrant red and blue!
- Gluten-Free Option: Substitute regular flour with almond flour or a gluten-free blend to make this cheesecake gluten-free.
- Lower Sugar: Use a sugar substitute like stevia or erythritol for a lighter version without sacrificing taste.
- Chocolate Twist: Add cocoa powder to one of the batters for a chocolatey surprise in your cheesecake.
- Vegan Version: Replace cream cheese with a vegan alternative and use flax eggs instead of regular eggs for a plant-based treat.
Serving Suggestions
- Fresh Berries: Serve with a side of mixed fresh berries for a burst of flavor.
- Whipped Cream: A dollop of whipped cream on top adds a creamy touch.
- Mint Leaves: Garnish with mint leaves for a pop of color and freshness.
- Patriotic Drinks: Pair with lemonade or a red, white, and blue cocktail for a festive vibe.
FAQs about Patriotic Swirl Cheesecake
Can I make the Patriotic Swirl Cheesecake ahead of time?
Absolutely! This cheesecake can be made a day in advance. Just let it chill in the refrigerator overnight. It’ll be even more flavorful the next day!
What can I use instead of cream cheese?
If you’re looking for a lighter option, consider using Greek yogurt or a vegan cream cheese alternative. Both will still give you that creamy texture.
How do I store leftovers?
Store any leftover cheesecake in an airtight container in the refrigerator. It should stay fresh for up to five days, but I doubt it will last that long!
Can I freeze the cheesecake?
Yes, you can freeze the *Patriotic Swirl Cheesecake*! Just wrap it tightly in plastic wrap and then in aluminum foil. It can be frozen for up to three months. Thaw it in the fridge before serving.
What’s the best way to slice the cheesecake?
For clean slices, dip your knife in hot water and wipe it dry before cutting. This helps prevent the cheesecake from sticking to the knife, giving you those beautiful swirls in each slice!
Final Thoughts
Creating the *Patriotic Swirl Cheesecake* is more than just baking; it’s about bringing people together.
The vibrant colors and creamy texture evoke a sense of celebration, making it perfect for any gathering.
Each slice tells a story, whether it’s a backyard barbecue or a festive holiday.
As you serve this stunning dessert, watch the smiles light up the room.
It’s a delightful way to share joy and create lasting memories.
So, roll up your sleeves, gather your loved ones, and let this cheesecake be the star of your next celebration!
Patriotic Swirl Cheesecake: Enjoy a Festive Delight!
Ingredients
Method
- Preheat the oven to 325°F (160°C).
- In a large bowl, beat the cream cheese until smooth.
- Add sugar and vanilla extract, mixing until well combined.
- Incorporate eggs one at a time, mixing well after each addition.
- Stir in sour cream and flour until smooth.
- Divide the batter into three bowls.
- In one bowl, mix in the blueberries to create a blue batter.
- In another bowl, mix in the strawberries to create a red batter.
- In the last bowl, keep the batter white.
- In a greased springform pan, alternate pouring the red, white, and blue batters to create a swirl effect.
- Bake for 50-60 minutes or until the center is set.
- Let cool, then refrigerate for at least 4 hours before serving.
Nutrition
Notes
- For a smoother texture, ensure all ingredients are at room temperature before mixing.
- Garnish with fresh berries and whipped cream for added decoration.
- This cheesecake can be made a day in advance for convenience.